My attention to detail

Signed-In Members Don't See This Ad
See more from Dale Allen

Dale Allen

Member
Joined
Oct 27, 2012
Messages
1,384
Location
Massillon, OH
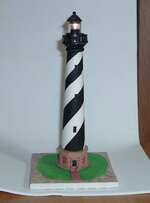
Someone at work got me interested in the Cape Hatteras lighthouse so after reading up on it I decide to try this.
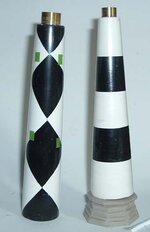
There are brass tubes in the column center, a small plastic tube for the lens and a mini flashlight in the tube to make it light.
Looks even better in a dark room.
All the rest is polymer clay.
There are 2 others from that area of the coast that I may build.
 

Attachments

  • LH1.jpg
    LH1.jpg
    35.2 KB · Views: 303
Signed-In Members Don't See This Ad

plantman

Member
Joined
Jan 2, 2012
Messages
3,437
Location
Green Bay, Wi
Ashes to ashes, dust to dust, clay to lighthouse. It all fits in with the universal sceam of things, doesn't it. Nice work Dale !!! How tall is it ?? Jim S
 

Dale Allen

Member
Joined
Oct 27, 2012
Messages
1,384
Location
Massillon, OH
Thanks all for the kind words and comments.
Jim, it is 7" tall to the very top and about 6" to the light.
I proportioned it based on the measurements of the real one and it is about a 1/420th scale. The stripes were the most challenging part. 4 stripes, 2 white and 2 black and they wrap 1.5 times around. My measurements were a bit off and not all of the stripes are the correct width on one side...but it is close.
3 windows on the side above the door and 4 on the back staggered from the front ones. Also the reddish stone behind the oddly placed brick like stones stacked on the corners of a hex shaped base. Needless to say there is more going on here than meets the eye.
I'm not too happy with the way the railing turned out and I may rework that. The top part is the same basic shape as the next one I will build which is the Cape Lookout lighthouse.
 

Dale Allen

Member
Joined
Oct 27, 2012
Messages
1,384
Location
Massillon, OH
The other 2 towers are about finished.
The one on the left is marked for windows and has many hours and one redo involved. I also discovered that there was no math that I am familiar with that could solve the layout. It was trial and error!
The one on the right was the easiest.
On that one I put the white stripes on and when cured and cool, put it on the lathe and trued up the joints. Easy!
Now it is a matter of many more hours finishing the details.
 

Attachments

  • others.jpg
    others.jpg
    31.8 KB · Views: 113

plantman

Member
Joined
Jan 2, 2012
Messages
3,437
Location
Green Bay, Wi
That is some very nice work Dale !! Wouldn't the standard 6" high by 9" deep work out for the stairs. Draw your steps out on graf paper using whatever scale fits, draw a line and connect the edges of the steps to form a ramp. cut on this line and wrap the paper around your lighthouse. Second method would be taking the height of your lighthouse, base to upper landing, and divide by 6"s this will give you the number of steps it will take to reach that high. Of course, when they built the lighthouses, thei didn't have a standard to go by. You can always fudge a little to make it come out even, but it gives you a starting point. Most lighthouses around here will have their windows offset to match the incline of the steps as they go around. I would find this project much easier myself doing it in wood as opposed to trying to get clay to form straight lines and diamonds. More power to you !!! Jim S
 
Last edited:

Dale Allen

Member
Joined
Oct 27, 2012
Messages
1,384
Location
Massillon, OH
Jim, the issue is a lack of statistics on the actual lighthouse. I find the base diameter and top diameter, sometimes, and the height in reference to the high water tide!
The rest is a guess. Looking at the actual one you see that the diamonds get slightly smaller as they get higher. The diameter gets smaller as it rises too. What I did was tape a string from the base to the top at 1.5 turns, then drawing a line where the string lays. Then do that 4 times at 90 degrees each. Then transfer one of those sections to a piece of stiff paper and make a cutout. Make 2 of them and tape them in a criss-cross fashion to get the diamond effect. That got me real close. Then I cut out the white ones and stuck them on the base and heat cured them. Then a touch-up with a file to get the edges straight and lined up and some fill-ins were necessary. Once the white ones were set it was easy to mark and fill in the black.
Cure it all good and turn it even with a skew. Some more touch-ups and done.
 
Top Bottom