I Never Even Considered the Possibility...

Signed-In Members Don't See This Ad

JD Combs Sr

Member
Joined
Jan 30, 2010
Messages
767
Location
Owingsville, KY
... of a leak.:redface: So guess what all my Alumilite mix ran out into the pressure pot.

I had every thing ready to go and was waiting for the weather to cool a little and it did.
IMG_4703.jpg IMG_4704.jpg

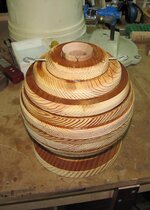
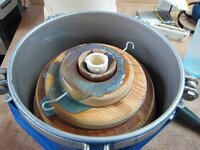
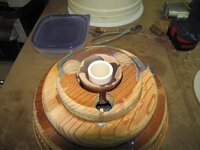
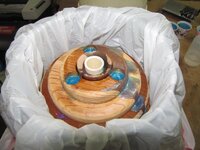
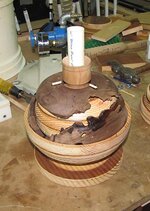
So I poured my mix and this is pretty much what it looked like after the pour, a minor amount of overflow. I let it set over night and removed the pressure lid and it looked liked this. I grabbed the two hooks to pull it out of the pot and oops, stuck like it was part of the pot. Using a flashlight I could barely see down the side of the vase and I thought I could see resin...hmmmm that shouldn't be, :frown:but it was. I spent the next hour beating on the side and bottom of the pot with a rubber mallet to see if I could knock anything loose, nada!:confused:
IMG_4717.jpg

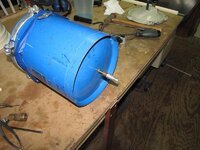
I finally gave up and decided that I need to do something different so I drilled a hole in the bottom and attached an air fitting. Cranked my air hose pressure down to 50lbs and attached it. Still nada!:mad: Now I figure every thing is a loss including the pot so what the heck I cranked the pressure up to 80... nothing, so I just left it like that lying on the floor of the shop. About 15-20 minutes later I started hearing the hiss of escaping air. It was coming from the pot. I picked up the rubber mallet that was still handy and whacked the bottom sides a few times and all of a sudden the vase was sticking halfway out of the pot. Eureka, it worked.:biggrin:
IMG_4719.jpg

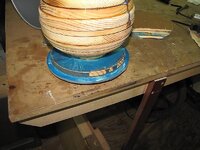
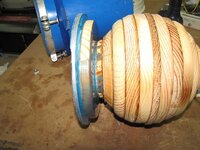
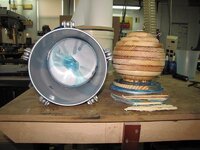
This is what it looked like after I finished prying it out of the pot. Anybody know what will melt Alumilite. I got to clean that pot up now.
IMG_4720.jpg
 
Last edited:
Signed-In Members Don't See This Ad

JD Combs Sr

Member
Joined
Jan 30, 2010
Messages
767
Location
Owingsville, KY
How am I going to salvage this?

Not sure how much resin leaked but it was considerable.
IMG_4721.jpg

Apparently the leak was at the very first ring(couldn't have been up near the top:rolleyes:).
IMG_4725.jpg

I did some cleanup work on the top and bottom of the mold assembly. Then drilled some holes around the perimeter of the top. Looking inside I can see both the outside void next to the outer wall and the inside void next to the plug so I think I can re-pour and salvage the vase. As soon as the pot gets cleaned up and the hole patched I will be giving it another try. I bet it can't leak now.:biggrin::wink:
IMG_4728.jpg
 
Last edited:

Jim Burr

Banned
Joined
Feb 23, 2010
Messages
3,060
Location
Reno, Nv
Curtis will know! This will be a good learning experiance for just about everyone! Sorry it had to be you JD:frown::mad:. Does Pam have to much liquid for Alumilite to tolerate? What about wax on the walls as a medium? Just tossing stuff out because I'm going to face this soon!:eek:
 

robutacion

Member
Joined
Aug 6, 2009
Messages
6,514
Location
Australia - SA Adelaide Hills
From what I can see, re-pouring looks quite possible and most certainly, will save the job however, it may endup with some small areas with missing resin but that you can repair after the bowl is out of the molds...!

I would not trust that the ring that failed the first time around is totally sealed so I would have a very close at that join and put some epoxy on any suspicious openings..!

In regards to the issue of voiding the pot being contaminated/messed-up with resin, the best practice is to to a heavy duty plastic bag of the correct size (pot inner). Nothing should be inserted in the pot tight so, a careful placement of the mold, won't perforate the bags base...!

I have used that filling method many times and quite honestly, no one would be prepare to pay for the ridiculous amount of time and wasted material that this process does involve...!

A different thing is if we do it for ourselves then, our time is our problem and better using it that way than in the pub getting drunk, huh...???

Looking forwards to see the results...!

PS: I'm sorry that I can't help you with the Alumilite removal from the pot, as I never used it, I only use PR however, putting the pot in the sun for a few ours and than put it in the freezer, should force the Alumilite to separate otherwise, some elbow grease and a spatula/knife, should remove it...!

Good luck...!

Cheers
George
 

dexter0606

Member
Joined
Jun 11, 2009
Messages
525
Location
Cambridge, ON
Glad you resolved your issue but I think you were living a little on the dangerous side!
You applied probably somewhere between 4 and 5 tons of force to the bottom of your casting. You're lucky it didn't come flying out :eek: :eek: :eek:
 

Justturnin

Member
Joined
Aug 19, 2011
Messages
2,235
Location
Houston, Tx
Acetone will break it down so you can chip it out. I would trash that pot sine you drilled the hole in it or just use it as a vacuum chamber.
 

JD Combs Sr

Member
Joined
Jan 30, 2010
Messages
767
Location
Owingsville, KY
Looks like mould release inside the pot might become a good casting practice. :wink: Hope you can fix the bottom of the pot.

Looks like mould release inside the pot might become a good casting practice. :wink: Hope you can fix the bottom of the pot.
Agreed....Acetone down the side may have been better.....
Good luck!
Not sure why I didn't think to line the pot. The pot is from my earlier days and it has been used to paint many different things but it was standard practice to put a liner in it or at least sit a one gallon can of paint in it. Lesson learned:)

Curtis will know! This will be a good learning experiance for just about everyone! Sorry it had to be you JD:frown::mad:. Does Pam have to much liquid for Alumilite to tolerate? What about wax on the walls as a medium? Just tossing stuff out because I'm going to face this soon!:eek:
Jim don't be like me:rolleyes: just use some common sense and your project will come out fine.:)

From what I can see, re-pouring looks quite possible and most certainly, will save the job however, it may endup with some small areas with missing resin but that you can repair after the bowl is out of the molds...!
I would not trust that the ring that failed the first time around is totally sealed so I would have a very close at that join and put some epoxy on any suspicious openings..!
In regards to the issue of voiding the pot being contaminated/messed-up with resin, the best practice is to to a heavy duty plastic bag of the correct size (pot inner). Nothing should be inserted in the pot tight so, a careful placement of the mold, won't perforate the bags base...!
I have used that filling method many times and quite honestly, no one would be prepare to pay for the ridiculous amount of time and wasted material that this process does involve...!
A different thing is if we do it for ourselves then, our time is our problem and better using it that way than in the pub getting drunk, huh...???
Looking forwards to see the results...!
PS: I'm sorry that I can't help you with the Alumilite removal from the pot, as I never used it, I only use PR however, putting the pot in the sun for a few ours and than put it in the freezer, should force the Alumilite to separate otherwise, some elbow grease and a spatula/knife, should remove it...!
Good luck...!
Cheers
George
Thanks for the info George. I did get the pot cleaned up. I let it set overnight with acetone in it. It didn't melt the resin but it did turn it into easily cracked and scraped material, almost like sand grains held loosely together. I put a screw with a copper washer under the head through the hole from the bottom. It doesn't leak so It will be ok.


I have a scrap board in the bottom of mine to prevent that. I hate to see that kind of problem. Lesson learned.
Donny, I had the same thing in the bottom of mine. that is the busted piece you can see in the last photo of my first post. When it cracked into that is what let the vase shot halfway out the end of the pot.

Glad you resolved your issue but I think you were living a little on the dangerous side!
You applied probably somewhere between 4 and 5 tons of force to the bottom of your casting. You're lucky it didn't come flying out :eek: :eek: :eek:
Thanks for posting Jeff. I had the unit on the floor on its side and I made sure I was never behind its bottom or in front of its open top when I was tapping on it, plus it was aim down the longest open aisle of my shop just in case. When the false bottom in it split(last photo 1st post) it let go and came halfway out of the pot. The large piece of the false bottom wedged again about halfway up where a gob of resin was that I had spill on the side during my initial pour. Still had to pry on it to get it completely out. Pressure was off when I was prying on the vase mold.

Murphy's law strikes again
Pretty much George but sometimes we tend to help old Murphy along.

Acetone will break it down so you can chip it out. I would trash that pot sine you drilled the hole in it or just use it as a vacuum chamber.
Thanks for the advice Chris, the acetone worked fine. I don't see any problem with using the pot, after all it set with 80lbs of pressure on the bottom for a good twenty minutes before the spilled resin and false bottom gave way. I only use it at 50psi in normal operation plus it is a high end tank, not HF or Chinese. The lid is cast iron with 5 clamps and the lid end was not involved anyway. I sealed the hole with a small bolt with a copper washer under the head and it works fine.

I re-cast the vase tonight and it is currently sitting in the shop under pressure. Didn't take as much resin as I thought it might so I had 3 small Dixie cups full left over. Didn't have any way to pressure them but I am hoping to use them for something, maybe bottle stopper handles if the air bubbles aren't to bad. Used half of one to fill a waste wood mold I had ready but it too will have bubbles.
 
Last edited:

robutacion

Member
Joined
Aug 6, 2009
Messages
6,514
Location
Australia - SA Adelaide Hills
Acetone will break it down so you can chip it out. I would trash that pot sine you drilled the hole in it or just use it as a vacuum chamber.
Thanks for the advice Chris, the acetone worked fine. I don't see any problem with using the pot, after all it set with 80lbs of pressure on the bottom for a good twenty minutes before the spilled resin and false bottom gave way. I only use it at 50psi in normal operation plus it is a high end tank, not HF or Chinese. The lid is cast iron with 5 clamps and the lid end was not involved anyway. I sealed the hole with a small bolt with a copper washer under the head and it works fine.

I re-cast the vase tonight and it is currently sitting in the shop under pressure. Didn't take as much resin as I thought it might so I had 3 small Dixie cups full left over. Didn't have any way to pressure them but I am hoping to use them for something, maybe bottle stopper handles if the air bubbles aren't to bad. Used half of one to fill a waste wood mold I had ready but it too will have bubbles.

Some how, I tend to agreed with Chris. is a reason why pressure pots are built with a concave bottom, and according to my understanding of how it all works, the pressure highest concentration point is precisely the exact place where you drilled a hole.

The metal structure, physics of concave surfaces and pressure distribution, will make the hole a possible rupture point of the metal and no washers or bolts will stop that from happening...!

So, and to be on the caution side of things, I would not exceed more than 40PSI with it and I would make a sealed base of some sort where the pots bottom would fit in, why...!
Well, and unless you don't mind to clean spilled resin all over the floor and other places, if the pot is to rupture under pressure, the built base on that pot would contain any spilled resin, and to make things a little safer, make a base where the pot can seat on but as heavy as you can or attached to the floor or something as, if it decides to go under pressure, that think will shoot up like a rocket (well, sort off...!) meaning that will have some lift off and can land side ways, which will probably allow the resin to escape and mess things up.

Will ever happen...??? probably not if you keep low pressures on it otherwise, I believe the chances of taking off to the moon (well, sort off...!) are very possible...!

I'am also a little concern about you saying that, it didn't take as much resin as you thought it would, and from the pic where I can see the thickness of the spilled resin at the very bottom, of near 1/2" or so, that makes me think is the reason why I said that you may endup with some areas with missing resin, have in fact happened but, in a much larger scale/volume than I predicted, will see, huh...?

It should be certainly interesting to see what comes out of this project...!

Cheers
George
 
Last edited:

ctubbs

Member
Joined
Sep 12, 2010
Messages
3,588
Location
Murray, Kentucky
It is very hard to drill a hole in hard metal without creating at least one mini crack in the hole. When applying pressure to any metal container, it will distort the shape. If you did leave a crack of any sort in that hole you drilled, somewhere down the road that crack will grow, most likely undetected until failure occurs. Curtis had a post about what his pot failure did in his shop. He was lucky. If your pot were mine, I would leave the hole open so the water poured on the flower in it would drain. Without placing that pot in a cage every time I charged it, I could not feel safe any where around that bomb. Just my opinion, it is free, take it for what it is worth.
Charles
 

JD Combs Sr

Member
Joined
Jan 30, 2010
Messages
767
Location
Owingsville, KY
Just wanted to make one last post in this thread to give a short summary of the results.

After about 20hrs in the pressure pot. The level of the resin appears to have compressed by about 3/8". There were no signs of further leaks.
IMG_4731.jpg

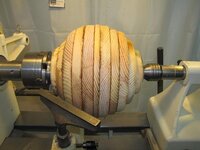
Chucked up in the lathe and ready to turn off the mold rings.
IMG_4734.jpg

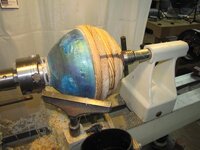
1/2 of the rings turned down to the resin. No voids as yet.
IMG_4735.jpg

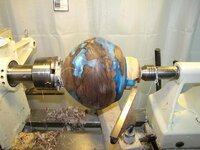
The remainder of the rings removed and the thin layer of outside excess resin. No sign of any voids.:cool: Another eureka moment. Can't even fine the nit line between the two pours which was a concern of mine.
IMG_4738.jpg

After some sanding and a quick coat of WTF(Wood Turners Finish, my first use of WTF, I think I am in love:biggrin:)
IMG_4741.jpg

All that is left is to hollow it. I will post a separate thread to show it off when it is complete.
 
Last edited:
Top Bottom