A few notes from a first-time caster

Signed-In Members Don't See This Ad

TimS124

Member
Joined
Apr 11, 2012
Messages
735
Location
Asheville, NC
I know that newbies generally aren't where rational people turn for advices, tips, or hints…but I'm pigheaded enough to try offering some anyway. :biggrin:

Most of what follows is likely old news to experienced casters but I haven't seen it mentioned and thought it might be useful for others starting down the slippery slope of casting.

  1. Your first umpteen batches will likely have problems…colors too weak/strong, swirling too lame/intense, resin not stirred well enough due to rushing…

    The plans for the standard mold are intended to create a block of something like 10 blanks. Making multiple mistakes on that scale gets expensive quickly.

    I'm starting with a narrower mold…wide enough for two blanks, the saw blade that will slice them apart, and maybe a hair more so the outer edges can be trimmed away (there seems to be less character/swirling there but they'll mostly be turned away on the lathe so this extra bit isn't critical).

    The height of my narrow mold is the same as the "standard" mold, so the resulting block can produce two layers of blanks or just one (depending on how much resin I pour into the mold).

    If you use a narrow mold, you'll need to adjust how much resin you mix. For the first batch, as long as the cast block ends up at least 3/4" thick, it'll work fine for blanks.

    Measure the resulting first block's height and you can calculate how much more resin to mix for the next batch to get a block that's high enough for two blanks plus the saw blade that will separate them…i.e.: a block that will yield four blanks…if you don't like the colors, swirling, etc, you've wasted far less resin than the standard mold.


  2. Your new mold will likely leak the first few times you use it. That's called out explicitly in Curtis' video on casting if I recall correctly. As the video explains, the problem goes away on its own as leaked resin sets in the cracks, but it's still messy until that happens.

    It's worth considering using a good tape across the seams to help minimize the mess until the seams seal themselves. For my first casting attempt, I had resin leaking on my work surface from the first color as I was mixing the dye into the second color. Fortunately, my work surface was a spare cardboard box so it didn't matter…but the lost resin and general mess could've been avoided with a bit of duct tape.


  3. I found some of the dyes to be too thick to squeeze out of the built-in dropper mechanism on the 1 ounce bottles. When I removed the dropper, I found it difficult to accurately/consistently control how much dye was going into the mix.

    I found that drilling the eye dropper mechanism out with a 5/64" bit helped considerably. That happened to be the size pilot bit I had handy and was just slightly larger than the dropper's original hole. The drops came out more like a very thin stream, but they flowed well enough to no longer need to remove the dropper mechanism so I think I'll be able to judge how much I'm using a bit better.

    Test this on just one bottle first in case you want to use a smaller bit instead. Also be certain to clean the bit off after each color dye's dropper has been drilled. I simply drilled a scrap of wood between each bottle...

    The dropper likes to spin while drilling, but a bit of thumb pressure was enough to stop that.


  4. Some of the Alumilite dyes seem stronger than others. This isn't meant as a complaint…I believe it's a natural side effect of certain colors being inherently stronger (like blue and red) vs. others (yellow or florescent green). The resin is clear(ish) during mixing but sets to white…so it will lighten the colors you're trying to create.

    If the color looks weak during mixing, it will be even weaker when the white coloring kicks in!

    It's probably worth mixing enough resin for a single-height block, splitting it into two or three cups, then adding different amounts of the SAME dye color to each cup. Don't try to swirl them a bunch…keep them fairly separate to make it easy to see the final colors from each cup in the resulting block. This should let you quickly get a sense of how much of a given dye is needed to produce light/medium/dark colors.


  5. If you're mixing equal amounts of a light color and a dark color in your mold, and you don't plan to pour both at the same time, I suggest pouring the lighter color in first. It will be much easier to see where/how the darker color is flowing into the lighter color. Trying to see how a lighter color affects a darker color doesn't work well.

    I used blue and yellow for my first batch. The blue was fairly dark and went into the mold first. The yellow was almost invisible as I added it into the mold. I stirred some after they were together so I'd also have some shades of green but it was all guesswork as it was very difficult to see where the yellow ended up until after the block came out of the pressure pot.


  6. I'm not currently planning to cast double batches in a single pressure pot, so I simplified the design of the caddy (mold rack) that holds the mold in the pressure pot. The folding handle and top air shield were skipped (those are parts E, F, and C in Curtis' design).

    Instead, the upper Part A acts as an air shield for the mold that sits on the lower Part A in his plans. Also, a simple 1x2 runs across the top where Part D would normally sit…that creates a fixed handle which doesn't hit any of the fittings underneath my pot's lid and it simplifies construction of the caddy.

I'd like to end with a big THANK YOU to Curtis for his wonderful videos on casting Alumilite as well as his plans for the mold and caddy. His videos saved a lot of mistakes (the only mistake worth mentioning was when I skipped one piece of his advice in a rush to get my first batch into the pressure pot).
 
Signed-In Members Don't See This Ad

TimS124

Member
Joined
Apr 11, 2012
Messages
735
Location
Asheville, NC
Batch #3 is in the pressure pot now. Verified #5 above is indeed a big boost (in more ways than I expected).

I used the last of the white alumilite I had on hand (enough for what should be one layer of blanks by three blanks wide…my narrow mold isn't as narrow as it was supposed to be).

About 2/3rds of what I mixed was tinted yellow…before it goes off, it's very translucent. Added all of the yellow to the mold.

The rest was dyed blue and poured into the yellow…the blue is much too dark to see through but it shows up quite well as it's poured into the yellow so you can see how the colors are interacting, you can aim/steer your swirling, etc.

Next time, I'll likely set aside even less than 1/3rd for the darker color. It really looked like it was overpowering the yellow completely (with zero stirring).

The blue also appeared to sink nearly to the bottom though that might be either an optical illusion or a sign that the blue had too much momentum (pouring from too high or pouring too quickly).

I started with the white Alumilite because, as many have noted before, it sets up faster and you can see the results without waiting and waiting and waiting.

Now that my starter bottles of white are empty, my next batch will have to be with the clear. It'll be interesting to see if the same issues (color strength, sinking during mixing, etc) vary at all.
 

TimS124

Member
Joined
Apr 11, 2012
Messages
735
Location
Asheville, NC
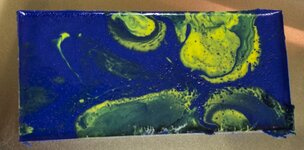
No thread is complete without some pictures…here's the first block I cast. 50/50 mix of blue and yellow, about 4 oz by weight of each. Blue poured in first, then the yellow randomly poured around plus a tiny bit of mixing/stirring.

There was a soft spot on the back side when I took the block out of the pressure pot. I baked the block for an hour at 160 degrees F (that's the lowest my tiny oven will allow). That didn't seem to help but the soft spot is pretty shallow so hopefully it'll vanish when the blank gets turned.

I suspect the soft spot was caused by two factors. First, I added the dye to the cup before I added Part A and the dye is pretty thick. It's possible a blob of dye simply wasn't stirred in very well and settled to the bottom of the mold.

The other factor was me ignoring Curtis' advice (on purpose) and mixing the dye into Part A before combining with Part B. The blue dye is so dark you can't really tell if you've mixed A & B completely. Being able to see if you've mixed A & B completely is explicitly why he advises not adding dye in advance.

While his videos clearly demonstrate there's enough time to mix it all and get it under pressure, despite the fairly short open time for white Alumilite, I was trying to shave some time off. I figured as a rookie, I'd be slow at things like adding the dye (and I was right due to the dropper problems mentioned in #3 of my original post).

I think I got A & B mixed well enough since the block seems reasonably solid except for one small spot. That spot feels more like unmixed dye...
 

Attachments

  • first casting attempt 3-8-14.jpg
    first casting attempt 3-8-14.jpg
    160.4 KB · Views: 321

TimS124

Member
Joined
Apr 11, 2012
Messages
735
Location
Asheville, NC
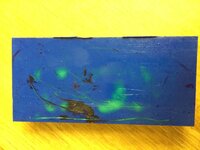
Here's a view of the bottom of the first block. Along the left side, about 2/3rds of the way up from the bottom, there's an oddly shaped dark blob…that's the soft spot.

You can also see that very little of the yellow made it to the bottom and there's not a lot on top…so somewhere in between there should be a lot of yellow and/or green.

I don't have a table saw or bandsaw handy where I'm at currently. So, I haven't sliced into the block yet…hoping to do that Monday.
 

Attachments

  • first casting block - back side.jpg
    first casting block - back side.jpg
    190.7 KB · Views: 243

TimS124

Member
Joined
Apr 11, 2012
Messages
735
Location
Asheville, NC
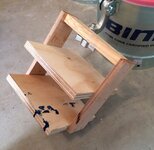
Here's a quick phone photo of the simplified caddy (mold rack) mentioned earlier.

If I make another, I'll raise the location of the middle shelf/air shield. There's enough room for the mold to slide in/out but I wouldn't mind having a bit more room.
 

Attachments

  • casting caddy for pressure pot.jpg
    casting caddy for pressure pot.jpg
    235.2 KB · Views: 235

TimS124

Member
Joined
Apr 11, 2012
Messages
735
Location
Asheville, NC
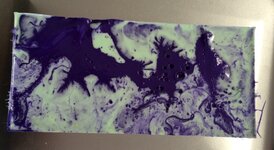
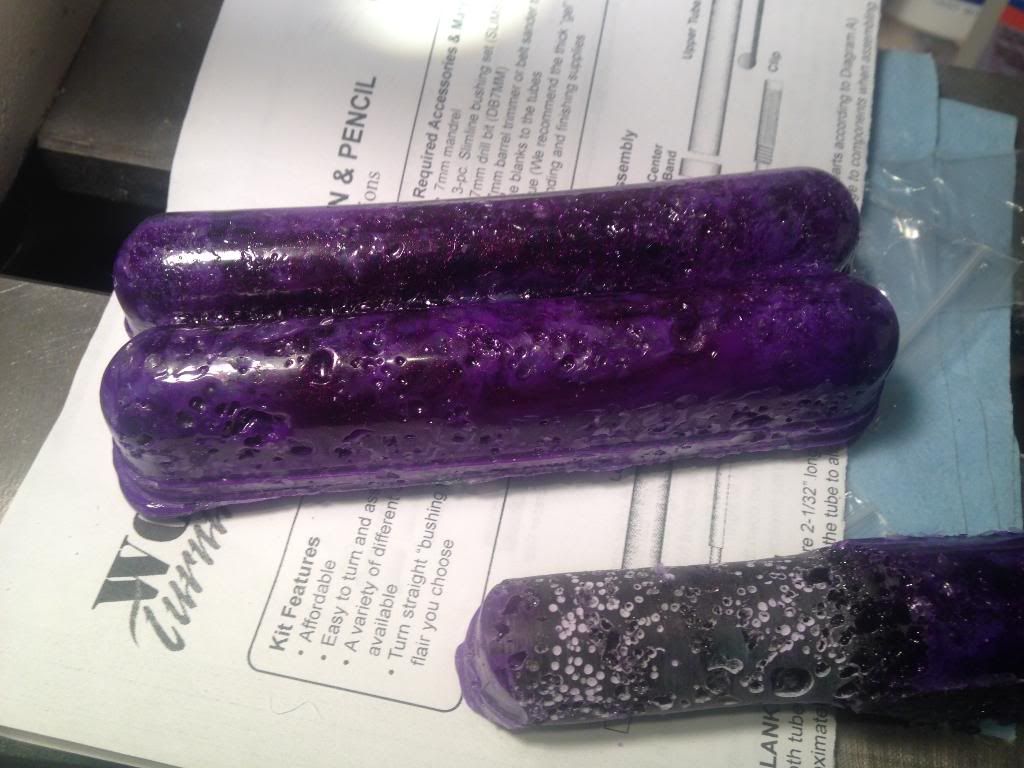
For the second block, I mixed the same amount again for two different colors, but I poured both at the same time. No stirring afterwards, but lots of moving the streams around as they were poured.

I wanted to try different colors so this time I went with the violet dye and florescent green. Yes, it's a horrible combination but that wasn't the point. I wanted to see how they'd swirl when poured that way. I also wanted to see if I had calculated the right amount of resin to produce a block thick enough for two rows of blanks (the first block was only an inch thick so clearly that wasn't enough resin).

I expected the violet dye to produce a light purple especially since it was being mixed with white Alumilite. It came out darker than I expected so I'm happy.

I also mixed in a small amount of metallic purple powder. Apparently, I need to mix in much more to see an effect or else I need to save that stuff for the clear Alumilite. I don't think it shows up at all in this block.

I did not add enough of the Florescent Green, so when the white kicked in, I ended up with a slightly lighter shade of green than you'd see if you ordered mint chocolate chip ice cream. It's a fine color unless you've paired it with purple (purple really needs something closer to forest green and some gold so you have Mardi Gras colors).

I'll save the florescent colors for the clear Alumilite (which is next on my experimenting list). The white really washed out the effect though to be fair, it looked pretty weak while I was stirring it. Like the yellow from the first block, this color left the mixed A & B very translucent which apparently means the effect of the white coloring will be fairly obvious once the resin goes off.

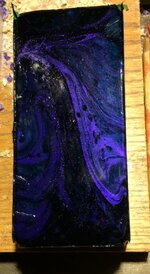
I like the effects shown on the top of the block produced by pouring both colors at once. The bottom and sides of the block are much less interesting so I won't know what I really have until I slice into it.

Even then, I may have to actually turn it to get down to what really matters. Good thing slimline kits are cheap. I'm overdue for making a few of those for a friend of a friend anyway.

I tend to make more than requested and let them choose which ones they want so it's not like I'm forcing these blanks on anybody. :biggrin:
 

Attachments

  • second block - top.jpg
    second block - top.jpg
    160.1 KB · Views: 294

Edward Cypher

Member
Joined
Feb 8, 2011
Messages
1,901
Location
Denver, Colorado
The second blank is very nice, much better mix of colors. You may not see the metalic purple powder effect until you mm and buff. Some metalics only pop after finishing or in very bright sun light at least that has been my experience with PR. I have not done alumilite yet.
 

HamTurns

Member
Joined
Jul 25, 2012
Messages
273
Location
Madison, Wisconsin, USA
Tim - Nice write-up on your process.

I think you'll find that coloring the Alumilite clear will be a lot different from coloring the white resin.

One coloring tip that I use is to put a little "A" resin into a smaller cup, then mix the colors that I want into that small amount of "A" resin and set it aside. This saves time dripping the colorant into the already mixed resin. Then what I do is take a larger cup for mixing the whole batch, mix it, then pour off the mixed resin into the smaller "color" mixes, then stir to mix in the colors. This allows you to mix a bunch of colors and not run out of mixing time. I will usually mix three to six colors this way, and still have time on my timer to get it into the pot and bring up the pressure.

It looks like your well on your way to casting fun, keep it up.

Happy Turning
Tom
 

gbpens

Member
Joined
Jul 1, 2011
Messages
821
Location
Homer Glen, IL
Tim, thanks for documenting your experience and sharing it with us! Directions seldom mention the pitfalls and potential problems and are therefore incomplete. Recording exactly what one is doing helps to avoid repeating the same mistakes. You have provided a real how-to and what to avoid. That is what many of us need.
 

TimS124

Member
Joined
Apr 11, 2012
Messages
735
Location
Asheville, NC
The second blank is very nice, much better mix of colors. You may not see the metalic purple powder effect until you mm and buff. Some metalics only pop after finishing or in very bright sun light at least that has been my experience with PR. I have not done alumilite yet.

Thanks, I'll look again once I get it turned and polished…maybe some of the metallic will show after all. I used what I felt was likely a pretty small amount though so if it doesn't show, I won't be overly surprised.
 

TimS124

Member
Joined
Apr 11, 2012
Messages
735
Location
Asheville, NC
Tom - your tip about mixing the dye into a small amount of Part A and combining that after A&B are mixed is genius! It's definitely on my list of things to do different for the next batch!

Thanks for the tip and the kind words!
 

Cmiles1985

Member
Joined
Nov 12, 2013
Messages
1,611
Location
Aransas Pass, TX
Thanks for the tips on casting. Any advice in methods helps out in my list of "what to try." I did my first two casts today, the first was very much no bueno. I was experimenting with vacuum as opposed to pressure. The resin is just thick enough that the air is not removed and just makes a very light bubbly resin that completely fills the mold. Second was following the Curtis Seebeck YouTube video, mixing all resin, then separating small amounts for colors. I think they will come out great. I will turn one tomorrow. As for a mold, I'm temporarily using a Big Lots hot dog container...I was aggravated with making one, but ready to cast. My wife had the idea of using the hot dog deal, and while the blanks are a little awkwardly shaped, I don't think it wastes as much resin as a solid block. The only major thing for tomorrow is to mount a level to my casting rack.
 

TimS124

Member
Joined
Apr 11, 2012
Messages
735
Location
Asheville, NC
Clarification to my original point #3. I found additional info in another thread that Curtis recently posted...posts #2 and 3 of:

http://www.penturners.org/forum/f43/alumilite-dye-bottles-120149/

I hadn't considered that the holes might be intentionally sealed because it sounded to me like air escapes fine if I squeezed the bottle while holding it upright. The eye drops I use with my contact lenses comes in a similar bottle and those tips are never sealed…so four decades of exposure to those tips kept me from even pondering that the dye tips might be sealed (or partially sealed).

The drilling I mention in #3 fixes that problem and perhaps widens the hole a wee bit as well…definitely makes it much easier to get the dye to come out (almost too easy so don't squeeze hard the first time after drilling a tip). :biggrin:
 

TimS124

Member
Joined
Apr 11, 2012
Messages
735
Location
Asheville, NC
Clark - congrats on jumping into the casting fray. I'd love to see a photo of the vacuum'd blank. Curtis' videos are a huge help!!! (other than the fact that they always induce a bit of shop-envy).

I love the hot dog mold concept! You should make a hot dog pen in its honor. :biggrin:
 

Cmiles1985

Member
Joined
Nov 12, 2013
Messages
1,611
Location
Aransas Pass, TX
Clark - congrats on jumping into the casting fray. I'd love to see a photo of the vacuum'd blank. Curtis' videos are a huge help!!! (other than the fact that they always induce a bit of shop-envy).

I love the hot dog mold concept! You should make a hot dog pen in its honor. :biggrin:

Next bash maybe.....

I'll get a pic of the vacuum blank. I turned a little of it, so I can get a picture of lightly turned and not turned. Here's a pen from the second casting:
 

Cmiles1985

Member
Joined
Nov 12, 2013
Messages
1,611
Location
Aransas Pass, TX
I swirled the colors around a little. This is Alumilite clear with 2/3 (base) being dyed white, and 1/3 each dark blue with silver macro pearl Pearl-Ex and light blue. All dyes used (rather, both dyes) were Alumilite. Casting was done in the half hot dog container. Blues poured on to white then swirled using a piece of bailing wire looped at the end. Then it was 60 psi for 45 minutes, build two raised garden beds for the wife and turn! I attempted the homemade silicone mold, and I failed (not miserably). I tried the cutting board method...needed a thicker cutting board. I'm on staycation all week, so between wife mandated projects, house repairs and normal turning I should be able to build the right mold.
 

TimS124

Member
Joined
Apr 11, 2012
Messages
735
Location
Asheville, NC
Clark - thanks for the details.

The cutting boards I've found locally are only 3/8" thick these days. I made a "standard" sized mold with that material but didn't like how much the screwed bulged out the sides. It wouldn't really affect the casting, but it annoyed me.

TAP Plastic has 1/2" thick material so I picked up a small block of that. If you have one close, check their scrap bin first…found a couple pieces at my closest TAP that were only a couple bucks.

Even with pilot holes for the screws, I got some bulging (but I went with thicker stainless steel screws instead of drywall screws because I find drywall screws to be very brittle).

It works pretty well though - even when I've forgotten to spray it with mold release, the block pops right out (I made sure to get untextured material).
 

Cmiles1985

Member
Joined
Nov 12, 2013
Messages
1,611
Location
Aransas Pass, TX
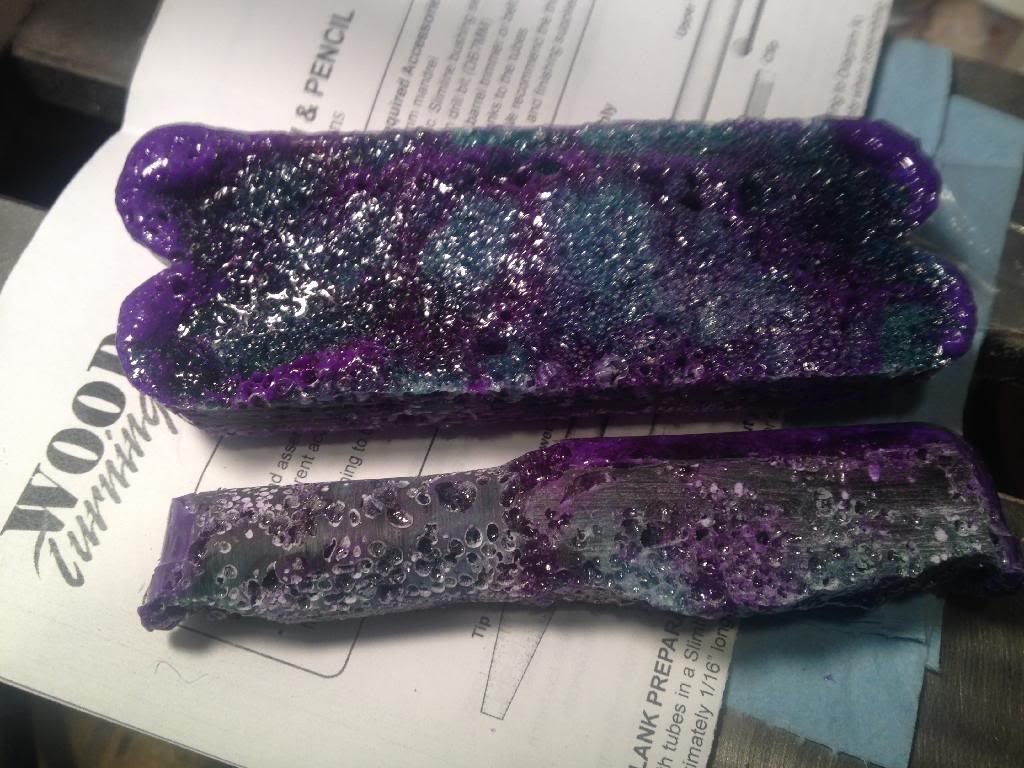
As promised earlier, here is my real first cast done under vacuum. As you can see, the bubbles are far more prominent towards the flat side (top) of the slab. The pour was a Mardi Gras theme purple with gold Pearl Ex swirled with green sprinkled with silver Pearl Ex. I didn't actually polish any as there wasn't really much to polish. I'm going to save it and maybe hit it with some other color under pressure to try filling the voids.


TimS124

Member
Joined
Apr 11, 2012
Messages
735
Location
Asheville, NC
That's an impressive collection of air bubbles! :)

If pressure casting works to fill the voids, please post a follow up...
 

TimS124

Member
Joined
Apr 11, 2012
Messages
735
Location
Asheville, NC
I finally remembered to actually slice open the three blanks I started this thread with. One of the resulting blanks has been drilled and a tube glued in a few minutes ago...will likely turn it later tonight or maybe tomorrow.

My shop is not air conditioned and we're having a nasty heat wave...if it cools off enough this evening, I'll turn the blank tonight. If not, I have access to a lathe at an air conditioned maker space a few miles away...might turn there tomorrow.

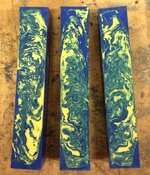
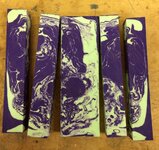
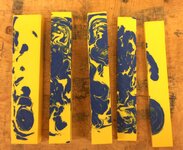
The surfaces of the original blocks look pretty lame. But the insides look reasonably useful (at least for a first attempt at casting). I've attached pics showing the insides of each block...
 

Attachments

  • blue, yellow, green - sliced 2014.jpg
    blue, yellow, green - sliced 2014.jpg
    327.5 KB · Views: 186
  • Purple & Green blank - sliced 2014.jpg
    Purple & Green blank - sliced 2014.jpg
    325.5 KB · Views: 194
  • Yellow - sliced 2014.jpg
    Yellow - sliced 2014.jpg
    252.8 KB · Views: 180

TimS124

Member
Joined
Apr 11, 2012
Messages
735
Location
Asheville, NC
I cast a block of clear Alumilite tonight. Tried several new things all at once. I'm not concerned with whether or not this blank is usable. I'm much more interested in how various things work and rather than trying them one by one, I tackled several together in one blank.

I revisited the purple and green from earlier in this thread. The original attempt ended up with really light (almost mint-green) green because I didn't account for the whitening effect when the white Alumilite went off.

Sadly, I think I overcompensated this time and used too much green dye...it's darker than I wanted (but still cool, just not what I was after).

I added fine/small glitter to the green...so far, I like how that turned out. At least on the surfaces of the block, it looks pretty cool.

The purple came out lighter than I wanted, in part I think because I added purple mica powder (which I think also lightened it a bit). With the green coming in too dark and the purple a bit light, the purple doesn't show well unless the light catches it well (and then the mica powder earns its keep).

This blank was about 2/3rds green and 1/3rd purple. The green went into the mold first, then the purple was drizzled in from a height that gave a thin line as I moved side to side and front to back randomly over the mold. I also stirred a bit after pouring in the purple.

I'll let the block sit for a few days before slicing it....though I'm anxious to get a look inside...
 

Attachments

  • First clear block - green & purple 5-13-14.jpg
    First clear block - green & purple 5-13-14.jpg
    213.2 KB · Views: 202

sbell111

Member
Joined
Jan 16, 2008
Messages
3,465
Location
Franklin, TN
Even with pilot holes for the screws, I got some bulging (but I went with thicker stainless steel screws instead of drywall screws because I find drywall screws to be very brittle).

Your new mold will likely leak the first few times you use it. That's called out explicitly in Curtis' video on casting if I recall correctly. As the video explains, the problem goes away on its own as leaked resin sets in the cracks, but it's still messy until that happens.

Many people use screws to put these molds together, but I simply duct-tape mine. It holds the mold together perfectly fine.

I avoid leaks by 'caulking' the interior seams with Goop glue. I apply a small bead and then press it into the seam with my finger. It applys super fast and easy and sets up quickly to give a flexible seal. When it's time to knock down the mold, the glue comes right off. After letting the Goop dry for just a few minutes, Its ready to use.

Since the mold is duct-taped together, demolding is a breeze. I just remove the tape, knock down the mold, and pop off the slab. Since the mold knocks down flat, it's easy peasy to store.

Using my no-screw, tape-and-goop mold method, I've used the same molds perhaps hundreds of times with nary a problem.
 
Last edited:

Dick Mahany

Member
Joined
Dec 21, 2012
Messages
323
Location
Palm Springs, CA
Looks like it will be fun to cut into that one! I'm casting a few today, but 102 degrees outside today, I hope I can get it into the pressure pot fast enough.:wink:


TimS124

Member
Joined
Apr 11, 2012
Messages
735
Location
Asheville, NC
Using my no-screw, tape-and-goop mold method, I've used the same molds perhaps hundreds of times with nary a problem.

Cool approach. Thank you for sharing the details. I don't recall any leaks from last night's batch...that would be batch #4 in that mold so indeed, they do self-seal fairly quickly.

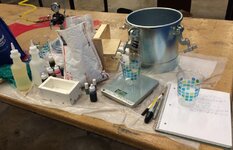
I like the flat storage option of your approach though currently that wouldn't help me much. I have all the casting-related "stuff" in a large, re-usable bag...the mold is a small piece of the pile. I've attached a photo of the pile of stuff...dyes, mold, pressure pot, caddy, scale, cups, glitter/mica-powder, resin, gloves, protective layer of plastic (flimsy drop cloth to catch drips), notebook...and probably a few other things still in the bag. :)

It's easier and more convenient to cast at a local maker space (TechShop) than in my garage. Their space is air conditioned and we're having a heat wave so my garage is almost hot enough to melt human skin... :biggrin: Which is hot enough to make the resin's open time shorter than my stirring/pouring/swirling time...

I also have a lot more elbow room there and they have a much larger compressor so my pressure pot fills faster. Since I was casting clear Alumilite, and it needs 45-90 minutes under pressure, there's a lot more to do (and people to talk with) at the maker space than in my garage.
 

Attachments

  • casting clutter May 2014.jpg
    casting clutter May 2014.jpg
    197.3 KB · Views: 198

TimS124

Member
Joined
Apr 11, 2012
Messages
735
Location
Asheville, NC
Looks like it will be fun to cut into that one! I'm casting a few today, but 102 degrees outside today, I hope I can get it into the pressure pot fast enough.:wink:


Post a photo of your block...hope your part of the heat wave didn't mess up your casting. :)
 

sbell111

Member
Joined
Jan 16, 2008
Messages
3,465
Location
Franklin, TN
Using my no-screw, tape-and-goop mold method, I've used the same molds perhaps hundreds of times with nary a problem.

Cool approach. Thank you for sharing the details. I don't recall any leaks from last night's batch...that would be batch #4 in that mold so indeed, they do self-seal fairly quickly.
Another 'feature' of my molds is that they are scaleable. If I want to change the number of blanks that I am pouring, I simply tape the end wall into place at a different location.
 

TimS124

Member
Joined
Apr 11, 2012
Messages
735
Location
Asheville, NC
I'm using two different molds...the larger one was built using the plans Curtis (MesquiteMan) has on his web site. The smaller one is about half that width and has been used for all but one block so far.

Tonight, I figured out about what the maximum amount of resin I can put into the smaller mold. It should produce a block tall enough for 2 blanks and wide enough (if cut with a narrow kerf blade) for 3 blanks....so, six total if I fill that mold.

Most of my practice blocks have been about half (or a bit over half) of that small mold. I think can get four blocks out of a 16 oz package of Alumilite. Each set of bottles has included at least one full-height block as I dial in the amounts I should be using, so I haven't fully proven that I can get four blocks that are one-blank thick yet.

I'm also playing with trying to get desired colors/effects. Some of the dyes are really strong...one drop of the green or blue dyes goes a long ways, especially when working with such small amounts of resin.

I have a couple colors pretty much figured out and ideas on what to try next for the ones that have eluded me so far. Since the amount of resin being used for each batch has been varying (on purpose), I finally figured out that when comparing one block's results with another's when planning the next block, I need to look at more than just how many drops of dye I used!

I have to look at the ratio of drops to grams. For one experiment, I had 10 drops of color (way too much) for 100 grams of Part A. For the next block, I went with 4 drops, but had only 60 grams of Part A. It seemed like I'd drastically reduced the amount of dye I was using, but since I also slashed the amount of resin being used for that color, I ended up only making a modest change (and still had way too much dye-to-resin).

After that, I figured out one drop of the strong dyes (like green and blue) goes a long ways when dealing with such small blocks.

Eventually, I'll have to go to the full sized mold and fill it so I can further dilute the dye-to-resin ratio for those strong dyes.

In the mean time, I'm thinking of trying mixing some blue and yellow to get a different shade of green (the green dye, even with some white mixed in, is still really dark).

No wonder nobody ever wants to post a recipe for their color combinations. :biggrin:
 

TimS124

Member
Joined
Apr 11, 2012
Messages
735
Location
Asheville, NC
I turned a pen from a blank sliced out of the second block I'd cast. The material turned very nicely (after all, it is Alumilite!). I only have a lame phone photo of the results so posting a picture will have to wait a bit (hopefully later this week).

I'm pleased with how the material turns and how the blank came out. It's not commercial grade swirly bliss, but it's not bad for only the second block I've made.
 

Cmiles1985

Member
Joined
Nov 12, 2013
Messages
1,611
Location
Aransas Pass, TX
I can't wait to see what you've turned from your castings. It sounds like you're getting it figured out pretty well. After my foiled attempt at vacuum, I got pretty well situated through only a couple more trials...then my Alumilite set for a while. I attempted a burnt orange/white cast for a custom and Part B was semi solid. I (stupidly) thought that was probably the end of the road for it, but I made the cast anyways. The color came out spot-on. However, do to the viscosity of Part B, a complete mix did not happen and the cast has some "moist" areas. Then I read to heat up Part B: voila!! It was a low viscosity liquid again, made pour two of burnt orange/white with the assistance of my two year old son. I guess I was sidetracked and spilled about half of my mold on the garage floor! So, I gave it one more shot, and the third try was a charm. All of this was to make a custom FP for my mother to give her boss on his birthday. I told her I was only about $50 in on making the blank, but I'm sure I can recoup most of my expenditures :)

Good luck using the volume calculations on the Alumilite site. They show cubic inches *0.554 = oz of resin. My mold comes out to 13.7 oz based on that...I pour 17 oz and get a perfect slab.
 

TimS124

Member
Joined
Apr 11, 2012
Messages
735
Location
Asheville, NC
Ouch! So far all of my spills have been fairly small.

My Side B was gelled last night as well. Soaked it in very hot water for about 45 minutes (changing the water multiple times to keep it hot). Thought it was liquify enough, but it started thickening up a bit.

Stirring the two together was "interesting". I put down the spatula that I'd normally stir with (much too wide for aggressive stirring) and used a pair of Starbucks stir sticks...that let me really go at it and the semi-snot-like Side B mixed in fairly well.

I haven't seen any problems on the outside of the blank, but haven't cut into it yet (so there may be problems deeper in). While that block sat in the pressure pot, the rest of Side B went back into hot water...another hour of soaking and it appears to have stayed liquidy this time.

One more small block to cast today...after I get some more mixing cups (oops).

I haven't tried the volume calculations on Alumilite's site. Easier to just wing it apparently.

Any pics of the burnt orange and white pen?
 

Cmiles1985

Member
Joined
Nov 12, 2013
Messages
1,611
Location
Aransas Pass, TX
I have not yet made the pen. I'll be epoxy in tubes in tonight. I'll post a pic of the blanks though. My Part B stayed fairly fluid after one good long soak with just hot tap water (~140F). I poured some Green Bay (maybe-not) Packers colored blanks this morning for a new repeat customer. The B side still poured very freely.

As for the oops slab, it was very noticeable that the parts didn't thoroughly mix! The outside of the slab is very sticky and nasty. I still cut it into blanks to see what happens (<---too tight to throw away resin!!), and I'm going to forget about them for a few days/weeks and see if they dry out.
 

TimS124

Member
Joined
Apr 11, 2012
Messages
735
Location
Asheville, NC
The block that was created when my Side B was semi-snot-like worked out quite well. The aggressive stirring appears to have worked. I sliced the block late yesterday, drill one of the resulting blanks, glued in a tube last night, and turned it this morning. Turned really nicely, polished well, just need to pull out a proper camera to get a photo (the phone photo I took was horrible).
 

TimS124

Member
Joined
Apr 11, 2012
Messages
735
Location
Asheville, NC
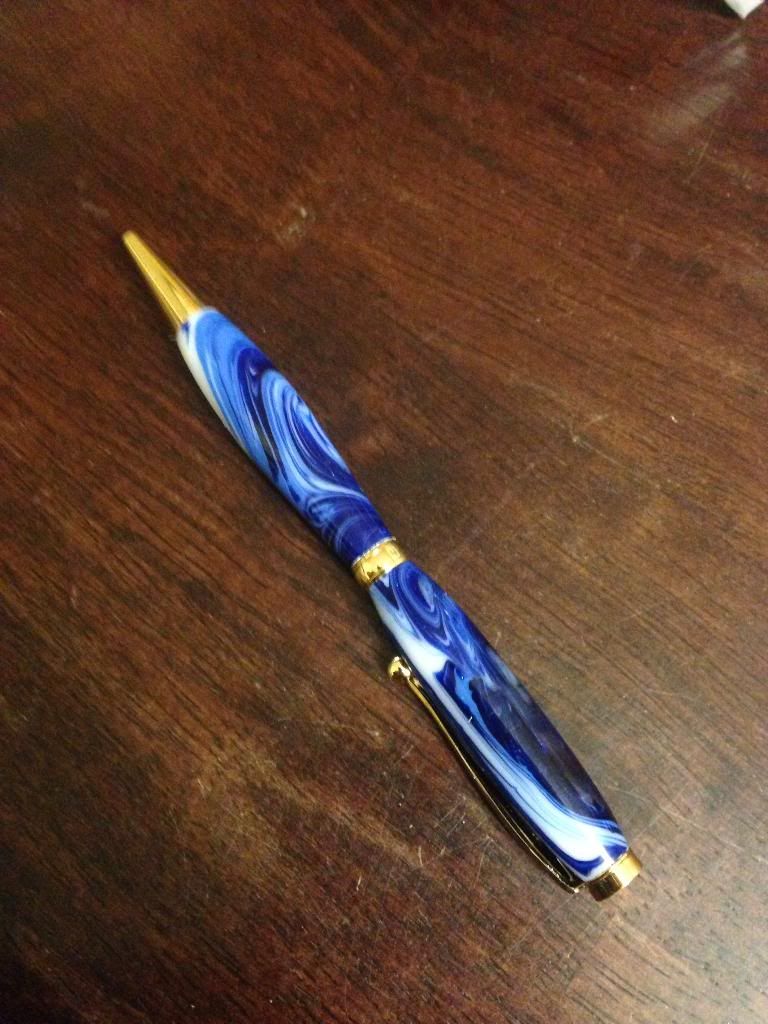
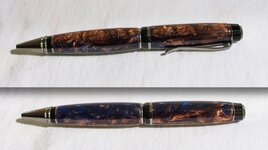
Two views of the pen I made from the recent copper & blue casting attempt. Stirring didn't work out the way I expected so there's not much mixing between the two colors.

This blank ran right between the layers...I think the copper part came out pretty good. The blue was darker than I wanted so I made another block that fixed that (but had even less swirling).

This is cast from clear Alumilite. The copper color is entirely due to copper Alumilite metallic powder mixed into the clear resin.

The blue side is mostly due to Turquoise PearlEx mica powder plus a drop of Alumilite blue dye...that one drop of dye was too much and the blue came out too dark.

The second attempt skipped the blue dye and added some white dye...came out much better. That block has been sliced and one blank from it has been drilled and a tube glued in. I'll get it turned soon and post a picture. The blue on it shows much better but I need to figure out how to get better swirling between the layers.

The metallic powders don't swirl together as well as just colors seemed to mix...but I have ideas on how to get the effects I want as soon as I get more of the Clear resin. I used the last of what I had on hand trying to figure out out to get the right shade of green (still working on that) and then on the copper/blue combinations.

I still have white Alumilite on hand so next thing to try is working out some color recipes with that.
 

Attachments

  • Copper & Blue cigar pen May 2014-1.jpg
    Copper & Blue cigar pen May 2014-1.jpg
    81.9 KB · Views: 141
  • Copper & Blue cigar pen May 2014-2.jpg
    Copper & Blue cigar pen May 2014-2.jpg
    80 KB · Views: 154
Signed-In Members Don't See This Ad
Top Bottom