Menck Damascening Tool

Signed-In Members Don't See This Ad

skiprat

Passed Away Mar 22, 2022
In Memoriam
Joined
Oct 19, 2006
Messages
7,812
Location
In a Skip in Wales
I guess this is a question / topic primarily for folks that cutomise their rifle bolts.
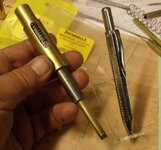
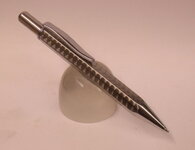
I recently bought this little tool from Brownells USA ( The gunsmiths ) to see if I could make it work on my stainless pens.
It works but no matter what I try, I struggle to get consistant results.
I've tried the Cratex rods on their own, with WD40, with a mix of WD40 and very fine valve grinding paste and just the paste. Aaargh!!!:rolleyes:
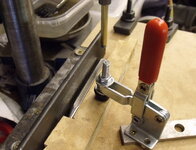
I know the secret is to make sure you use the same pressure for the same amount of time so I made the spring loaded carrier for the tool to take care of the pressure, and counted to ten with a metronome for each step.

One of the things that worries me is the illogical action. :confused:
You grind /polish a full circle, then move the tool to make the next overlapping circle. The first circle was on perfectly polished stainless, but the next circle now has to cut through half of the first one just to get rid of the scratches and then gring it's own circle. If you continue with this sequence, then each grind has to be progressively deeper till you can actually feel the grind with your fingernail. Not nice.

There is a Youtube vid or two but they don't really show a lot.

Any clever tricks or advise will be welcome please :biggrin:

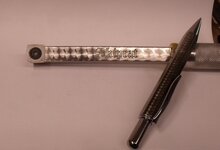
This little pen looks ok-ish in natural light but under bright lights it looks like I ground it on a bench grinder:redface:


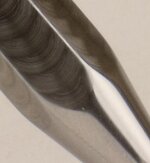
Edit in; I just added the close up shot that shows the different scratch pattern on each circle. I need them all the same. :redface:
 

Attachments

  • Picture 012.jpg
    Picture 012.jpg
    207.9 KB · Views: 1,707
  • closeup.jpg
    closeup.jpg
    97.1 KB · Views: 1,060
Last edited:
Signed-In Members Don't See This Ad

OKLAHOMAN

Member
Joined
May 17, 2006
Messages
10,228
Location
Costa Rica
Skippy just dig into your pockets deep enough and buy some Damascus billets, then no need to make stainless look like Damascus.:biggrin::rolleyes:
Said as I hid from the blow from across the pond.:wink:
 

skiprat

Passed Away Mar 22, 2022
In Memoriam
Joined
Oct 19, 2006
Messages
7,812
Location
In a Skip in Wales
LOL Roy,
I'm not sure if you are familiar with this technique. It has dozens of names and I don't think anyone actually know the proper name. The most common name is Jeweling. I have no idea why they called it Damascening because that ( IIRC ) is actually inlaying metal into metal. Perhaps like Damascus steel it originates from there too.

It is also often called Engine Turning but I think that is an insult to that art form.:biggrin:
 

skiprat

Passed Away Mar 22, 2022
In Memoriam
Joined
Oct 19, 2006
Messages
7,812
Location
In a Skip in Wales
Here you go Roy. This has got to be the most famous picture of 'Engine Turning' in the world. Charles Lindburgh's Spirit of St Louis. :biggrin:
 

Attachments

  • SpiritOfStLouisDetailB&W.jpg
    SpiritOfStLouisDetailB&W.jpg
    85.4 KB · Views: 640

OKLAHOMAN

Member
Joined
May 17, 2006
Messages
10,228
Location
Costa Rica
Was just yanking your chain! ( A pure Yank expression):wink:, We used enging turned face plates on our hot rod gages for years.
 

skiprat

Passed Away Mar 22, 2022
In Memoriam
Joined
Oct 19, 2006
Messages
7,812
Location
In a Skip in Wales
Was just yanking your chain! ( A pure Yank expression):wink:, We used enging turned face plates on our hot rod gages for years.

LOL, I think that is morally wrong in most countries, but hey, whatever floats your boat is fine by me !!!:tongue:

Didn't you also help out with 'enging' turning on Charlie's plane?? I reckon you must have been around 20 or so at the time??:cool::biggrin::tongue:
 

PTsideshow

Member
Joined
Dec 26, 2011
Messages
1,033
Location
Macomb County Michigan
Here you go http://www.cs.ucr.edu/~eamonn/et/et.htm
Don't know if it just down or it is gone ENGINETURNING.COM
Here it is carried to the next level carving it in 3-D http://www.artmetal.com/images/dw_eldredge/2006/08/engine_turning

I did a little on gold leaf, it is done with a little square of silk filled with cotton and a quarter turn/twist of the wrist takes practice.
I have seen it done with wood dowels and lapping compound, the round erasers used for the powered erasers in drafting. In all versions it takes practice, practice!
great looking pen from here!
:clown:
 

skiprat

Passed Away Mar 22, 2022
In Memoriam
Joined
Oct 19, 2006
Messages
7,812
Location
In a Skip in Wales
Thanks guys, some great links there !!:wink: I've seen one or two before but there are others that look promising. Thanks again:biggrin:

Billy you might be on to something. I'll try half as much pressure for twice as long. :wink:
 

skiprat

Passed Away Mar 22, 2022
In Memoriam
Joined
Oct 19, 2006
Messages
7,812
Location
In a Skip in Wales
Well Billy, I think you got it!! I used less pressure, longer time and cranked the rpm up to 750.
Cratex rods on their own, no lube or paste added.
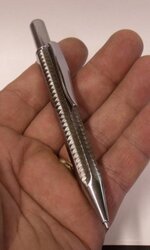
Still need more practice but at least it's shiney :biggrin:

This little pen is about the same size as an Elegant Beauty and weighs just under 48grams

Also is a pic of it set up in my super-duper-hi-tech-jiggery thing !!

Learning is fun but aaargh!!! these are boring :turtle: to do!!!
 

Attachments

  • jig.jpg
    jig.jpg
    184.3 KB · Views: 563
  • Shiny.jpg
    Shiny.jpg
    21 KB · Views: 395

bitshird

Member
Joined
Aug 27, 2007
Messages
10,236
Location
Adamsville, TN, USA.
Skip, I made a tool for my mill, that has a spring loaded wooden dowel's which I glued a piece of hard leather, I use a peck drill cycle and use Valve grinding compound, I programmed the mill to move X half the distance of the leather disk, I have 3 different sizes, I think the one I did on the tool Roller Bob sent you was done with 3/8 pad,
Over here we call it engine turning, I have no Idea where it came from, but I learned it from my Dad who used to open Safe Deposit boxes, and since the box doors were done that way, I got to plug the hole from drilling then try and match the area around it.
All I had was the shop drill press and a can of valve grinding compound I use a spindle speed of about 500 rpm and peck down about 10 times per and the dwell is probably 6 to 8 seconds per fish eye, that's what it looks like to me, but that's the way I do the presentation tools, or the ones for special guys like you!!!!
 

skiprat

Passed Away Mar 22, 2022
In Memoriam
Joined
Oct 19, 2006
Messages
7,812
Location
In a Skip in Wales
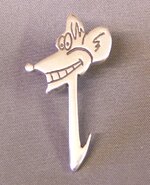
Ken, that is still one of my most prized possesions !! That and my Silver Skiprat badge !!:biggrin:

I'm going to find some tough old leather ( I might have some in the bottom of my undies drawer ) and see if I can do like you did. :biggrin:
 

Attachments

  • Ratty2.jpg
    Ratty2.jpg
    122.2 KB · Views: 351
  • Picture 026.jpg
    Picture 026.jpg
    122.9 KB · Views: 392

BRobbins629

Passed Away Dec 28, 2021
In Memoriam
Joined
Mar 8, 2006
Messages
4,037
Location
Richmond, VA, USA.
Nice concept Skippy - if you finish in time, maybe you can fly it over for the contest. Particularly because it won't be in my category:embarrassed:
 

skiprat

Passed Away Mar 22, 2022
In Memoriam
Joined
Oct 19, 2006
Messages
7,812
Location
In a Skip in Wales
Nice concept Skippy - if you finish in time, maybe you can fly it over for the contest. Particularly because it won't be in my category:embarrassed:

Thanks Bruce !! But having seen the big names that have entered so far, and now add you into the mix, I think I'll just save the postage !!:biggrin:

Having had another look at my Custom Woodchuck and with Ken's mention of 'Pecking' I changed it again !!:rolleyes: Still using the Cratex.
I altered the spacing and reduced the time in contact to 5 seconds.
Starting to look presentable now even though the pic doesn't show the sparkle effect.
My wife and daughter both said...'Hey, that's pretty !!' and that's good enough for me:biggrin:
 

Attachments

  • Picture 028.jpg
    Picture 028.jpg
    149.2 KB · Views: 533

joefyffe

Passed Away Aug 19, 2018
In Memoriam
Joined
Mar 29, 2010
Messages
1,316
Location
Indianapolis (almost Zionsville) Indiana
I think you ALL have too much free time on your hands :eek:! Stop, have a :drink: on me!!! LOL, isn't that what makes this hobby so much fun? !!! I'm still trying to learn how to get PR to set up at the right time!:frown:
 

skiprat

Passed Away Mar 22, 2022
In Memoriam
Joined
Oct 19, 2006
Messages
7,812
Location
In a Skip in Wales
I think you ALL have too much free time on your hands :eek:! Stop, have a :drink: on me!!! LOL, isn't that what makes this hobby so much fun? !!! I'm still trying to learn how to get PR to set up at the right time!:frown:

LOL yes Joe, this hobby forcing me to drink is the good part!!:beer::biggrin:
And quit lying about your PR !!:mad: There are many of us here that would love to get the cool result you are showing us these days!!
 

bitshird

Member
Joined
Aug 27, 2007
Messages
10,236
Location
Adamsville, TN, USA.
Skip The Cratex rods sound great, but all I can find are small ones, about 6mm-- 1/4 inch.
I think the pen is looking spectacular, I for one sure am glad to see you creating again, Thanks!!!
 

skiprat

Passed Away Mar 22, 2022
In Memoriam
Joined
Oct 19, 2006
Messages
7,812
Location
In a Skip in Wales
Ken, I must be going senile because I could have sworn I'd seen 3/8 diameter ones too. But I've searched and searched and like you can only find the 1/4 ones. :redface: Brownells and Midway seem to be the main stockists.
As has been mentioned, there are many simple methods of doing it including wooden dowels. But I chose the rubber cratex because I will want it to flex around a round pen barrel.
All the other methods are great if you are doing it on a flat surface.

Incidently, one of the very best results I got with my trial and error practice runs was on a piece of flat SS sheet but using a round PR off cut with fine valve grinding compound. :biggrin:
 

skiprat

Passed Away Mar 22, 2022
In Memoriam
Joined
Oct 19, 2006
Messages
7,812
Location
In a Skip in Wales
Mike, I didn't make the tool, just the spring loaded brass holder that it's in.
The tool is actually very simple though. Now that I've seen how it works, I'll make my own to suit some o-rings I'm cutting up.
LOL, I have actually broken the tool already by adding the screw to slide up and down in the holder. :rolleyes: I drilled and tapped through the centre pin that pushes the rod down. No big deal as the rod can be loose too.

I have tough rubber o-rings that are up to 15mm diameter ( old used gas seals from HV switchgear I work on ) I'll try these with various abrasive polishes etc and report back in a few weeks. :biggrin:
 
Top Bottom