byounghusband
Member
I received an email from a member of this forum and the Dallas Area Woodturners asking about my buffing system he saw when he took my Basic Pen Turning class a few months back. So I figured I would write this up for those who might be interested.
I had a JET 1014 and thought that three wheels were to tight in there, so I made a two wheel buffer and kept the third wheel on the bolt it came from Beall with. I feel I have more room that way, but it is a personal choice. The measurements are for the two wheel system...
Parts:
1 13" long piece of 3/4" All-thread
6 3/4" Hex nuts
1 3/4" Nylon locking hex nut
4 3/4" x 2" fender washers
Approx. 6" of 3/4" PVC pipe
3 Buffing wheels matched to the buffing compounds you will use. I got the wheels from Beall.
First you need to mill down about 1-1/2" fo the all-thread down to 1/2" so it will fit in the jacobs chuck on your lathe.
Second, you need to enlarge the hole in the buffing wheels to accomodate the 3/4" all-thread. I traced the diameter of the all-thread onto the wheels and cut it with a razor knife. It took a bit of time because the wheels are many layers...
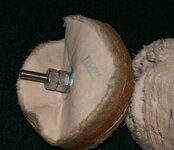
Thread two hex nuts onto the all-thread down to the point where the milling ends. Follow with a fender washer and the Tripoli wheel, another washer and another hex nut. Tighten them to squeeze the wheel. (1st pic)
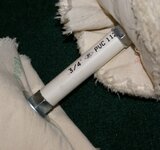
Then add a 4-1/2" piece of the PVC pipe on and a hex nut, the White Diamond wheel, another washer The PVC is to protect the pens from the spinning allthread (and my knuckles!! DAMHIKT!!! ) (2nd pic)
Add two hex nuts. Tighten them to squeeze the wheel.
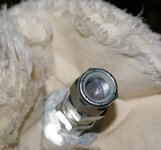
Now add another hex nut and the nylon hex nut so the nylon hex nut is about 1/2 way on. (3rd pic)
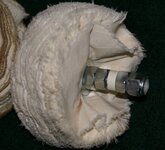
Measure the space between the 5th and 6th hex nuts and cut a piece of PVC to fit in that space. Remove the nylon hex nut and the 6th one, add the PVC, then the 6th and nylon hex nuts. Tighten everything. (4th pic)
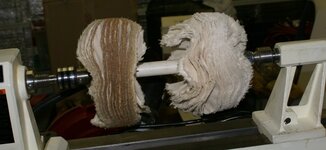
On the lathe (5th pic)
I had a JET 1014 and thought that three wheels were to tight in there, so I made a two wheel buffer and kept the third wheel on the bolt it came from Beall with. I feel I have more room that way, but it is a personal choice. The measurements are for the two wheel system...
Parts:
1 13" long piece of 3/4" All-thread
6 3/4" Hex nuts
1 3/4" Nylon locking hex nut
4 3/4" x 2" fender washers
Approx. 6" of 3/4" PVC pipe
3 Buffing wheels matched to the buffing compounds you will use. I got the wheels from Beall.
First you need to mill down about 1-1/2" fo the all-thread down to 1/2" so it will fit in the jacobs chuck on your lathe.
Second, you need to enlarge the hole in the buffing wheels to accomodate the 3/4" all-thread. I traced the diameter of the all-thread onto the wheels and cut it with a razor knife. It took a bit of time because the wheels are many layers...
Thread two hex nuts onto the all-thread down to the point where the milling ends. Follow with a fender washer and the Tripoli wheel, another washer and another hex nut. Tighten them to squeeze the wheel. (1st pic)
Then add a 4-1/2" piece of the PVC pipe on and a hex nut, the White Diamond wheel, another washer The PVC is to protect the pens from the spinning allthread (and my knuckles!!
Add two hex nuts. Tighten them to squeeze the wheel.
Now add another hex nut and the nylon hex nut so the nylon hex nut is about 1/2 way on. (3rd pic)
Measure the space between the 5th and 6th hex nuts and cut a piece of PVC to fit in that space. Remove the nylon hex nut and the 6th one, add the PVC, then the 6th and nylon hex nuts. Tighten everything. (4th pic)
On the lathe (5th pic)

