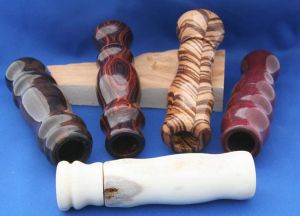
Comparison b/w BLO-CA and straight CA

Signed-In Members Don't See This Ad

Tiger

Member
Joined
Feb 15, 2009
Messages
245
Location
Melbourne, AUSTRALIA
I have tried a number of different CA finishes usually after the particular author gives a ringing endorsement of their method. I have now settled on 2 methods that have been more consistent for me. One method is 15 to 20 coats of thin CA applied with either paper towel or craft foam. The other method is BLO/CA applied as per William Young's WoodTurning BLO and CA Pen Finish - YouTube

I have never however been able to get a deep gloss with the second method so I thought I'd do a bit of measurement. I applied 3 coats as per William's method and measured the finish with digital calipers, it was barely a few hundreths of a millimetre thick, another 3 coats and not much difference. The resulting coat is very thin and should you try and sand it, the CA will disappear. It would appear that most of the CA finishes up on the paper towel applicator. What I liked about this method was that it is quick but more importantly no sanding required. You do get a nice smooth finish but that's the BLO, very little CA actually gets on the blank. Should have known this was too good to be true.
 
Last edited:
Signed-In Members Don't See This Ad

bradh

Member
Joined
Mar 9, 2005
Messages
688
Location
Aurora, Ontario, Canada.
Hi Tiger,
The CA/BLO finish is easier to learn, the BLO acts like a lubricant and accellerant and allows one to get the finish smooth without much sanding. Sanding should be minimal starting at about 1800MM or finer. Be even more careful if wet sanding, wet sanding removes much more material than dry sanding since the water keeps the abrasive clean and cutting. I normally do put more finishing coats on a CA/BLO finish than a CA/accelerator or a straight CA finish.
I find that BLO does tend to cloud the CA slightly and that is the reason I use CA and accelerator instead of CA/BLO now. I am after an extreme gloss on my pens so the slight clouding is critical.
Both finishes you mention will work and I sucessfully used both on many pens.
 

Tiger

Member
Joined
Feb 15, 2009
Messages
245
Location
Melbourne, AUSTRALIA
Hi Brad, the wet sanding is a good point as no doubt it does cut more aggressively than dry but I've found there is so little CA on the blanks with this method that anything other than very fine sanding takes it all off. You mention that you need more coats using CA/BLO than straight CA, that would defeat the purpose somewhat as the benefit as I see it with Bill's method is the speed. I've not had any cloudy issues with this method but I learnt long ago that you only need a drop of BLO, any more than that seems to cause issues.
 
Joined
Aug 2, 2011
Messages
230
Location
Crestview Fl
I like to use 5 coats of CA then a coat of BLO... I do this process 3 times then wet sand with MM and follow up with novus ... works for me and like the results..
 

Tiger

Member
Joined
Feb 15, 2009
Messages
245
Location
Melbourne, AUSTRALIA
It would appear that most people use somewhere in the order of 15 to 20 coats which makes sense if you are seeking a deep glass-like gloss. Would still be interested in knowing whether anyone can get that same gloss with either Bill's method or any other but on the evidence so far it's unlikely.
 

NewLondon88

Local Chapter Leader
Joined
May 15, 2008
Messages
5,077
Location
Claremont NH
It would appear that most people use somewhere in the order of 15 to 20 coats which makes sense if you are seeking a deep glass-like gloss. Would still be interested in knowing whether anyone can get that same gloss with either Bill's method or any other but on the evidence so far it's unlikely.


I had to check and see how long you'd been on IAP when you said that.
many are able to get deep gloss finishes and have been sharing the
'secrets' for many, many years here in the forum. I hate to be one of
those "Use the Search Function" people .. .but really.. the answers have
been given hundreds of times by many people over the years.

I think people believe this is much harder than it is.. and so they approach
it that way. It becomes a self fulfilling prophecy.

It doesn't take 20 coats to get a deep gloss. You can get it with or
without BLO. BLO itself shouldn't cause hazing. (why would we ever use
it if it did that?!?) but the wrong accellerator, excess humidity and oily
woods can cause it.. You can use Thin, Thick, Medium, Gel .. they all
work. and they all work well. You can use paper towels. You can use
Viva. You can use Bounty. You can use blue shop towels. And contrary
to the rumor I started, you can wear any color socks you like.

If you are sanding off your finish, that means you are starting with an
aggressive grit. If you need to do that, there is already something wrong
with the way you are applying the CA. Properly applied, (perhaps with a
bit of BLO on the paper towel) the CA should be fairly glossy while you
put it on and rub it in. It might dull a little and then the gloss will come
back up as you're rubbing. You're putting on a thin shell. It'll be hardening
as you are rubbing it in. (if you're using BLO .. if you're not, then
by now you're picking pieces of paper towel off of your blank) You can
use accelerator or not. Then do it again.. a few times more. Each coat
only takes a few seconds. When you're done, you only need to sand if
you see ridges. (ie.. you messed up!) otherwise, you might just hit it
with a little plastic polish to kick the shine up a little more. Plastic polishes
are really nothing more than very very fine sandpaper without the paper.

What you DON'T want to do it build up a thick shell just so you can sand
it back down to the right size and then polish it.. hoping you'll get a nice
gloss. You won't. Your CA will probably be full of air bubbles and haze.

Most of all, relax with it. It's only hard if you approach it like it is. Don't
give that power to a little bottle of glue. And if you'e not enjoying it,
what's the point?
 

leehljp

Member Liaison
Joined
Feb 6, 2005
Messages
9,325
Location
Tunica, Mississippi,
Charlie,

Time has done passed us by! :biggrin: Nobody gonna listen to us anymore! :rolleyes: I finally realized that "experience" was a better teacher than me. :wink:

CA finishes below. The technique used was 'experience':


Tiger

Member
Joined
Feb 15, 2009
Messages
245
Location
Melbourne, AUSTRALIA
NL, I've read through a lot of posts and a number of pen turners use multiple coats somewhere of the order of 15 to 20 for thin CA, 5 to 10 for medium CA. I use MM wet to bring it up to a nice gloss but do start at the 1500. My application still needs work because I'm unable to just put a polish onto the work after applying the CA, there are usually small ridges or bumps particularly when I've used medium or thick CA. Agree that if you apply the CA properly then sanding is minimised but not to have to do it all is a little hard to comprehend at least for a man of my ability. Still, is there one particular technique that you've found to be consistent and easy to apply? Happy to try different techniques.
 

leehljp

Member Liaison
Joined
Feb 6, 2005
Messages
9,325
Location
Tunica, Mississippi,
TC,

Have you ever wet a finger just a bit and ran it around a crystal glass until it begins to "sing?" Just a little too fast or too slow and it doesn't work. Just a tad too much pressure or too little pressure and it doesn't work. I will get back to this analogy in a minute.

There are those on here who can't make head or tails out of all the different ways of applying CA and they still make beautiful finishes. Those that seem to have the most difficulty, IMO, are those who look for a "list" - step 1, step 2, step 3 etc.

The differences between those that just jump in versus those that require written out or video/pictures is those that just jump in - they experiment, observe and learn from their experiences. The problem with the "lists" and "Videos" is that EACH person is doing like the crystal analogy above. To one person, he or she is applying it just like they see in the video. But the fellow in the video is apply different amounts of pressure - just the right amount. To one person, light pressure is "heavy" pressure to another. To one person, they are moving the CA/Paper Towel at the "same speed" as the video, but in reality they are not.

Timing, speed, pressure ARE abiguous and subjective to EVERY individual. Without direct personal interaction from a mentor at the time of applying CA, the variables are enough to cause 100 variations in CA application. And with some adaptions, they work. And each will be written up differently.

BUT, The closest thing to a "magic bullet" is experience and observation.

You have posted your observations and experiences already and that is GREAT. There will be dozens later on to read your experiences and have just as much trouble doing it your way. The REAL problem is that "words" are so subjective in meaning and that the reader has a different take on the word than the writer, simply because they don't have the experience to "qualify" the words the same as you meant.

The best way to get on the "same page" in CA application is through personal experience. Some take longer than others.
 

NewLondon88

Local Chapter Leader
Joined
May 15, 2008
Messages
5,077
Location
Claremont NH
NL, I've read through a lot of posts and a number of pen turners use multiple coats somewhere of the order of 15 to 20 for thin CA, 5 to 10 for medium CA. I use MM wet to bring it up to a nice gloss but do start at the 1500. My application still needs work because I'm unable to just put a polish onto the work after applying the CA, there are usually small ridges or bumps particularly when I've used medium or thick CA. Agree that if you apply the CA properly then sanding is minimised but not to have to do it all is a little hard to comprehend at least for a man of my ability. Still, is there one particular technique that you've found to be consistent and easy to apply? Happy to try different techniques.

TC.. it's true that you'll see many people putting on 15-20 coats. But
read between the lines.. they put on 20 coats.. and then they sand
it off!
Sometimes they completely remove the CA by sanding.

Also, since forums are, by nature, a democracy, every voice gets heard.
But not everything we read is valid. How many times do we see someone
typing that they use 3 or 4 coats of Renaissance Wax on their pens?
More must be better, right? But what they fail to realize is that each
application of the Ren Wax is removing the previous application. The wax
doesn't build like lacquer or shellac do.

Actually, there's so many posts about it, I can see where it would be
difficult to sort the wheat from the chaff (so to speak) But let's think
on this a second.. the CA comes out as a liquid. The liquid is glossy. If
you spill it, it will dry glossy. So .. where is this gloss getting lost? Perhaps
the sanding of the blank isn't quite done yet? Or maybe it is very porous
and needs to be sealed? Nothing wrong with getting a sealer coat on
there (even if the sealer coat is CA) and sanding that down again. Then
start the CA finish. I would use a strip of paper towel with a couple of
drops of BLO on it for now. It will stop the towel from sticking. Also
helps keep the glue from getting to your skin!

If you put it on wet and put on a lot, it will give you ridges. You want to
apply a couple of drops to the towel, put the towel to the blank and rub
till it's firm. You're moving the towel as the blank is moving... your CA
coat should be at least as smooth as your prep work. It should be
smoother.. since the CA will fill in any sanding scratches that were there
before. So it should now be glossier than it was. Back to the towel for
another drop or two.. rub it into the blank. You're rubbing till the glue is
firming up. Smoothing it out. Working the finish. (not glopping on glue
to be sanded off later) After your second coat of CA, the blank should
be the shiniest it has ever been. Now a 3rd coat. Same thing. Work it in.
You should be able to put down a CA finish that doesn't need sanding.
CA wants to be a glossy finish by it's nature..until WE mess it up!

After all, if we're just going to get it wet and hope for the best, might
be better off dipping it in lacquer a few times and letting it sit for a month
before sanding and polishing.

Wow. I think I need a bigger soapbox.

Grab some scrap wood out of the bin and make some long round
sticks. It's a good place to practice and it will only cost you some time.
Pretty soon it will be your turn to cover the CA shift. :tongue:
 

Tiger

Member
Joined
Feb 15, 2009
Messages
245
Location
Melbourne, AUSTRALIA
Hank well expressed and lovely work by the way that you posted in this thread. I've done a lot of experimenting with CA finishes. I like the prescriptive methodologies that set out step by step what you need to do, they make it a bit more idiot-proof :biggrin:.
You make some valid observations about why different people will obtain different results even though they follow a method precisely.
One observation that I have made based on your photos is that the reflection shows a scratchless finish, I've looked at mine and can see evidence of scratching although you need a magnifying glass to see it, trouble is I already spend a lot of time sanding so to have to increase it more is going to be a pain.
 

Tiger

Member
Joined
Feb 15, 2009
Messages
245
Location
Melbourne, AUSTRALIA
Thanks NL, what happens to me is that when I apply the BLO/CA to the blank it does become shinier but after a few seconds it loses its gloss. I'll try sealing the wood with CA first, that's about the only thing I haven't tried yet and it is olive wood so it may help. The digital calipers though don't lie and for 6 coats not much is actually getting onto the blank, perhaps it's being absorbed quickly into the wood?
 

NewLondon88

Local Chapter Leader
Joined
May 15, 2008
Messages
5,077
Location
Claremont NH
I'll try sealing the wood with CA first, that's about the only thing I haven't tried yet and it is olive wood so it may help.?

oh, hold the phone!

Olive is a very oily wood.. it doesn't like to accept ANY sort of finish
(like other oily woods) so you need an additional step first. Get a clean
rag and wipe down the blank with acetone. Some say denatured alcohol,
some say use the CA accelerator, but acetone cuts through the natural
oils in the wood so you can get some CA in there. Wipe it down, let it
dry a few seconds and give it another wipe down. THEN hit it with your
BLO and CA. That could be the game changer. Start your finish as soon
as the acetone dries. Otherwise the oils just come back up to the surface.
These same woods don't glue together very well...it's the same problem.

Oily woods are like that. Cocobolo and other rosewoods act the same.
as do ebony, bubinga, lignum vitae, kingwood etc.
 
Last edited:
Joined
Aug 5, 2009
Messages
3,229
Location
Millersburg, OR
Oily woods are tricky and so are porous ones because it takes more to get a smooth coat. Also how many coats doesn't tell you how much is on the blank or how much was sanded off. Better the prep work the better the finish. With oily woods sometimes I'll wipe with acetone then wait until the next day do it again then finish. I'll still leave it for a day or so to see if it fogs up, easier to fix it before it is a pen. I also think CA polishes better and feels harder if I wait overnight to micro mesh and polish. A CA finish is more art than science.
 

ctubbs

Member
Joined
Sep 12, 2010
Messages
3,588
Location
Murray, Kentucky
On open porous woods, Oak and such, I usually sand in the first coat of CA to fill the pours with CA and dust. On light wood, though, you MUST use paper with a light colored grit or there will be black dots all over the blank as the grit falls off and gets stuck in the pours. Please, I beg you, DAMHIKT
Charles
 

its_virgil

Member
Joined
Jan 1, 2004
Messages
8,117
Location
Wichita Falls, TX, USA.
I use a slurry of CA and sanding dust on all woods as a sealer. Oily woods, as Charlie noted, need to be wiped with something to remove the oil. Denatured alcohol is not the best to use for this since alcohol will contain moisture.
Do a good turn daily!
Don

On open porous woods, Oak and such, I usually sand in the first coat of CA to fill the pours with CA and dust. Charles
 

Tiger

Member
Joined
Feb 15, 2009
Messages
245
Location
Melbourne, AUSTRALIA
Did some more experimenting, sealed the olive wood with thin CA and also tried acetone on another piece of wood. The result was a mild improvement when using the BLO/CA method. I would describe the finish achieved as somewhere between a satin finish and the deep gloss finish that I've seen. I just can't see how you can get the glossy finish without some sanding even if it's very fine sanding. I still believe that I'm not getting much CA onto the blank and all I'm achieving is largely a burnishing effect as the the only time the blank seems to grow in shine is when I rub the towel very hard against the wood. Now I'm talking specifically about Bill Young's method where there is no sanding. I did use the last 4 grits of MM and guess what, some of the finish came off.
 

leehljp

Member Liaison
Joined
Feb 6, 2005
Messages
9,325
Location
Tunica, Mississippi,
Tiger,

I have not been one to check "Show off your pens" very regularly in the past 2 years so I could have missed quite a few posts. However, I read many posts on finishing that mention William Young's method and no need for sanding. I have not seen a pen finished with his method with a photo up close in the "photography" section. So, what I am getting at is this: I think we are talking about two different levels of acceptance. That method may be great for achieving a very good finish - much like a very good quality piece of furniture purchased at a major chain department store. However, there is the next level of furniture that is custom made and hand finished that will be or has been handed down for several generations.

The photo of my duck calls that reveal the shine better than smaller pens do - that kind of shine will practically never be achieved by a "no sand" method. Even "spray painting" will need a polishing and waxing to achieve that kind of finish consistently.

So, what we have here is two differntly levels of acceptance - Very Good for the masses versus "I will not settle for anything less than the best". To beginners and even those who have been doing this a while, they tend to see finishing methods as all the same in the end. I don't agree, as there are two different levels. I keep a 5X magnifying loup by my lathe and check the finish regularly.

I write this from the perspective of having lived in Japan and saw flawless lacquer finishes for years before starting to make pens. When I started making pens, even in my first year, my goal was to have a finish that had a quality of smoothness/shine that the lacquer finishes had on them. While the finishes were different, the shine was as much a "discipline" of the maker as it was from the content of the finish. Undisciplined people (without the practice needed for high skill levels) can take the Most Expensive quality lacquer and never achieve the quality of finish that the finish is capable of being. It is as much a combination of skill that comes from practice as it is from the qualities of the finish itself.
 
Last edited:

leehljp

Member Liaison
Joined
Feb 6, 2005
Messages
9,325
Location
Tunica, Mississippi,
I am going to add a second part to what the fellows above said about "oily" woods and specifically Olive Wood. What they said is true overall, but with considerable experience there are workarounds to having to rub the woods down with denatured alcohol, accellerant, acetone or other. I have made over a dozen pens with BOW in which I could not wipe them down because they were segmented and any liquid would cause "bleed over". What I did was "dry rub" the blanks. I would turn the lathe on low speed and with paper towel, lightly to mildly rub paper towel for 30 to 45 seconds to heat it up. Wait a minute and do it again. 3 or 4 times. The heating up would do the force the moisture out and the paper towel would absorb it. I would let the blank cool for about 30 minutes. This led to evaporation which further "dried" it. This in effect did the same as the liquid dryers.

As a note, I use bloodwood often, and holly and BOW and ebonies in segments. Bloodwood and ebonies will "bleed" onto holly and BOW with most of the liquid dryers mentioned. So I do what I can to avoid this. Therefore, I use the "dry rub" method.

I have not had a problem the the BOW pens that I have made. Nor have any of the segments had a problem with movement as some expressed on another thread a couple of weeks ago.
 

NewLondon88

Local Chapter Leader
Joined
May 15, 2008
Messages
5,077
Location
Claremont NH
I just can't see how you can get the glossy finish without some sanding even if it's very fine sanding. I still believe that I'm not getting much CA onto the blank and all I'm achieving is largely a burnishing effect as the the only time the blank seems to grow in shine is when I rub the towel very hard against the wood. Now I'm talking specifically about Bill Young's method where there is no sanding. I did use the last 4 grits of MM and guess what, some of the finish came off.

1. Chew on this: CA is glossy in the bottle. It dries glossy by it's nature.
SOMETHING in between is causing the loss of gloss.
2. If you have a drop of oil on the towel acting as a lubricant, the CA
should smooth out to a glossy finish.
3. MM is an abrasive, so yes.. it will be removing finish. Polishes are also
abrasives, but usually much finer grit. Some as small as 1/2 micron.
The 12,000 micro mesh is about 2 micron.

If you're going to be sanding, then you'll need to apply more coats of
CA so you'll have something to sand off.
 

ctubbs

Member
Joined
Sep 12, 2010
Messages
3,588
Location
Murray, Kentucky
OK, everyone, I know this question is subjective, but how much pressure are you using to apply the CA? Remember, you are applying a liquid and anything other than light pressure, just enough to make contact with applicator to blank, very well may be way too much. I find when I loose concentration finishing, I'll apply way too much pressure squeezing the CA away from the blank and putting it somewhere else giving me a way too thin layer of finish. This will apply to any liquid finish.
Charles
 

leehljp

Member Liaison
Joined
Feb 6, 2005
Messages
9,325
Location
Tunica, Mississippi,
Charles,

I do use paper towel on occasion . . . until I get frustrated and go back to either rubber gloves or a flat non-absorbant applicator. I put 2 or 3 drops on the rubber glove/applicator and watch it flow on and over as I move my finger or the applicator. Of course this is with the lathe turning* the blank on slow speed - 600 RPM or so. For me, pressure is enough that I can feel/sense the CA flowing between the wood and applicator. Too much pressure causes a different feeling and because of expereince, I know that it is about to "catch" and wrap around the blank. I know that feeling WELL! :eek: :rolleyes: So, I just back off a little when I sense this point. or add another drop of CA.

Now the purpose of getting to this point - It is like a master chef who knows the window of a few seconds when something is not done enough versus too done. By taking and rubbing to the point it is nearing tacking, (getting tacky) you can add a second coat within a few seconds and build up layers quickly and it will harden within minutes. IF on the other hand, you play it safe and withdraw the pressure too soon, a thicker layer will be there but it is probably 3 to 7 seconds from being tacky. If other layers are added onto this, hardening times and curing times are increased to minutes, and when the temps are in the 70's the hardening and curing times are in the 10's of minutes.

The key is finding that window of 1 to 3 seconds between being rubbed to the point of being tacky but just before it "grabs" and wraps around the blank.

For me, in this hot weather, I hold the CA above the turning blank and add a drop when it starts feeling tacky and thin layers build up to thick layers quickly this way. AND for me, I can do this better with THIN CA than I can with medium or thick. Others have a different feel and their results with medium or thick show that they can do well with those.


With Paper towel, more CA is absorbed in the PT than gets on the blank. Pressure is different with PT than with a flat applicator or rubber gloves. The CA hardens the PT and it forms around the turning blank. It was hard for me to judge the pressure consistently with PT. I would be very interested in seeing what others say. That was a good question you posed.


*A couple of months ago I was surprised to read of a few people who coat with CA while it is NOT turning. I don't understand how a consistent depth all the way around can be achieved with that method.
 
Last edited:

Tiger

Member
Joined
Feb 15, 2009
Messages
245
Location
Melbourne, AUSTRALIA
Hank, I accept now that there are 2 levels of finish, I suppose I wanted to believe there was a easier, quicker way to get there but as I said previously anything that sounds too good to true usually isn't. Good tip about the olive wood although the wood that I have is very dry and has no problems accepting the usual CA finish. You're right about the application of CA, it takes time to learn how long to apply, how long and hard to apply, definitely an experience thing.

NL, agree with all your points, something is happening that causes the CA to "disappear", it goes on glossy but seems to evaporate as the lathe spins, I suspect that the BLO may prevent absorption. Also, Bill says in his video that you need to press down hard to get the CA to cure, that may well lift more CA off the wood.

Charles, you are right, correct pressure is essential. I found that out when I switched from paper towels to craft foam but Bill Young empasizes using a lot of pressure in his video so that's what I did.

In the end Hank has probably got it right, unless we compare the different types of finishes next to each other it's all too hard to assess. The thought of not having to sand and still getting that wonderful finish is just too hard to accept.
 

NewLondon88

Local Chapter Leader
Joined
May 15, 2008
Messages
5,077
Location
Claremont NH
In the end Hank has probably got it right, unless we compare the different types of finishes next to each other it's all too hard to assess. The thought of not having to sand and still getting that wonderful finish is just too hard to accept.

Well .. I don't think you'll get a finish like Hank's without sanding. But
he's in a whole different category.

My own pressure is probably somewhere between Bill's and Charles.
I don't do it like a friction polish, but I don't just get the CA onto the
blank and then sand it round and shiney, either. Like Hank said, there is
a point that you can feel ... really no sense trying to explain it, as Hank
did a good job of that. It's one of those things that you understand when
you read it .. .IF you already understand it and don't need to read it. :eek:

But you can get a good gloss without sanding. Many people do.
Perhaps the fact that you don't believe it is causing you to approach it
in such a way that you aren't able to? I don't know. Just an armchair
psychologist type idea. :tongue:

The danger in just getting the CA onto the blank without working it in is
that the lathe is moving as you apply it, so all those revolutions give air
bubbles a chance to get into the CA. That can give you a cloudy or hazy
look. (under high magnification you'll see air bubbles, but to the naked
eye it may just look like haze)

Please keep in mind that if my posts sound 'negative'.. it is because I
know of all the things that are wrong because I have done them all. I'm
no finishing guru.. I just put my $.02 in on this thread and stuck with it!
 

Tiger

Member
Joined
Feb 15, 2009
Messages
245
Location
Melbourne, AUSTRALIA
In the end Hank has probably got it right, unless we compare the different types of finishes next to each other it's all too hard to assess. The thought of not having to sand and still getting that wonderful finish is just too hard to accept.


But you can get a good gloss without sanding. Many people do.

Is there a post/file that explains your method in more detail?
 

robutacion

Member
Joined
Aug 6, 2009
Messages
6,514
Location
Australia - SA Adelaide Hills
Charles,

I do use paper towel on occasion . . . until I get frustrated and go back to either rubber gloves or a flat non-absorbant applicator. I put 2 or 3 drops on the rubber glove/applicator and watch it flow on and over as I move my finger or the applicator. Of course this is with the lathe turning* the blank on slow speed - 600 RPM or so. For me, pressure is enough that I can feel/sense the CA flowing between the wood and applicator. Too much pressure causes a different feeling and because of expereince, I know that it is about to "catch" and wrap around the blank. I know that feeling WELL! :eek: :rolleyes: So, I just back off a little when I sense this point. or add another drop of CA.

Now the purpose of getting to this point - It is like a master chef who knows the window of a few seconds when something is not done enough versus too done. By taking and rubbing to the point it is nearing tacking, (getting tacky) you can add a second coat within a few seconds and build up layers quickly and it will harden within minutes. IF on the other hand, you play it safe and withdraw the pressure too soon, a thicker layer will be there but it is probably 3 to 7 seconds from being tacky. If other layers are added onto this, hardening times and curing times are increased to minutes, and when the temps are in the 70's the hardening and curing times are in the 10's of minutes.

The key is finding that window of 1 to 3 seconds between being rubbed to the point of being tacky but just before it "grabs" and wraps around the blank.

For me, in this hot weather, I hold the CA above the turning blank and add a drop when it starts feeling tacky and thin layers build up to thick layers quickly this way. AND for me, I can do this better with THIN CA than I can with medium or thick. Others have a different feel and their results with medium or thick show that they can do well with those.


With Paper towel, more CA is absorbed in the PT than gets on the blank. Pressure is different with PT than with a flat applicator or rubber gloves. The CA hardens the PT and it forms around the turning blank. It was hard for me to judge the pressure consistently with PT. I would be very interested in seeing what others say. That was a good question you posed.


*A couple of months ago I was surprised to read of a few people who coat with CA while it is NOT turning. I don't understand how a consistent depth all the way around can be achieved with that method.

G'day mate,

I've been reading this whole thread with some interest, and see how many ways there is to actually skin a rabbit however, it can change things considerably depending upon the way that bunny was killed, huh...???:wink::biggrin:

While I don't believe that, a coat of BLO over 4 or 5 coats of CA, wouldn't do a damn thing, as the wood is already sealed with the CA so the BLO has nowhere to go but stay on the surface, waiting to be rubbed/sanded off...!

Anyway, what made me start this post was you statement marked in red...!

I may be one of those people you're read that, do that regularly. However, I only use that technique when I need to soak deeply and cover/fill some irregularities that would be almost impossible to level, using the traditional CA method application with the lathe spinning.

Is amazing how much CA stays on, applied that way, as I proceed to sand if down with dry 240 quality grit paper, again with the lathe OFF and sanding longways (length of the blank). One other important detail in this smoothing and levelling process is, to use a block (solid material) on the sandpaper's back.

Time wise, and only on surfaces that require such a initial "levelling" process, I found that, the 5 minutes (more or less) that will take to finish this first stage, ready for the normal CA application following coats, are a very good time investment as not only, the blank would achieve a supper deep finish with under 10 coats but, without this firs prep. stage, you will for ever putting CA and than sanding it off, in the attempt of levelling the blanks surface.

I tested 20 coats of medium CA with no sanding at all, and then cutting back with a gouge (skew or other) and the high spots become either exposed or with little CA over them, making it very easy to sand off all together, during the wet sanding final steps, creating those dreadful "dull spots" that we some much hate...!

Again, not all blanks/surfaces require this first "heavy duty" surface levelling treatment but, those that do, do very good with it...!

This is my story and I stick with it...!:wink::biggrin:

Cheers
George
 

ctubbs

Member
Joined
Sep 12, 2010
Messages
3,588
Location
Murray, Kentucky
Hank nailed it! I can put lots of words on paper trying to express what my fingers do automatically without even really thinking about it, without ever truly saying just what my fingers are doing. As stated before, just how much pressure is 'light' or 'heavy'? If you could even get into my shop, I could hold your hand and allow you to feel the pressure I use. That is not going to happen in the forum. Hank said it best. The only way I learned the decisive second was watching the towel go around the blank then pealing it off and starting over. Being a slow learner, that fun time happened more than once for me. It may be even worse to turn loose too soon because then the dreaded 'ridges' pop right up. What I should have done is what has been suggested over and over, grab some pine, make some blanks, spin them round and apply finish. Turn that off and do it again and again and more until your hand does the finish without you having to really think about it.
On the other hand, just when you get it down, something will change and you get to start all over again.:rolleyes::):doctor:
Charles
 

NewLondon88

Local Chapter Leader
Joined
May 15, 2008
Messages
5,077
Location
Claremont NH
Is there a post/file that explains your method in more detail?

No.. and I think that's the point we've all been dancing around.
Every method is really just explaining what works for that person.. but
they're all doing pretty much the same thing. getting glue onto the wood.
The rest? Comes from your own experience. That's why someone says
one thing works and others say it doesn't. Well, it does for that person!

I'm guilty of the same thing. Here I am saying you shouldn't load up the
blank with glue and sand it off .. while others are saying that this is what
works for them. I've done it, and I had problems.. but if others do it and
it works for them.. then it's a legitimate method of application.

The most important things you can do:
Make lots of scrap blanks and practice.
Don't make more of it than it is.. don't over-think it.
You're just putting glue onto wood and making is shiny.
 

KenV

Member
Joined
Oct 28, 2005
Messages
4,720
Location
Juneau, Alaska.
One point I have not seen in this thread is that one can have too much finish on the surface of the pen. --

CA is brittle when cured and can be subject to cracking (crackling) when the buildup is large. I am not talking about the classic split in the wood/corian/acrylic cracking but surface finish damage -- This is more prevalent/frequent as the CA ages in months and years (as compared to hours and days). Have refinished a few pens that have had surface cracks with excessive CA buildup

One needs to get enough to have a gloss finish, and provide a wearable surface, but not so much that the risk of surface failure increases --

I am seeking enough finish to polish and protect regardless of which one is used -- and no more.
 
Top Bottom