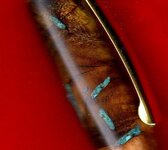
Turquoise (and other) inlays

Signed-In Members Don't See This Ad

Russknan

Member
Joined
Mar 13, 2012
Messages
537
Location
Nanuet, NY
I've seen some people on IAP produce beautiful inlays, particularly with turquoise. Having come across some occasional blanks with - ahem - voids, I'd like to learn how to do that. I couldn't find any info in the tutorials or by searching. If it's not proprietary information, could somebody please point me in the right direction? Thanks. Russ
 
Signed-In Members Don't See This Ad

plantman

Member
Joined
Jan 2, 2012
Messages
3,437
Location
Green Bay, Wi
Russ; It's realy simple. Fill the voids with the turquoise proud of the surface. Add thin CA slowely to the void/infill mixture and let dry. Don't add excellorator or it will cloud up. Try not to let the tip of your glue bottle touch the infill. Turn as normal. Jim S
 
Last edited:

Russknan

Member
Joined
Mar 13, 2012
Messages
537
Location
Nanuet, NY
Thanks for the FAST reply, Jim! Two more questions, if I may. Where do you get the turquoise? And do you usually fill when the blank is square, or turn it round before filling? Thanks again. Russ
 

PTsideshow

Member
Joined
Dec 26, 2011
Messages
1,033
Location
Macomb County Michigan
Hey Russ here is one place that sells it Inlay Materials You can also use embossing powder that the scrap bookers use Hobby Lobby, Micheal's. Just be careful with the embossing material as some may be ground up Mylar or polyesther material, as are some of the materials from Costal that are used in make up.

You also can used any of the powder pigments used for paints etc. like from here Non-toxic Pigments, Mica Powders and Mediums for Natural Finishes

or here COSMETIC GRADE POWDER PIGMENTS, IRON OXIDES, ULTRAMARINES, FD&C DYES, AND MICA POWDERS FOR SOAP MAKING AND TOILETRIES | The Ponte Vedra Soap Shoppe

Just keep the CA tip above the material if you use that adhesive, Or it can be mixed in the epoxy as a filler then pressed in the voids if you want. There is as many ways of doing it as members of the forum.
:clown:
 

Ed McDonnell

Member
Joined
Oct 20, 2008
Messages
2,294
Location
Melbourne, FL
Thanks for the FAST reply, Jim! Two more questions, if I may. Where do you get the turquoise? And do you usually fill when the blank is square, or turn it round before filling? Thanks again. Russ

If you want real gemstone inlays, there are plenty of places on the web where you can find all sorts of gemstones / minerals for sale. Buy what you want (beads or bags of chips), crush it to whatever texture you want and inlay just like Jim described.

Firemountain used to be a good place, but I haven't bought anything from them in a couple of years so it could be different now. Whatever you buy, make sure you don't buy dyed / stabilized or any other modifed gemstones. Only the real stuff will maintain it's color when crushed (and will be substantially more expensive).

If you get tempted by other great looking stones beyond turquoise, check the hardness before you buy. Some will be almost impossible to turn with normal lathe tools when inlayed.

I've always turned close to final shape / size before filling with expensive inlay material. You want to minimize the amount of expensive inlay material that ends up laying on the floor.

If you decide to fill when square and are doing very deep inlays, try filling in layers to insure the glue penetrates all the way.

Ed
 

plantman

Member
Joined
Jan 2, 2012
Messages
3,437
Location
Green Bay, Wi
Russ; A few quick tips I should have added. Get yourself a set of Dentists picks from HF. Use these to get into the holes and cracks to remove any loose or rotten material. Also when you fill in the holes, take your finger or some flat tool and press the filler in tightly, than add a little more to the top. Let the CA seep into the filler. Some times if you try to refill, you will get white spots on your blank. Also if you do have to refill, make sure you clean out all dust before adding CA. Most of my fillers I get from pens I have turned and saved the chips in the little screw together containers fly fisherman use to keep their flys or small lures in. Take a flat bottomed rod or dowel to grind into a fine powder. Others I buy from crafts stores or vendors on this site. Jim S Jim S
 
Last edited:

Jim Burr

Banned
Joined
Feb 23, 2010
Messages
3,060
Location
Reno, Nv
For years, I've used small crushed stone, coral, turquoise and others. Keep the part you want to inlay level...add a little stone, drip thin CA onto the fill and just spritz with CA from about 2'. Any more and you cloud. Rotate and repeat. Sand down the stone to just proud of the surface, Shear cut to flush, sand and finish as normal. Small pockets can be filled with a powder version of the stone used.
 

Russknan

Member
Joined
Mar 13, 2012
Messages
537
Location
Nanuet, NY
Wow! What a wealth of info! That's one of the things I love most about IAP. "Seek and you shall find." Actually, you'll find more than you could have imagined. Thanks! Russ
 

gbpens

Member
Joined
Jul 1, 2011
Messages
821
Location
Homer Glen, IL
Large voids should be filled in stages just as if you were working with plaster or wood putty. Press material into hole after applying a drop of thin CA. Begin filling well before the final dimension. Check for small pits and refill as necessary. You can use dust from sanding, drilling even turning. Powders and small pieces are available from various suppliers.
 

bobaltig

Member
Joined
Aug 11, 2004
Messages
86
Location
Crooked River Ranch, OR, USA.
I buy my stone inlay powders from Gilmer Rock Shop in Gilmer, TX. Very reasonable prices and wonderful customer service. Just google Gilmer Rock Shop and you will find their website.
 

sbwertz

Member
Joined
May 11, 2010
Messages
3,654
Location
Phoenix, AZ
I take small chips of turquoise and put them in the cut off finger of a nitrile glove. Then I pound on it with a small sledge hammer until it is reduced to the consistency of sand with some almost powdered. (The powdered stone is used to fill tiny cracks and flaws.) I sometimes add one or two small chips of red or brown or white stone to add depth to the inlay. You can see some of the tiny colored stones in the picture.

I turn the blank until it is about a 32 of an inch proud of the bushings, then dribble in a little of the turquoise and a drop of thin CA. Repeat until the stone stands a bit proud of the surface of the blank.

Turn with a carbide tool (the stone dulls a skew REALLY fast). Then sand and finish with CA or CA/BLO. Put on enough coats that any slight irregularities in the inlay are smooth.
 

Attachments

  • inlay.jpg
    inlay.jpg
    40.4 KB · Views: 544
Last edited:

Hendu3270

Member
Joined
Mar 13, 2012
Messages
919
Location
Pearland, Texas
The technique describe in this tutorial will work with mostly any inlay material

Inlay Turnings


That's pretty much the technique I use except for one main thing. I reverse the steps in applying the inlay material and glue. I use PearlEX powder. If I fill the voids with the powder and then try to apply the glue, the glue just clumps up and runs off and doesn't actually absorb into the powder, (regardless of thin, medium or thick). So I turn to pretty close to the final shape and then put a few drops of medium CA and already have my powder ready to "sprinkle" onto the CA. Then I use a piece of cardboard to spread the mixture into the voids. If a blank has alot of voids this may take several applications. Once it's all filled I make the final cuts with a carbide cutter and start sanding to remove inlay from around the voids.
 

sbwertz

Member
Joined
May 11, 2010
Messages
3,654
Location
Phoenix, AZ
The technique describe in this tutorial will work with mostly any inlay material

Inlay Turnings


That's pretty much the technique I use except for one main thing. I reverse the steps in applying the inlay material and glue. I use PearlEX powder. If I fill the voids with the powder and then try to apply the glue, the glue just clumps up and runs off and doesn't actually absorb into the powder, (regardless of thin, medium or thick). So I turn to pretty close to the final shape and then put a few drops of medium CA and already have my powder ready to "sprinkle" onto the CA. Then I use a piece of cardboard to spread the mixture into the voids. If a blank has alot of voids this may take several applications. Once it's all filled I make the final cuts with a carbide cutter and start sanding to remove inlay from around the voids.

Yeah, with embossing powder I put the glue in first, too. But I just use my finger to spread it. I keep a jar with an old dishrag and acetone to clean the glue off my hands because I always get it all over myself, no matter what I do, so I usually just give up and use my finger :biggrin:
 

sbwertz

Member
Joined
May 11, 2010
Messages
3,654
Location
Phoenix, AZ
Another tip on inlaying. Befriend your dentist! Ask him to keep old dental bits for you. They are great for cleaning out cracks and knots for inlaying. I chuck them up in my Wizard or dremel.
 
Last edited:

eliasbboy

Member
Joined
Sep 2, 2012
Messages
357
Location
Manhattan, IL
I keep old medicine bottles handy. Anytime I turn a colored or dyed blank I collect the scrapings and droppings, as it were. I they were great to decorate, or even covertly fix voids.
 

eliasbboy

Member
Joined
Sep 2, 2012
Messages
357
Location
Manhattan, IL
Another tip on inlaying. Befriend your dentist! Ask him to keep old dental bits for you. They are great for cleaning out cracks and knots for inlaying. I chuck them up in my Wizard or dremel.

I have an appointment next week! I will definitely be asking, thanks for the tip!!
 

Mr Vic

Member
Joined
Aug 11, 2008
Messages
1,865
Location
Falcon, CO
You can get some great Cripple Creek Tourquoise here Foxy Woodz | Larrys in our turning club and does awsome natural edge bowls with turquoise. He sells it in five grades fromfine = powder to rocks., His Tri-Pack is great for Cholla Cactus. Sprinkle the powder in for the base and to hide the tube soak with CA, then medium and use the small as filler. I like the look of exposed granules.
 
Top Bottom