Scallop form

Signed-In Members Don't See This Ad

avbill

Member
Joined
Oct 18, 2007
Messages
1,973
Location
San Bruno, CA, USA.
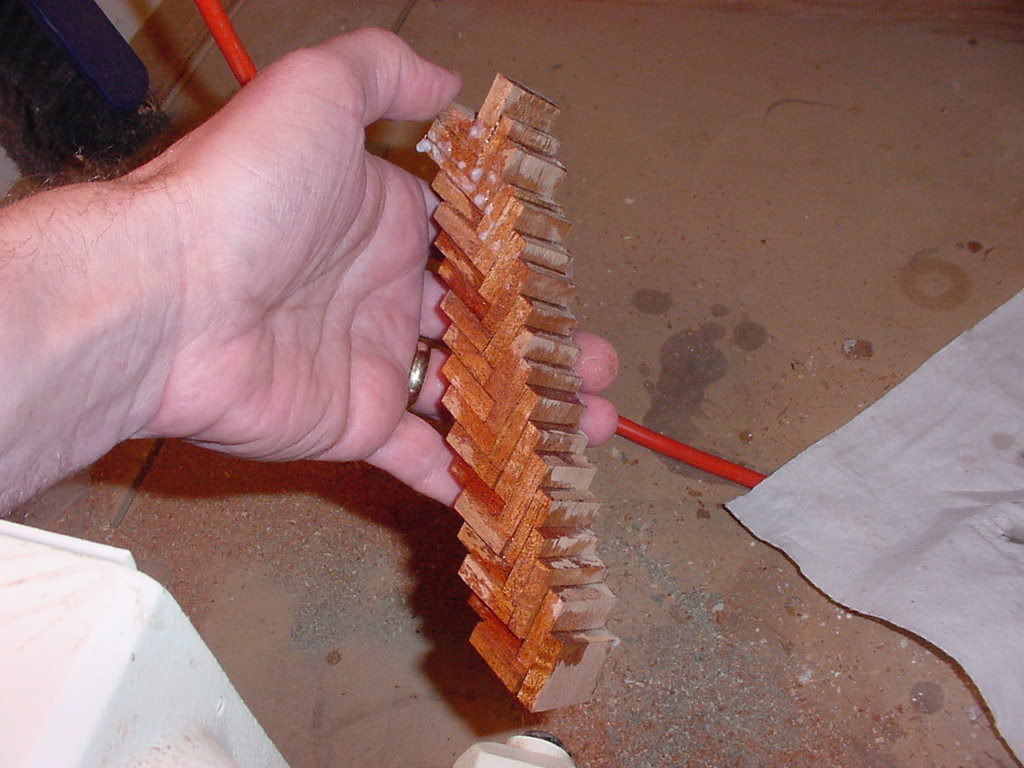
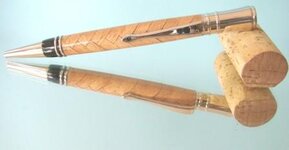
In the last several days there have been pens in the Show boat area showing a scallop design. I have studied the photos and my rusty mind is coming up blank as to figuring out the technique. Is there anyone what can explain it to this old dog.:dog:

thanks
 
Signed-In Members Don't See This Ad

Russianwolf

Member
Joined
Jul 13, 2007
Messages
5,690
Location
Martinsburg, WV, USA.
bill, they are just a series of miter cuts. two at each level on opposing sides (making an arrow point) and then move up about 1/4-1/2 inch, flip the blank 90 degrees and repeat the process. Not overly complicated, but a very pleasing design.
 

Skye

Member
Joined
Jan 3, 2006
Messages
3,487
Location
Rock Hill, SC
I've never done it, but think of celtic knot cutting, only smaller... and half.... but the same thing.... but not.
 

workinforwood

Member
Joined
Mar 1, 2007
Messages
8,173
Location
Eaton Rapids, Michigan, USA.
I find it works best to remove one side at a time and then replace it with the wedge piece, then cut the opposite side and replace it with the wedge piece untill you go all the way around the 4 sides. It's a simple process, but not really that simple to do.
 
Joined
Mar 16, 2008
Messages
165
Location
Hayward, CA, USA.
Here's how I do an easy herringbone style:
A series of 1/4" thick 2"X2" slices glued together (this is mahogony)...
MVC-212F.jpg


Turns to make nice scallops and beautiful edge grain (this is Eucalyptus)...
MVC-194F.jpg
 

Tim'sTurnings

Member
Joined
Aug 19, 2008
Messages
420
Location
Central Michigan
Vince. I am trying to glue up the herringbone blank you have pictured. Are you sure the pieces are 2"X2" ?? The one I am making looks a lot larger than the one you have pictured. Just checking but it looks like a lot of waste with a blank that size. Thanks,Tim.
 
Joined
Mar 16, 2008
Messages
165
Location
Hayward, CA, USA.
I'm not exactly sure what size those slices were cut ( I made that about 6 mo. ago) but your glued up piece should be at least 2" square when finished. Once you cut it down to the final blank size you should have enough material left to turn any diameter pen kit available and will leave enough edge distance to get past any occlusions in the wood.
 
Last edited:

DurocShark

Member
Joined
Jul 26, 2008
Messages
3,622
Location
Anaheim, CA
Maybe he has REALLY big hands?

I just made a blank like that (thanks Vince, you enabler!!!) from alternating padauk and clear maple 3/4" blanks. The padauk is tough to turn without blowing out the endgrain bits. I got it close to final shape and just soaked it in thin CA followed by a thick slavering of gel CA. Tonight I'll turn to to size and finish it.

So far it looks great. What an awesome idea!
 

vick

Member
Joined
Nov 16, 2004
Messages
1,447
Location
Gilbert, AZ, USA.
Maybe he has REALLY big hands?

I just made a blank like that (thanks Vince, you enabler!!!) from alternating padauk and clear maple 3/4" blanks. The padauk is tough to turn without blowing out the endgrain bits. I got it close to final shape and just soaked it in thin CA followed by a thick slavering of gel CA. Tonight I'll turn to to size and finish it.

So far it looks great. What an awesome idea!

You are a saddist. I made a Padauk and maple chess board once and it was a royal pain trying to keep the natural dye in the Padauk off of the Maple. Good luck finishing it. With as much work as it is making the herringbone blanks I would never be brave enough to try that combination.
 

Tim'sTurnings

Member
Joined
Aug 19, 2008
Messages
420
Location
Central Michigan
Thanks VisExp,

I saw that turorial but I didn't go clear to the bottom pages to notice the herringbone info. I still think the blank I made is too big using 2"X2" pieces. I just finished the glue-up and am waiting for it to dry. After I trim it up to make it square I am pretty sure I can cut it in half to make two herringbone blanks of about 3/4" square. That makes me think that if I used it to make only one pen blank I would be wasting material. When I get to the point of cutting it up to make it square and I end up with two blanks I will post a pic. I am not sure when I am going to make the pen/s out of it as I have other projects right now.

Thanks again to Vince and VisExp.
 

DurocShark

Member
Joined
Jul 26, 2008
Messages
3,622
Location
Anaheim, CA
You are a saddist. I made a Padauk and maple chess board once and it was a royal pain trying to keep the natural dye in the Padauk off of the Maple. Good luck finishing it. With as much work as it is making the herringbone blanks I would never be brave enough to try that combination.

I made an attempt at protecting against that.

1: I used CA to glue them up, putting a full coat on every touching face.
2: I soaked the entire thing in thin CA before trimming.
3: After turning to the general shape, I again soaked the whole thing with thin CA, then put a bunch of gel CA over that.

I'm hoping that will mitigate the bleed of the padauk.

Hope-a-hope-a-hope-a-hope.
 

Tim'sTurnings

Member
Joined
Aug 19, 2008
Messages
420
Location
Central Michigan
Herringbone blank

Hi y'all.

I was incorrect when I said I would probably get two blanks out of the herringbone pen blank because of the 2"X2"X1/4" squares.
I thought they looked pretty big as I was making it.

But instead of one herringbone pen blank I got two. Plus 4 more angled segmented blanks. So I got a total of 6 pen blanks, 4 3/4" X 3/4". :eek:

Thank you again, Vince.

Tim.
DCP_0721-1.jpg
 

alphageek

Former Moderator
Joined
Jul 19, 2007
Messages
5,120
Location
Green Bay, WI, USA.
Personally, I actually REALLY like the high contrast in colors of herringbone. I can't find my picture right now to show the concept, but I would say the key to high contrast is to pick 3 (or any odd #) of colors. Then each color moves around more in the pattern.

I'm impressed at this one - I don't think I would have been able to stop the bleed that well. I would suggest introducing a dark wood (walnut, rosewood, blackwood) as a third color in the above.. Then the pattern would be REALLY nice.
 

Brandon25

Member
Joined
Jul 17, 2008
Messages
185
Location
Louisville, KY, USA.
Dang, Sharky. That's a nice one! I've been patiently waiting to see your results. :)

What about alternating the pieces, instead of lining them all up at once? I bet that'd look really cool.

Can I ask how you cut the pieces accurately and repeatably?
 

DurocShark

Member
Joined
Jul 26, 2008
Messages
3,622
Location
Anaheim, CA
Can I ask how you cut the pieces accurately and repeatably?


The small sled on my TS. I clamped a stop block approx 1/4" from the blade (actually a bit more... The kerf in my sled is getting wider.) I just kept cutting bits off.

As long as the TS is true, you get perfect 90* angles that glue up easy and square.

Thanks everybody for the comments. I like the idea of a 3rd wood. Maybe walnut...
 

Skye

Member
Joined
Jan 3, 2006
Messages
3,487
Location
Rock Hill, SC
I like the high contrast too.

I think it would have looked good if on the padauk side you were able to find a blank that was SLIGHTLY darker and alternated it on the right side. I think that would have been sharp too.
 
Joined
Mar 16, 2008
Messages
165
Location
Hayward, CA, USA.
I'm sorry Tim and Don, I should have been a bit more clear on my blank size target.:redface:
1.51-1.5 to 2x2 is typically the size of the untrimmed blank (the slices are about 1.5" square) and after you finish sizing it on the table or band saw, my end result will end up being about 1" square. I'm a bit sloppy on my glue-ups and I'll trim off a lot of stock to get down to a nice solid smooth surface.

Very nice work both of you! I love the paduak and maple pen, it's gorgeous!


Thanks VisExp,

I saw that turorial but I didn't go clear to the bottom pages to notice the herringbone info. I still think the blank I made is too big using 2"X2" pieces. I just finished the glue-up and am waiting for it to dry. After I trim it up to make it square I am pretty sure I can cut it in half to make two herringbone blanks of about 3/4" square.
 

Stephen

Member
Joined
Oct 20, 2007
Messages
398
Location
Singapore, 568198.
Herringbone in maple

Thanks Vince,
I tried your method and glued-up with epoxy but it blew up when turning. The second I did with CA and turning was slow because my skew required sharpening every 3 or 4 passes. Plenty of thin CA used to keep it from blowing up. I am not happy with the end result as the finish appears to be 'bumpy' if my expression is descripitive of it. More sanding has made the blank too thin for my liking and finishing with CA has not helped. Perhaps I should add a few more coats of thick CA to get a better smooth finish.
Please see a picture of the pen . Any advice will be appreciated. I hope I am not going away from the original post. Sorry if I have.
 

Attachments

  • Copy of herringbone.JPG
    Copy of herringbone.JPG
    19.3 KB · Views: 195

Brandon25

Member
Joined
Jul 17, 2008
Messages
185
Location
Louisville, KY, USA.
Not that you asked me, but I used a 1/4" bowl gouge. Going with the direction of the pattern helped prevent tearout at the seams. Finished off with a sharp skew. Only problem I encountered was the different densities of the different woods (I alternated maple and walnut side to side) made the skew want to dig in deeper on the maple and skate over the walnut, so light passes helped, and I sanded to final dimension.
 

VisExp

Member
Joined
Oct 1, 2007
Messages
2,738
Location
Palm Coast, FL, USA.
Stephen, it is possible to build this blank using wood glue. When I built a herringbone blank I used Titebond original. It is easier to work with than CA, more time to align the pieces, and it dries clear without any shadow line. You do not have to use clamps. You can assemble the blank one piece at a time using a "rub joint". Put glue on a piece and rub it against the piece you are joining it to. As you rub you will start to feel resistance as the glue bonds. Align that piece and start on the next. I think you might also find turning the blank easier, there will be less resistance as you cut across the glue joints of the blank.
 
Top Bottom