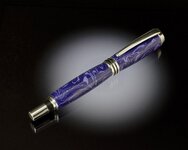
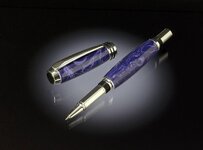
Purple TruStone Rollerball Pen & Tutorial

Signed-In Members Don't See This Ad

AlanZ

Member
Joined
Mar 2, 2009
Messages
266
Location
Oradell, NJ
I wasn't sure if I should put this in Penturning or in SOYP, but considering that I've added a tutorial video, I'll give this section a try.

I've made several TruStone pens before, but this was the first time working with this purple version.

It's pretty brittle, so it was slow going, with very light cuts with sharp carbide tools.

It was a commission from my bride's co-worker, so it's nice to have it completed.

Also, the actual pen has more red and less blue than in these photos. It's a subtle purple on purple color. I'm experimenting with a rather unusual photographic setup/background suitable for small items... and this was my first test of the configuration. More to come on that later.

I documented photos of the step-by-step making of this pen, and turned them into a video tutorial so those who might like to try this can see how it's done.

Here's the video: Purple TruStone Rollerball Pen Tutorial - YouTube

The video has no sound because I thought that folk might be starting and stopping it often to look at details.

I hope folk find the photos and tutorial useful.
 

Attachments

  • purple_trustone_4820_a.jpg
    purple_trustone_4820_a.jpg
    28.1 KB · Views: 606
  • purple_trustone_4823_a.jpg
    purple_trustone_4823_a.jpg
    30.5 KB · Views: 432
Signed-In Members Don't See This Ad

76winger

Member
Joined
Aug 30, 2009
Messages
2,784
Location
Lebanon Indiana
Great looking pen and I'll attest to that variety of Trustone being VERY hard.

After dulling my HSS Sorby skew in about 30 seconds, three times in a row, I shut the lathe off and went out and purchased my first carbide tipped cutter! Mine went on a discontinued PSI Designer Elite and just like your it came out really nice. Amazingly, as hard as this material is to turn, it sanded and polished fairly easily.
 

76winger

Member
Joined
Aug 30, 2009
Messages
2,784
Location
Lebanon Indiana
That is a beautiful pen. Congrats! I am trying Tru-stone in the near future myself. I think I will check out your video.

If you're new to it, you might want to try out the lighter colors to begin with as they're a little easier to turn. Reds, whites, greens and such seem to be easy enough to turn with normal wood turning tools, but as you start getting into the blues, purples and blacks, you'll find the need for a carbide tipped cutter unless you enjoy sharpening as much or more than turning.
 

SDB777

Member
Joined
Feb 6, 2010
Messages
6,620
Location
Cabot, Arkansas USA
Great pen. Fit-n-finish is spot on!!

But the photo is doing something to it...a double vision thing(maybe it's just me) from the underside that pulls my attention away from the pen.


I will check out the video, and thanks for doing that too!!


Scott
 

AlanZ

Member
Joined
Mar 2, 2009
Messages
266
Location
Oradell, NJ
Scott,

I am partial to reflections under items in small product photos, and generally prefer them over shadows. It's not everyone's taste.
 

AlanZ

Member
Joined
Mar 2, 2009
Messages
266
Location
Oradell, NJ
All,

Thanks all for the kind words.

There are a lot of techniques demonstrated in the video. Some very familiar, some not so obvious.

So I'm curious....
  • What little tidbits did you pick up from the tutorial?
  • How do my tools and techniques differ from your current procedures?
Let's chat about the many paths to the same destination... and the choices that lead us down those paths
 

Jim Burr

Banned
Joined
Feb 23, 2010
Messages
3,060
Location
Reno, Nv
I learned a few things...although I was waiting for the sound to come on:wink: I like the rifle brush idea, I use a counter sink router bit on my electric drill to remove the burr on the tube after milling. I like the way you drill your blanks...going to have a lash at that today:biggrin:
 

Texatdurango

Member
Joined
Apr 23, 2007
Messages
4,649
Location
Show Low, Arizona
Alan, I've got to be honest and say when I first saw that you did a tutorial on "just turning a pen" I thought how boring can that be.

But..... I watched it then, even though I've turned hundreds of kit pens, I watched it again! I haven't done kits in a while but found it to be interesting and very well done. I'm sure a lot of new turners will learn a lot from it.

So now I say.... Excellent job, well done and thanks for taking the time to do it!
 

AlanZ

Member
Joined
Mar 2, 2009
Messages
266
Location
Oradell, NJ
George,

Thanks for your kind words. I guess the world didn't need yet one more how to make a pen tutorial, but I actually made this with the intent of showing it to the man who commissioned the pen. He's an avid pen collector and thought he would be entertained by the process. You mentioning that you watched it twice is taken as a high compliment.

My initial goal here was not to make a tutorial... it was to document the making of the pen.

Then I thought that the using this rather brittle material and using an approach of going from mandrel to dead center with bushing to dead center bushingless... might be a different approach to some folk, and could be interesting to them.

Finally, the technique I used to photograph the pen was a bit novel, and thought that also might be interesting to some members... I haven't discussed that much yet. I will if there is interest.
 
Last edited:

Chuck Key

Member
Joined
May 3, 2005
Messages
1,596
Location
Richmond, Virginia, USA.
I read about the setup you used in photographing the pen on another site. Very interesting and I am sure many here would be interested in viewing the details on this forum or in Pen Photography forum.

Chuckie
 
Last edited:

danrs

Member
Joined
Aug 15, 2011
Messages
163
Location
Greenville, NC
Outstanding video and pen. I learned to give more though to exactness. That is, the use of sleds, holders (jigs), and my finishing technique.

I do believe you have it down. I'm getting there (with help like that in this tutorial and example).
 

plano_harry

Member
Joined
Jan 12, 2012
Messages
1,959
Location
Plano, TX 75093
  1. The rpm info was helpful on the different steps since this information is not usually provided. I have just been guessing at what speeds to use. I have a couple of TrueStones sitting in the box until my skills are better. Dk red/gold, dk blue/green.
  2. What is your observation on the round vs the radiused square carbide, especially during rounding? I only have the radiused square and have to be careful not to hang a corner. I have tried using it tipped on a 45 degree angle like a skew if turning acrylic or hard burls. Sometimes that seems to work but I could use a more experienced opinion.
  3. I turn on a mandrel but it was interesting to see how you switched to centers for the final diameter. If working wood with a CA finish, the bushings make it hard for me to get a couple of thousandths under for a CA build. Might need to try your approach.
  4. I finish like you do, but I don't buff or wax. After 12k MM, it is so shiney that I haven't seen the need to buy the buffer wheels. I presume you can see a difference after buffing.
I hope you post this to the library.

Thanks for the video tutorial. The stills with notes were very helpful to study each step. I would like to see motion video next time to watch your technique. I don't know anyone near me to watch.

Harry


All,

Thanks all for the kind words.

There are a lot of techniques demonstrated in the video. Some very familiar, some not so obvious.


So I'm curious....
  • What little tidbits did you pick up from the tutorial?
  • How do my tools and techniques differ from your current procedures?
Let's chat about the many paths to the same destination... and the choices that lead us down those paths
 

AlanZ

Member
Joined
Mar 2, 2009
Messages
266
Location
Oradell, NJ
Harry,

I actually prefer roughing acrylics with the round carbide tools. It takes just the right "bite" with little if any chip out
 
Top Bottom