Need advice on segmenting

Signed-In Members Don't See This Ad

ngeb528

Member
Joined
Mar 4, 2009
Messages
808
Location
Deland, FL
Hi all,

I'm getting ready to start trying segmenting (got to go to the next level) and have a question but also would like any advice you may have.

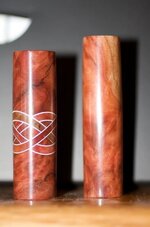
My question is this: I often see a thin metal band around segmented areas on many of the pics posted around here. What is that made from? I think some are silver and others look gold in color. What are you using?

Thanks for any answers and any advice you can give someone just getting ready to try this technique.

Nancy
 
Signed-In Members Don't See This Ad

VisExp

Member
Joined
Oct 1, 2007
Messages
2,738
Location
Palm Coast, FL, USA.
Nancy, aluminum and brass are the most common metals used in segmenting. A quick and easy way to try inlaying some metals is to cut up a soda can. Scratch the surface up good with sandpaper to give the adhesive something to grip. Soda can is pretty thin, about 0.005". If you want a thicker inlay then get some 30 gauge brass or copper, 0.010". Credit cards also make for some nice inlays and are probably the best use I can think of for them :wink:
 

ngeb528

Member
Joined
Mar 4, 2009
Messages
808
Location
Deland, FL
Nancy, aluminum and brass are the most common metals used in segmenting. A quick and easy way to try inlaying some metals is to cut up a soda can. Scratch the surface up good with sandpaper to give the adhesive something to grip. Soda can is pretty thin, about 0.005". If you want a thicker inlay then get some 30 gauge brass or copper, 0.010". Credit cards also make for some nice inlays and are probably the best use I can think of for them :wink:

Thanks Keith. I knew I could count on you.

We just got a band saw so I'm itching to try some segmenting. The soda can is a great idea to try it out with. How hard is the metal on chisels?

Nancy
 

ldb2000

Member
Joined
Sep 11, 2007
Messages
5,381
Location
Laurence Harbor, NJ, USA.
Hi Nancy . The metal you see in segments is Aluminum and Brass sheet . you can use soda can aluminum , it gives you a nice thin band or you can buy the metal sheets from your local hobby shop or from a place like this , www.speedymetals.com . I use metals from .010" to .032" thick . These can be turned with regular wood turning tools . Be careful as the cut metal can be very sharp and watch using light colored woods because the sanding dust from the metal will contaminate the wood and stain it .
 

hewunch

Member
Joined
Aug 5, 2008
Messages
4,663
Location
Albany, GA
Nancy Keith and Butch are two great pen makers and have given you a bunch of good advice. If I may be so bold as to put in my .02
1. You can also get aluminum flashing (the stuff that goes on roofs) from the home centers for a low price.
2. As the guys said, scuff it (that includes credit card too unless you want a little color coming out in the pen).
3. Medium and Thick CA, Gorilla Glue and Epoxy are the best ways to join the metal to the wood or acrylic, regular white or yellow glue will not hold.
 

DurocShark

Member
Joined
Jul 26, 2008
Messages
3,622
Location
Anaheim, CA
Another material to play with is the plastic notebooks or folders from your local office supply store. I've been dabbling with black notebook material sandwiched between two pieces of aluminum. Looks sharp as a CB.
 

rwyoung

Member
Joined
Feb 21, 2009
Messages
145
Location
Lawrence, KS
While I have not yet used any metal to make segmented blanks (or made segmented blanks for that matter) I do occasionally make use of thin brass for other projects. Many hardware stores and hobby shops have a small display with various bits and pieces from K&N metals. You can pick up sheets of copper, brass, aluminum and in some cases stainless steel (can't remember the alloy number but you probably won't be using that anyway) for just a buck or two.

I usually raid the display at the local Ace Hardware but I've also seen them at Hobby Lobby and I think Michaels.
 

gketell

Local Chapter Leader
Joined
Dec 15, 2006
Messages
2,772
Location
Pleasanton, CA, USA.
Aluminum Flashing

Here is a shot of a pen in process where I used aluminum roof flashing from the local borg. Same thickness as the bottom of a coke can but much much easier to deal with.

attachment.jpg


GK
 

Attachments

  • _MG_6218.jpg
    _MG_6218.jpg
    24.1 KB · Views: 606

gomeral

Member
Joined
Dec 29, 2008
Messages
220
Location
Apex, NC
Here is a shot of a pen in process where I used aluminum roof flashing from the local borg. Same thickness as the bottom of a coke can but much much easier to deal with.

Greg,

Every time I think I'm getting better at this, you show me something to work harder to achieve. I don't know whether to thank you or thump you! :tongue:


daniel
 

ngeb528

Member
Joined
Mar 4, 2009
Messages
808
Location
Deland, FL
Here is a shot of a pen in process where I used aluminum roof flashing from the local borg. Same thickness as the bottom of a coke can but much much easier to deal with.

attachment.jpg


GK

Greg, that is absolutely beautiful. You'll have to share how you did that.

Nancy
 

gketell

Local Chapter Leader
Joined
Dec 15, 2006
Messages
2,772
Location
Pleasanton, CA, USA.
Every time you make a pen you improve in some small way. You see something to strive towards when you see that pen. Me too. It isn't perfect and I know what I need to do better next time... make the blank 100% square to start so that the "loops" are even rather than having thee ones on the left up higher than the ones on the right; do a better job of drilling through the center; and (from the back side) make sure the blank starts out significantly bigger than the final so you turn all the way down into the segments all the way around. Thank God for clips to hide the oopses.

GK
 

gketell

Local Chapter Leader
Joined
Dec 15, 2006
Messages
2,772
Location
Pleasanton, CA, USA.
#1 rule: have the segments exactly as thick as your saw kerf. Once you have that then everything else is "easy".

#2 rule: have a way to cut very precise and accurate strips of wood. I use a vacuum rip fence that you can find directions to here: http://www.davidreedsmith.com/Articles/VacuumRipFence/VacuumRipFence.htm. It allows me to make strips accurate to 1/100" and I can "guesstimate" to within 3/1000".

With those two, this is easy. Find your highlight material and measure it. Cut a saw kerf in a scrap wood. Figure out (kerf - (2 x highlight material) = filler material). Cut scrap wood to make filler material. Test filler + highlight and adjust filler until snug in saw kerf. Cut your blank big and square (see my previous note).

Now that the jig is set right rip a bunch of filler material strips.

Cut a saw cut 1/32" or 1/16" shorter than the blank is tall. Glue your highlight material and filler into the kerf. Let dry. Sand flush.

Rotate the blank 90 degrees and repeat. Repeat 2 more times. (altenatively, rotate 180 degrees the first time, 90 degrees the 2nd and 180 the 3rd for a more symetrical look).

Drill very carefully right down the middle. I drilled this on the lathe for accuracy.

Sand the corners off. Turn the blank. Show off to your friends!

It takes a "long" time, but is worth it.
GK
 

JohnU

Member
Joined
Jan 31, 2008
Messages
4,973
Location
Ottawa, Illinois
Nancy, another option for aluminum is at your local newspaper printing office. My town paper always posts aluminum sheets for .50 cents in the classified section. The sheets are about 30" X 18" and last a long time. You can cut them with normal scissors and its already flat.
 
Top Bottom