Celtic knot theory & question

Signed-In Members Don't See This Ad

junosdad

Member
Joined
Aug 8, 2008
Messages
71
Location
La Conner, WA
Greetings all.

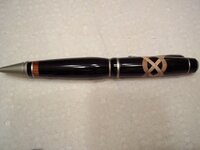
I'm looking to make sure I've got this down before starting on my first celtic knot pen, so I'd love to lean on the experience of those who have already tread this path....

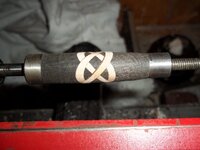
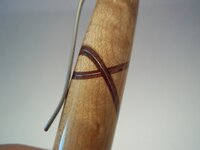
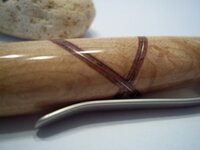
Having read the tutorials, I understand the need for the knot material to be same width as the kerf of the saw blade if one doesn't cut all the way through the blank. I also get the advantages of not cutting all the way through.

I'm thinking that I'm not always going to want my knot to be .094 (or any given kerf width) wide. I'm also thinking, that if one were to cut all the way through the blank, while it'd be trickier to glue it all up, that the thickness of the knot material would no longer matter, and could be any thickness, so long as it was the same for each segment of the knot.

Am I missing something?

Thanks in advance,
Sam
 
Signed-In Members Don't See This Ad

gwilki

Member
Joined
May 20, 2007
Messages
971
Location
Ottawa, ON, Canada.
Sam: It doesn't matter whether you cut all the way through or not. If the thickness of the knot material is not equal to the kerf of your saw blade, the knot segments will not line up. You will be taking more or less material out of the blank than you are replacing with the inset material.
If you want differing kerf widths, simply use different blades. For pen blanks, I frequently put a 6 1/2" or a 7 1/2" blade on my table saw. They are very thin kerf blades and make for a nice knot.
Along that same idea, make sure that, when you drill the blank, you are dead in the centre of the knot material. If you aren't, again, the knot will not be symmetrical.
 

Gary Beasley

Member
Joined
Sep 18, 2009
Messages
1,326
Location
Marietta, Ga. USA
That said you can do your cuts with a bandsaw or change to a thin kerf tablesaw blade. You can also set a shim on your stop and run the cut again for a wider kerf.
By cutting all the way through you will be introduced to all the problems of keeping the alignment. If you can make a jig to hold the blank while it dries you will be a little better off, watch that end pressure though as it will cause a sideway slip and you will get jagged misalgnments of the knot lines.
 

randywa

Member
Joined
Jul 31, 2008
Messages
893
Location
Republic, Mo.
I'm as far from an expert as you can get, but here's what I've learned. For the knot to be right, you have to maintain the centerline of the blank so it will meet right. I also tried one with a thicker material, about 1/8", and it didn't look right. I started thinking the thinner, the better.
 

Gary Beasley

Member
Joined
Sep 18, 2009
Messages
1,326
Location
Marietta, Ga. USA
I'm as far from an expert as you can get, but here's what I've learned. For the knot to be right, you have to maintain the centerline of the blank so it will meet right. I also tried one with a thicker material, about 1/8", and it didn't look right. I started thinking the thinner, the better.

Yeah those thick kerf knots on a small barrel look a bit mushy unless they are thin contrasting strips laminated to thickness.
 

paintspill

Member
Joined
Apr 17, 2011
Messages
891
Location
toronto, ontario, canada.
i have used both methods and will provide proof for both.
1. not sawing through the blank makes it easier but just marginally. it is a little easier to keep everything aligned, but matching the material to the kerf is tough. and if it is not right the blank starts to twist.

2. cutting through the blank is my preferred method because it allows you to use any sized material. and when using c.a glue to assemble it is incredibly fast and once glued it is just like a solid piece of wood again.

bottom line. do what works for you. try both and see what you like. in the pictures attached. the mahogany in african ebony was NOT cut through and the walnut and aluminum in maple was cut through. especially handy when inlaying layers because the thickness doesn't matter.

cheers
 

Attachments

  • 100_0619 (640x480).jpg
    100_0619 (640x480).jpg
    225.1 KB · Views: 277
  • 100_0615 (640x480).jpg
    100_0615 (640x480).jpg
    252.9 KB · Views: 255
  • 100_1796 (640x480).jpg
    100_1796 (640x480).jpg
    198.4 KB · Views: 267
  • 100_1797 (640x480).jpg
    100_1797 (640x480).jpg
    205.8 KB · Views: 222

leehljp

Member Liaison
Joined
Feb 6, 2005
Messages
9,330
Location
Tunica, Mississippi,
I'm also thinking, that if one were to cut all the way through the blank, while it'd be trickier to glue it all up, that the thickness of the knot material would no longer matter, and could be any thickness, so long as it was the same for each segment of the knot.

Am I missing something?

Thanks in advance,
Sam

It has been explained well above by others but I will give you a simple exercise to prove what the others have said.

Instead of trying to make a celtic knot, just start off with making an "X" in a blank.
1. Mark your square all the way around as the starting point,
2. cut one side.
3. Add in a layer that does NOT match the blade kerf thickness and glue up.
4. on the opposite side make your second cut and add in the same thickness that you added into the first.

Surprise, surprise, it does not line up!

This is hard for many (most) people to visualize correctly before attempting it. After trying it and seeing it, then it makes sense what the others are saying.
 
Last edited:

junosdad

Member
Joined
Aug 8, 2008
Messages
71
Location
La Conner, WA
Thanks to all

First off, thanks to all for your insight.

Hank.....totally makes sense when you put it that way.

Much obliged folks....saved me a handful of spent blanks and time that would've been spent re-inventing the wheel. Proof positive of the value of this forum.

Hugely appreciative,
Sam
 

islandturner

Member
Joined
Jul 17, 2009
Messages
376
Location
Victoria, BC
Here's a cute YouTube video, for one type of cross and pen...! They've made a little story behind making this pen, but it's HD and well done. You'll love all the spotless tools in this gazillion dollar shop...

http://www.youtube.com/watch?v=Y9uQv5sKibk

How interesting!!! Is there someplace where I can download "plans" or instructions about how to do the several shapes of knots there are?

Much obliged
 
Joined
Oct 11, 2011
Messages
534
Location
Monterrey Mexico
Here's a cute YouTube video, for one type of cross and pen...! They've made a little story behind making this pen, but it's HD and well done. You'll love all the spotless tools in this gazillion dollar shop...

The Homework Ultimatum - YouTube

How interesting!!! Is there someplace where I can download "plans" or instructions about how to do the several shapes of knots there are?

Much obliged

Lol... no need to go and see it to know what you're talking about. I've seen it already. :biggrin: Thanks for the info, though! :)
 

TonyBal

Member
Joined
Dec 12, 2011
Messages
51
Location
Jacksonville, Florida
I just wanted to thank everyone who contributed to this thread. I "think" I finally understand how to do this Celtic Knot thing. I am going to try my hand at it this weekend. Thanks again!!!!:biggrin::biggrin::biggrin:
 
Top Bottom