Wood Cast In Resin

Signed-In Members Don't See This Ad
See more from h0race

h0race

Member
Joined
Sep 9, 2011
Messages
43
Location
Puyallup, WA
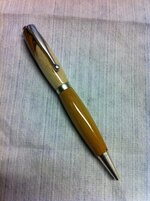
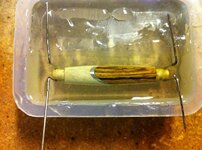
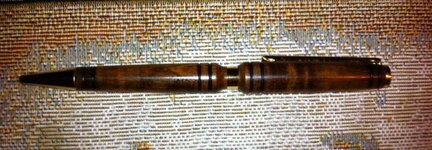
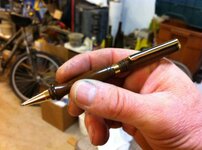
I decided to experiment with casting a pen the other day. I first turned the upper and lower tubes to a very slim, well used slimline bushings. After doing so, I wiped everything down with acetone, plugged both ends of the tubes (with led shot inside) and dropped them in some casting resin. After cutting everything out on my band-saw, I re-turned the pen tubes to the comfort pen bushings... but a little prouder than I did with the first time I turned.

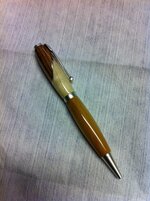
I was amazed with how the polished resin draws the wood to the surface.

Just another experiment for future pens in mind....

BTW, the top is ironwood separated by aluminium. the bottom is bamboo. This is the second one with this design but the first didn't get the resin.
 

Attachments

  • WoodCastInResin.jpg
    WoodCastInResin.jpg
    44.6 KB · Views: 342
  • WoodCastInResin2.jpg
    WoodCastInResin2.jpg
    45.8 KB · Views: 524
Signed-In Members Don't See This Ad

lago

Member
Joined
Jan 20, 2011
Messages
57
Location
Lago Vista, TX
h0race

Is that ironwood the same as Ipe. If so, I was wondering how it turned. I used it on my deck and boat dock and it is the hardest wood I have encountered. Just wondering if it would turn since I have some left overs.

FWIW, I have had 2 instances where a charcoal briquet fell to the deck and only left a black spot. Small pieces won't float either.

Lago
 

h0race

Member
Joined
Sep 9, 2011
Messages
43
Location
Puyallup, WA
Wonder if you can hang the body on a string and dip it like a candle to build up a thin layer of resin.

I don't think that would work.. by the time you get done dipping it a few times, the resin may start to set on you making for an ugly mess.

The first time I cast this, the blank had to be contaminated... or maybe I kicked the resin too hot but either way, I had to do a re-do. The challenge is avoiding the air bubbles. This is where I need a pressure pot. I also poured the lower layer first to set the blank on and didn't like the results, so I suspended it with paperclips.
 

Attachments

  • IMG_3514.jpg
    IMG_3514.jpg
    73.3 KB · Views: 157
Last edited:

h0race

Member
Joined
Sep 9, 2011
Messages
43
Location
Puyallup, WA
h0race

Is that ironwood the same as Ipe. If so, I was wondering how it turned. I used it on my deck and boat dock and it is the hardest wood I have encountered. Just wondering if it would turn since I have some left overs.

FWIW, I have had 2 instances where a charcoal briquet fell to the deck and only left a black spot. Small pieces won't float either.

Lago

I don't think so...it could be... but I'll be honest, I don't know my woods as well as I would like to........but let me tell you about Ipe... (please see the photos below)..

I have a tub of 6" cut-offs. This is the wood I started turning early on. I personally like turning it because it is so easy to control my gouge and skew on it. I have found that the grain pattern is so different from one blank to the next. The down side is it sure dulls my tools quickly. I have had to have my end mills sharpened several times because of this wood.

I also recognise how dense the wood is because of how resin enriched it is (pitch). When turning, you get a yellow dusty residue on the end of your tools. After sanding and polishing your pen, you can see the yellow grain if you look hard enough. I like to take my propane torch and heat it up while it is spinning and just before my final sanding. The pitch turns a deep black and fills the grain as it bubbles out. Also, I like to burn my dark lines in the blank before heating and the final sand. When I sand it, I actually WET sand it all the way to MM 12000. A little pen wax and allow it to heat up on the cloth, makes for a fine finish.
 

Attachments

  • IMG_4010.jpg
    IMG_4010.jpg
    62.8 KB · Views: 150
  • IMG_0585.jpg
    IMG_0585.jpg
    61.3 KB · Views: 145
  • IMG_0611.jpg
    IMG_0611.jpg
    57.8 KB · Views: 141

h0race

Member
Joined
Sep 9, 2011
Messages
43
Location
Puyallup, WA
WELL
I'd just like to say that for someone with 25 posts your fit and finish are FLAWLESS. WOW!


Wow...., I don't know what to say... other than I'm honored. Thank you very much. And thanks for looking.

I'm teaching a friend 12 year old tomorrow what I "think" I know and I may also be starting "the Harley pen" as well. I hope I can live up to your comment.

Thanks again
 

Gary Beasley

Member
Joined
Sep 18, 2009
Messages
1,326
Location
Marietta, Ga. USA
Wonder if you can hang the body on a string and dip it like a candle to build up a thin layer of resin.

I don't think that would work.. by the time you get done dipping it a few times, the resin may start to set on you making for an ugly mess.

The first time I cast this, the blank had to be contaminated... or maybe I kicked the resin too hot but either way, I had to do a re-do. The challenge is avoiding the air bubbles. This is where I need a pressure pot. I also poured the lower layer first to set the blank on and didn't like the results, so I suspended it with paperclips.

Maybe if the resin is kept cold and you hit the body with a hair dryer after the dip to accelerate the setup. It might take holding back a little on the hardener.
 

its_virgil

Member
Joined
Jan 1, 2004
Messages
8,126
Location
Wichita Falls, TX, USA.
Not necessarily, if you are using polyester resin. Or, I should actually say, "No! You don't." (If you're using another kind of resin then I can't comment.) Been there and no longer use the pressure pot. Haven't seen mine in two years. Many of us once used one and maybe some still are. I made 10 sets of snake skin blanks today without a pressure pot and they all came out perfect. Look in the library for some articles on casting.

Nice work on the wood casting. The curved surface of the polished resin certainly make the wood look nice. The more figure in the wood the better it will look. Keep up the good work.

Do a good turn daily!
Don

h0race;1291211 The challenge is avoiding the air bubbles. [COLOR=red said:
This is where I need a pressure pot. [/color][quote]
 
Last edited:
Top Bottom