Sedona Fountain Pen

Signed-In Members Don't See This Ad
See more from SDB777

SDB777

Member
Joined
Feb 6, 2010
Messages
6,620
Location
Cabot, Arkansas USA
Have you ever noticed, no matter how well you wipe the pen down...you always see something on it after? I digress.....

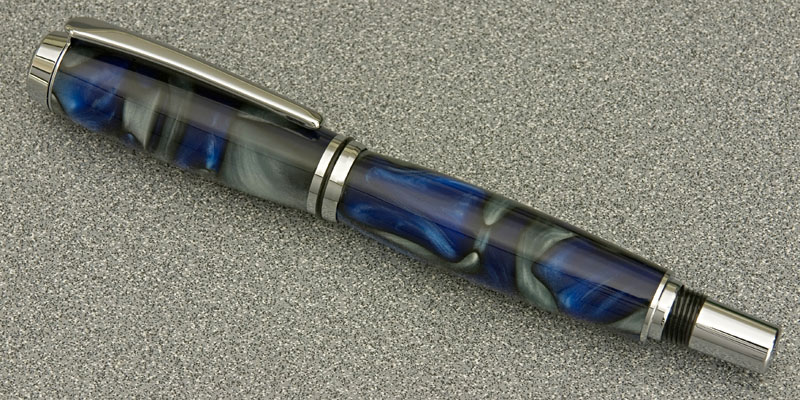
For your viewing pleasure!

Kit from ArizonaSihloutte:
Sedona Black Titanium Fountain Pen

Wood from Bad Dog Burls:
Desert Ironwood Burl

SBTFP-DIW1.jpg


This is the pen I will be presenting to the doctor that did my back surgery on 19 July 2010!!! Yes, I'm still healing, but I took my time(3 days) and I hopefully did good.....finished by sanding to 800grit, EEE Ultra Shine, 7 coats of thick CA/BLO, #0000 buffed, 2x Plastix, and then waxed to a gloss!

As always, comments and/or critique is most welcome(don't powder-puff me, can't learn without good critiquing)


Scott (free pen for a great back job) B
 
Last edited:
Signed-In Members Don't See This Ad

skiprat

Passed Away Mar 22, 2022
In Memoriam
Joined
Oct 19, 2006
Messages
7,812
Location
In a Skip in Wales
Very nice piece of wood:biggrin:
That's the first time I've seen the cap band assembled like that.
 

SDB777

Member
Joined
Feb 6, 2010
Messages
6,620
Location
Cabot, Arkansas USA
Very nice piece of wood:biggrin:
That's the first time I've seen the cap band assembled like that.


What do you mean? I followed the instruction I downloaded on the PDF from AZ's site......
The more I look at it.....the more I think I got the wrong kit(mis-packaged or something), this looks a lot like a Baron after looking back on the webpage at AZ!


Scott (don't tell me....) B
 
Last edited:
Joined
Feb 18, 2004
Messages
4,130
Location
Grosse Pointe Woods, mi, USA
OK, you didnt hear it from me...but...The black band is generally between the two silver bands, not next to the cap material, It is your choice to keep it like that or make it per the instructions. NO customer would know the difference. If you need to disassemble it, just be sure to epoxy the band and the cap finnial back in as (in my experience)once they are removed they dont hold like they do the first time.
Great looking pen and fine material used. The Doc should be extatic about this one!
What do you mean? I followed the instruction I downloaded on the PDF from AZ's site......


Scott (don't tell me....) B
 

wizard

Member
Joined
Aug 27, 2009
Messages
3,569
Location
Houston, Texas
Beautiful Pen !!! Love the wood! Incidentally, I believe that is the Baron kit from AZS. The doctor will love no matter what the name or where the ring is... Doc
 

toddlajoie

Member
Joined
Feb 6, 2010
Messages
1,728
Location
Feeding Hills MA
Just for reference, since I believe that there is no "correct" way to do something, this is the "intended by the manufacturer" assembly (BTW, This is a woodcraft Navigator, basically the same thing... The "Sedona" that Woodcraft sells has a rounded posting cap...):

Blue_White_Swirl_Navigator_01w.jpg


but I don't see anything wrong with the way you have it...

Should you decide to disassemble, here's my take (from having done it) if you don't have a full set of punches, get one, they are invaluable. If not, find what you can to get the job done as best you can (you can always turn a piece of pine or something to the size you need in place of a metal punch, they just won't last more than a few uses...) Grab the largest punch that will easily slide through the cap opening and use that to knock out the top and clip. Then from the top end, find the largest punch that will still easily slide in the tube, and use that to knock out the center band (you need to be LARGER than the plastic threaded insert, but smaller than the tube diameter, and the closer to the tube diameter, the less damage you may do to the thread insert...). Then re-arrange the center band pieces, and use a VERY small amount of epoxy or blue LockTite inside the tube before you re-assemble the CB and cap/clip. I strongly recommend AGAINST using CA in this situation. It will often set before you get the pieces assembled fully, or oooze out onto something you don't want it on (like the threads!!!) and generally make things difficult...DAMHIKT:cool:
 

SDB777

Member
Joined
Feb 6, 2010
Messages
6,620
Location
Cabot, Arkansas USA
Thanks for all the help, think I'll leave it be...if it were just a piece of spalted pecan(got tons of that) or something, I'd chance it.
When I followed the directions on the Sedona pdf, it showed a thin band and a meduim-ish band assembled as I did it above in the photo. Baron pdf, shows it assembled in the opposite direction.

I dug in the trash to get the zip-loc bag, and it says Sedona Black Titanium Fountain.

It clearly isn't!!
It is a Baron kit.... Not that it matters now, I'll just have to be sure when I make some others(which I will).


Scott (Just have to make a mental note!) B
 
Joined
Jun 28, 2010
Messages
1,830
Location
Pineville, Louisiana
don`t you hate that when you do something wrong and don`t even know it.
Pen looks great the way it is and the wood looks great on it.
I just screwed up a cigar pen and ruined it with pliers. Then I decided to try and get it apart anyhoo using nut drivers, just found some that fit in the tube and pounded away. I put it together correctly and now my daughter uses it.
 
Top Bottom