Scalloped Chechin/Blue Larimer

Signed-In Members Don't See This Ad
See more from firewhatfire

firewhatfire

Member
Joined
Mar 7, 2011
Messages
3,813
Location
Columbiana, Alabama
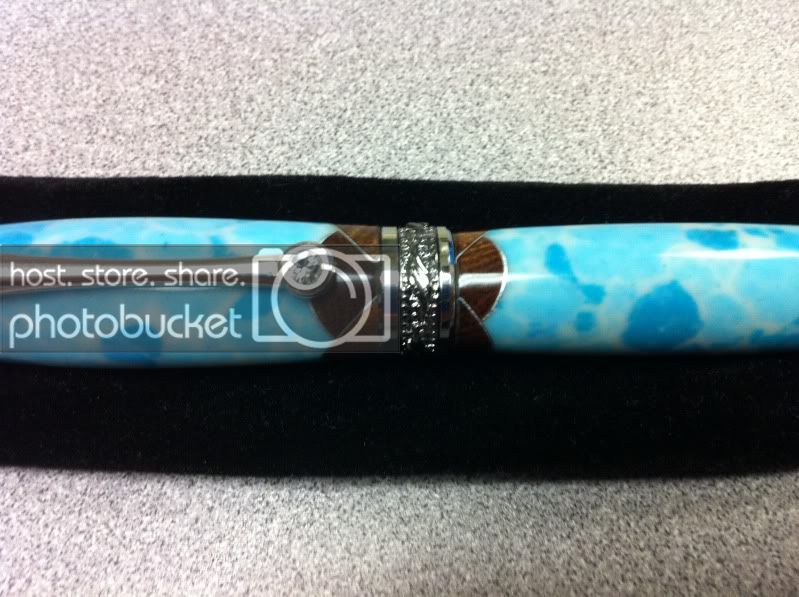
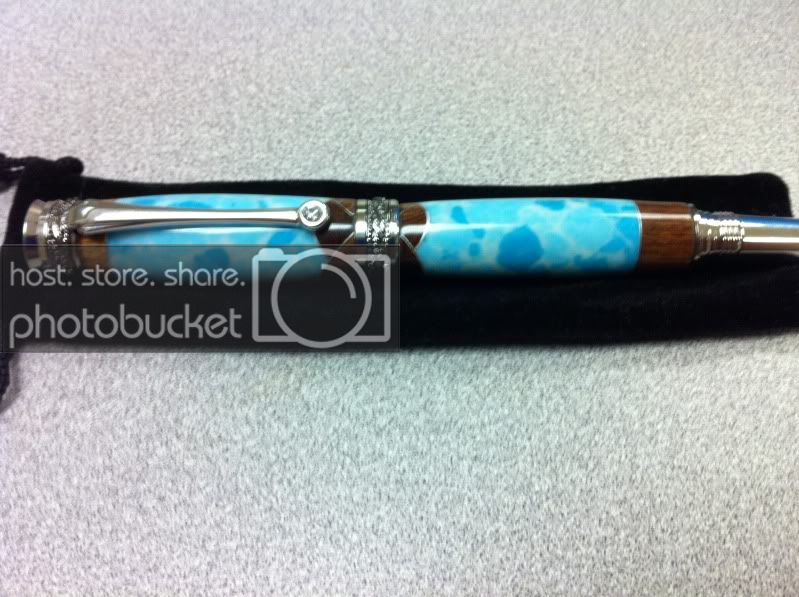
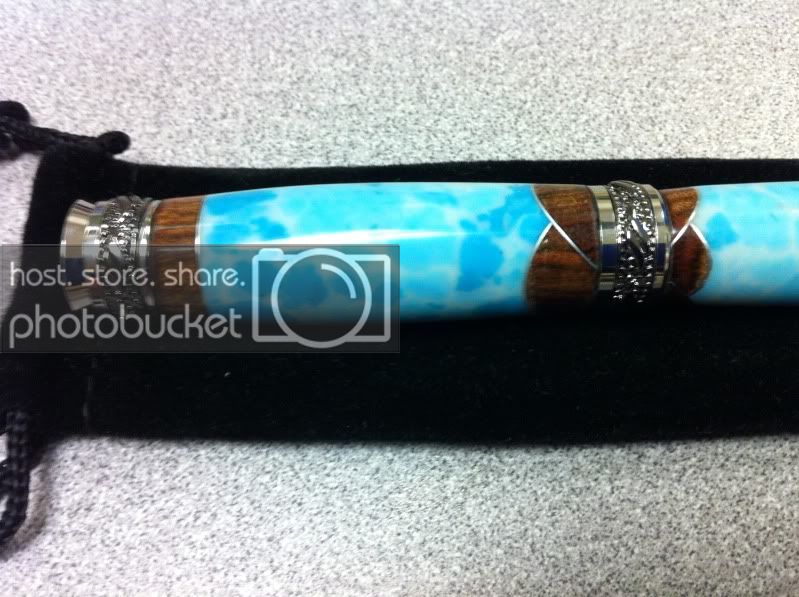
After seeing all the good looking scallops being done I finally broke down and done my own. Thanks to all of the folks willing to share your techniques. I used a black ti Majestic Jr kit. I have to agree that skin in the largest component use in glueing up the blank The other parts are Blue Larimar Tru-stone, Chechin and Aluminum in between. Comments and Critiques are welcome and as always thanks for looking.
scallop2.jpg

scalloppen.jpg

scallopedcap.jpg
 
Signed-In Members Don't See This Ad

wiset1

Member
Joined
Aug 25, 2010
Messages
2,222
Location
Florida
I'm so happy to see this being done now! I really like the bold color choice and mixing materials is great for your first go around. You really need to try the process of scalloping to understand all the steps that go into it. I like that you took the time to line up your points upon assembly as well. This attention to detail will treat you well in the future. Congrats on this pen Phil, you did a great job!
 

firewhatfire

Member
Joined
Mar 7, 2011
Messages
3,813
Location
Columbiana, Alabama
Thanks for the compliments, it is deffinately a process for cutting and gluing scallops. I could see if someone was gonna make alot of these that doing several at a time would move you along quicker in the end. I will deffinately be making more of them in the future as they are truly my favorite looking pens when done.

Phil
 

wiset1

Member
Joined
Aug 25, 2010
Messages
2,222
Location
Florida
Yeah, between the segmenting and scalloping I have about 4 in my shop right now just waiting for the scallop portion of the process. I really don't look forward to it, but it's what you have to do to move past your comfort zone and start working outside the box. Start looking at different materials to use and coming up with different color combos. Exotics is a great place to get materials to play with.

Best of luck and give your fingers time to heal and grow back some skin, ha ha ha.
 

Old Lar

Member
Joined
Dec 26, 2009
Messages
732
Location
Sturgis, SD
That is cool. I read the tutorial in an earlier thread and thought I should try one... now is the time to go for it. Thanks for the inspiration and showing a great pen.
 

wizard

Member
Joined
Aug 27, 2009
Messages
3,569
Location
Houston, Texas
Phil, That is a beautiful pen! I really like the striking contrast in colors with the materials you used. Something tells me if I tried this that my accents would not be aluminum but skin:rolleyes:. Thanks so much for sharing!
Regards,
Doc
 

firewhatfire

Member
Joined
Mar 7, 2011
Messages
3,813
Location
Columbiana, Alabama
Thanks for all the compliments. It makes a fella feel like he got close on one. Y'all are the ones who inspire my work with the stuff I see posted here. I hope to be inspired by everyone here I some way at some point. The funny thing is that the first PITH I was in I got sent a turners 1st segmented pen and it lit a fire under me to do more segmented work. I have learned alot since that first one.
 

wiset1

Member
Joined
Aug 25, 2010
Messages
2,222
Location
Florida
Well, best wishes with your future scalloping projects. I hope to post a couple more of mine in the next week when my kits arrive. I finished segmenting and scalloping 3 blanks today in various woods and Alt Ivory so we'll see how they look when they are turned and on a kit. Keep up the great work, makes me happy to see others doing it now.
 

rsulli16

Member
Joined
Jun 9, 2010
Messages
163
hi
hope this isn't too dumb a question.
But how do you get the scalloped parts to line up as they are on different sides of the threads? how do you account for however many turns it takes to close the pen so they line up at the closing point?
thanx
Sulli
 

doughogg

Member
Joined
Apr 2, 2010
Messages
17
Location
Wilmslow, Cheshire, UK
What a Stunning pen

I came across this thread by chance and I am stunned by the beauty of the pen and the work that must have gone into it. I see a reference to a tutorial in an earlier thread but don't know where to look to find it. Could someone please point me in the right direction.
I don't know if my skills are up to it but I HAVE to try (or go mad in the process)

thanks

Doug
 

wiset1

Member
Joined
Aug 25, 2010
Messages
2,222
Location
Florida
I came across this thread by chance and I am stunned by the beauty of the pen and the work that must have gone into it. I see a reference to a tutorial in an earlier thread but don't know where to look to find it. Could someone please point me in the right direction.
I don't know if my skills are up to it but I HAVE to try (or go mad in the process)

thanks

Doug

You can follow this link for the writeup I did: http://www.penturners.org/forum/showthread.php?t=89931

It shows pictures of how it was done and the steps taken. If you just want to do the scallops shoot past the segmenting steps. Hope that helps. Sorry Phil for jumping in here, just directing others to the tutorial.
 

Carl Fisher

Member
Joined
Jun 7, 2011
Messages
2,761
Location
Cape Coral, FL
hi
hope this isn't too dumb a question.
But how do you get the scalloped parts to line up as they are on different sides of the threads? how do you account for however many turns it takes to close the pen so they line up at the closing point?
thanx
Sulli

I would imagine just like lining up the grain on wood blanks.

Screw the kit pieces together with one half of the pen assembled and then use whatever method to mark or partially press the cap over the kit, then gently unscrew and finish pressing into place.


Very nice pen by the way. I've been wanting to try a variation on the scallops, but haven't found the time yet.
 

firewhatfire

Member
Joined
Mar 7, 2011
Messages
3,813
Location
Columbiana, Alabama
here is how I do mine. I get he bottom barrell all completed and together and screw the cap down on the bottom barrell. I then take the blank for the top and look it over good for which end is which. Once I get it oriented I look down the barrell and slide it on the part screwed onto the bottom barrell. Adjust till I like it and take it off and gently press it together, then add the finial and clip where I like it. Yes it like matching grain in wood as someone else stated.

hi
hope this isn't too dumb a question.
But how do you get the scalloped parts to line up as they are on different sides of the threads? how do you account for however many turns it takes to close the pen so they line up at the closing point?
thanx
Sulli

I came across this thread by chance and I am stunned by the beauty of the pen and the work that must have gone into it. I see a reference to a tutorial in an earlier thread but don't know where to look to find it. Could someone please point me in the right direction.
I don't know if my skills are up to it but I HAVE to try (or go mad in the process)

thanks

Doug

Doug I appreciate the comments, I am try pleased that folks here like it. It is more of a persaverance thing as opposed to a skill thing. (You gotta out stubburn the material) no matter how tuff it is:hammer:

WiseT no need to apologize for jumping in your the inspiration behind this anyway. I had it on my list you just pushed it forward a little bit.

Phil
 

Dalecamino

Local Chapter Leader
Joined
Jan 2, 2008
Messages
14,572
Location
Indianapolis, In.
Really excellent color combo Phil. Very nicely done. Looks like the scallops are catching on around here. Yours is at the top.
 

wiset1

Member
Joined
Aug 25, 2010
Messages
2,222
Location
Florida
Looked even better in person Phil! I was glad you brought it with you...made me remember that I can't segment to save my life :redface: :biggrin:

I hope you can drill and turn one Jonathon...I have one I'll be starting for you next week!:biggrin:
 

carpblaster

Member
Joined
Dec 12, 2011
Messages
273
Location
Shelby,Alabama
Man Phil, what a pen, I got to learn the segmented and scaloping what ever that is, i can look at the pen and have no idea how its glued in the middle to get them curves,fantastic pen, ithink thats one you showed my dad and i, I did 2 segmented gatsbys from your instructions, andthen came out good,just got to work on ca finish,and found out to slowly drill and stop to keep it from melting the glue
Rodney
 

firewhatfire

Member
Joined
Mar 7, 2011
Messages
3,813
Location
Columbiana, Alabama
I gotta get a new rock to start my next one on. Thanks for all the compliments but I gotta give props to ~~~Tim the Wise~WiseT~~~ for the directions.

Carp I will be glad to show you how I do what I do.

Thats what this place is all about after all.

Phil
 

wiset1

Member
Joined
Aug 25, 2010
Messages
2,222
Location
Florida
Thanks for the shout out Phil, but at the end of the day you're the one that turned it and took direction. This is all you and I'm happy that you chose to do it. Can't wait to see your next one and the materials you use.
 
Top Bottom