Polymer Clay and Birdseye Maple Panache RB

Signed-In Members Don't See This Ad
See more from CSue

CSue

Local Chapter Leader
Joined
Jan 16, 2007
Messages
2,368
Location
Laveen, AZ, USA.
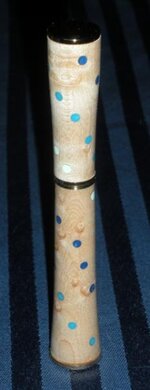
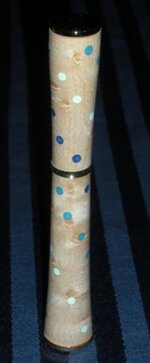
Well, I decided to take the bull by the horns, so to speak, and deliberately make a pen wood with Polymer Clay design elements. So this is a Birdseye Maple with Blue, Turquoise and light green PC spot design. The individual colors slowly swirl around from top of the pen to the bottom. I rounded the blank then drilled the holes. The Sculpey mixtures were packed into the holes with the tube in then baked 275 degrees 45 minutes. There was no problem with turning wood/clay mix. The PC didn't shrink. And I (accidentally) dropped one of the blanks on the floor - nothing came out. :redface:

So I would love your thoughts and comments.
 

Attachments

  • ClayWood Panache 1st b.jpg
    ClayWood Panache 1st b.jpg
    16.2 KB · Views: 300
  • ClayWood Panache 1st c.jpg
    ClayWood Panache 1st c.jpg
    14.8 KB · Views: 278
Signed-In Members Don't See This Ad

randyrls

Member
Joined
Feb 2, 2006
Messages
4,829
Location
Harrisburg, PA 17112
Cathy; Nice look. I will have to give mixtures of wood and clay a look. May give the laser engravers a run for the money. It is easy to engrave the outside of a design, not so easy for the inside.
 

kirkfranks

Member
Joined
Nov 23, 2006
Messages
689
Location
Salisbury, MD, USA.
Wow that looks nice.
I would have thought that baking the wood could have created problems so I would never have tried it. You did better by trying:)
 

CSue

Local Chapter Leader
Joined
Jan 16, 2007
Messages
2,368
Location
Laveen, AZ, USA.
Great job Cathy . I like the sprial design , did you use any kind of indexing to drill the holes ?

Pardon me. What's "indexing?" I just marked the wood for the holes and used a small drill bit with my dremel and drilled the holes straight in to the center following the spiral dotted lines around.

Thanks for your comments. I think it really does "open up" a whole new design method.

Maybe I need to check out a scroll saw myself. :rolleyes:
 

ldb2000

Member
Joined
Sep 11, 2007
Messages
5,381
Location
Laurence Harbor, NJ, USA.
Pardon me. What's "indexing?" I just marked the wood for the holes and used a small drill bit with my dremel and drilled the holes straight in to the center following the spiral dotted lines around.

Thanks for your comments. I think it really does "open up" a whole new design method.

Maybe I need to check out a scroll saw myself. :rolleyes:

"Indexing" is a way to make equally spaced holes in the blank . My Jet lathe has an "indexing" headstock , there is a little lock knob that allows you to lock the spindle in 20 (I think) different positions . You can also buy or make an indexing wheel that would thread onto your spindle .
 

CSue

Local Chapter Leader
Joined
Jan 16, 2007
Messages
2,368
Location
Laveen, AZ, USA.
Butch, I really could have used one of those! But I think it came out well anyway. I had my cousin check the pattern before I drilled the holes. She "has a good eye."
 
Joined
Dec 17, 2008
Messages
286
Location
Canada
Bravo! Really cool and original design. Goes especially well with the bird's eye. Give yourself a big pat on the back for that one.
 

randyrls

Member
Joined
Feb 2, 2006
Messages
4,829
Location
Harrisburg, PA 17112
Butch, I really could have used one of those! But I think it came out well anyway. I had my cousin check the pattern before I drilled the holes. She "has a good eye."

Cathy; One "no-index" way to do this is to round the blank.
Layout a piece of narrow masking tape and mark it at intervals of say 1/4".
Wrap the tape around the blank and note how many times you go around the blank.
Now drill the holes thru the tape.

Repeat the process for each succeeding spiral using the drilled holes and number of times you wrapped the first tape around the blank.
 

CSue

Local Chapter Leader
Joined
Jan 16, 2007
Messages
2,368
Location
Laveen, AZ, USA.
Cathy; One "no-index" way to do this is to round the blank.
Layout a piece of narrow masking tape and mark it at intervals of say 1/4".
Wrap the tape around the blank and note how many times you go around the blank.
Now drill the holes thru the tape. quote]

Great idea. I did basically the same thing. I've decided to always round the blanks when I'm going to do this type of pen. Only I used sewing measuring tape for the first spiral. Then "eyed" the rest marking the blank with fine point marker.

I think using a low oven temp keeps the wood from drying out too much. And next time I will bake for only 30 minutes as directed for "Primo".
 

workinforwood

Member
Joined
Mar 1, 2007
Messages
8,173
Location
Eaton Rapids, Michigan, USA.
Looks awesome Cathy. You know another way to make a spiral is to measure the circumference and multiply that by the number of spirals then add a tangent of 10 subtracting a prefix of 5.:biggrin: Me..I just eyeball it and it looks:search: damn good to me!
 

Bree

Member
Joined
Jun 19, 2009
Messages
1,736
Location
Buffalo, NY
Well Cathy Sue... that's a terrific Panache. I really love that one! Very creative and well executed. Super job.
:biggrin::biggrin::biggrin:
 
Top Bottom