B&W Waves on a Jr Retro

Signed-In Members Don't See This Ad
See more from skiprat

skiprat

Passed Away Mar 22, 2022
In Memoriam
Joined
Oct 19, 2006
Messages
7,812
Location
In a Skip in Wales
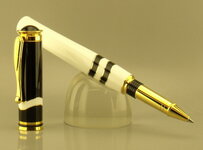
This little closed ended Retro is fresh off the buffing wheel. Has wave segments with brass shim borders. The shim is slightly thicker than I normally use or like, but my local K&N Metals stockist was closed this morning. :mad::rolleyes: I was concerned that the shim would feel proud of the resin once sanded and polished, but it turned out not so bad afterall. :rolleyes:

I hope you like it. Any comments, critiques, questions welcome.:wink:

I do have 'in progress' pics but they have a fingerprint on my cameral lens:redface:. But I'll show them if someone want to know how it was made.
 

Attachments

  • Picture 026.jpg
    Picture 026.jpg
    129.8 KB · Views: 341
  • Picture 031.jpg
    Picture 031.jpg
    190 KB · Views: 304
Last edited:
Signed-In Members Don't See This Ad

Curly

Member
Joined
Nov 20, 2010
Messages
4,841
Location
Saskatoon SK., Canada.
Beautiful!!!

I think I know how you did it but wouldn't mind a peek at the wip pics to confirm. Hollows and rounds (arcs and coves) nested together?
 

IPD_Mr

Member
Joined
Jun 27, 2007
Messages
3,707
Location
Zionsville, In
Pretty slick there Skip. I like the thicker shims, in fact they could have been a touch thicker and it would have been fine looking.
 

skiprat

Passed Away Mar 22, 2022
In Memoriam
Joined
Oct 19, 2006
Messages
7,812
Location
In a Skip in Wales
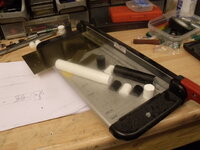
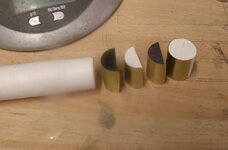
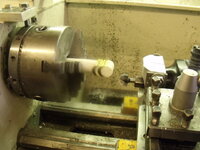
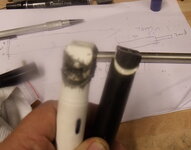
Here are the WIP pics. Again, apologies for the smudge.:redface:

Max, I use CA for EVERYTHING. :biggrin: I know lots of folks have problems when drilling through metal and it heating up and wrecking the joint, but now that we know the problem, it's simple to overcome. I drilled this with a 4mm pilot first then used about 7 different sizes to get to the final size.
All of the drill bits were freshly sharpened and I used soapy water as well.
I drill on the lathe at around 600rpm. I would go faster but never slower than that.

The only 'trick' with this design is that the segments including the shim must have the exact same diameter as the cutter. :wink:
 

Attachments

  • 1.jpg
    1.jpg
    163.1 KB · Views: 279
  • 2.jpg
    2.jpg
    118.5 KB · Views: 304
  • 31.jpg
    31.jpg
    182.9 KB · Views: 292
  • 4.jpg
    4.jpg
    163.3 KB · Views: 329

ericofpendom

Member
Joined
Jun 6, 2012
Messages
371
Location
Bolton, England
Hi Steven, Fabulous pen! the segmenting is flawless. Thank you so much for showing WIP pics, I would have never figured it out how you achieved that segmenting. Now all I need is a metalworking lathe...

Eric...
 

MartinPens

Member
Joined
Apr 3, 2010
Messages
1,813
Location
Medford, Oregon, USA
Skip thanks for sharing your work. That whole setup is impressive and rather mind boggling. Without the visual I would never have gotten a grasp. My left brain works, but my right brain is slow in catching up. Looks like both sides of your brain work pretty darn good!! : ) Thanks again for the pics

Sent from my iPad using Forum Runner
 

skiprat

Passed Away Mar 22, 2022
In Memoriam
Joined
Oct 19, 2006
Messages
7,812
Location
In a Skip in Wales
Eric, the lathe was used to hold the router only. :wink: ( and drill the holes of course.
Granted, a metal lathe helps but a half decent MDF jig and a router table would do the same. :biggrin:
 

OOPS

Member
Joined
Feb 6, 2010
Messages
674
Location
Spokane, WA
This pen is incredible. I am so glad you're back posting these. It gives me something to shoot for, and dream about!

Oh, and personally, I don't think these shims are too thick. At this thickness, it looks like they are an integral part of the design, instead of merely being used to separate the various pieces. A very impressive design.
 

maxman400

Member
Joined
May 25, 2009
Messages
3,111
Location
Omaha Arkansas
Here are the WIP pics. Again, apologies for the smudge.:redface:

Max, I use CA for EVERYTHING. :biggrin: I know lots of folks have problems when drilling through metal and it heating up and wrecking the joint, but now that we know the problem, it's simple to overcome. I drilled this with a 4mm pilot first then used about 7 different sizes to get to the final size.
All of the drill bits were freshly sharpened and I used soapy water as well.
I drill on the lathe at around 600rpm. I would go faster but never slower than that. . :wink:
Thanks Skip for the info, I have tried 3 steps but not 7. Next time I will increase my drilling steps and include a soapy water spray bottle. :)
 

seamus7227

Member
Joined
Mar 18, 2009
Messages
6,220
Location
Wichita Falls, TX
Steve, such a stunning job as always! I never would have thought of using a router in that way to make waves, now more of your other work makes more sense on how you create such unique designs! Very well done chap!
 

jttheclockman

Member
Joined
Feb 22, 2005
Messages
19,132
Location
NJ, USA.
Eric, the lathe was used to hold the router only. :wink: ( and drill the holes of course.
Granted, a metal lathe helps but a half decent MDF jig and a router table would do the same. :biggrin:

And that is what I have and may have to give this a try. Thanks for showing.

Looks like Skips Ying Yang pen.
 
Last edited:

mtgrizzly52

Member
Joined
Feb 24, 2008
Messages
326
Location
Kalispell, MT, USA.
My wife who seldom has a good thing to say about most of the pens I show her, just walked by, stopped and turned around, and exclaimed..."That is Gorgeous!!!" I totally agree with her. That is a beautiful pen and very nice work. Good Job!

Rick (mtgrizzly52)
 
Top Bottom