Snakewood Imperial

Signed-In Members Don't See This Ad
See more from Bree

Bree

Member
Joined
Jun 19, 2009
Messages
1,736
Location
Buffalo, NY
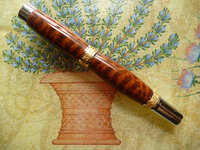
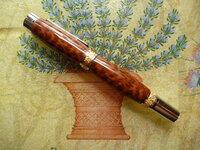
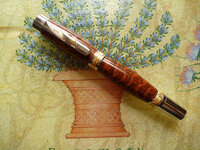
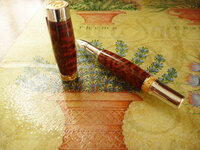
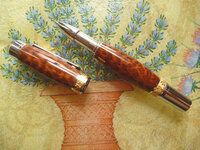
Got a beautiful piece of insanely expensive Snakewood at West Penn. I thought it might go well with an Imperial kit with gold to complement the colors of the Snakewood. Turned it slowly and with very sharp tools. Had no issues. Since it is very cracky wood, I decided to attack the source of most wood cracks... the end grain.

I put a drop of thin CA on some release paper and touched the end of the turned wood/tube to the meniscus of the drop. This causes the CA to literally form a bridge between the drop and the wood. I slowly rolled the tube careful not to break the surface tension bridge. This uniformly distributed CA on the end of the tube and allowed the CA to wick into the end grain. I did this to both tubes, both ends twice.

Then I applied thin CA to the wood followed by a quick rub and a hit of accelerator. I did this about 7 times to build up the volume of the CA coating. I gave it a quick hit with the maroon Micromesh to bring down the ridges and then applied three coats of Medium CA with BLO to fill in any gaps and further raise the coating level. Then I dry micromeshed the wood to 12,000 followed by a light buffing on the White China wheel.

Polished it with Meguiar's Extreme ScratchX and then PlastX. Light coat of Ren Wax and she was ready to assemble. The gold ring on the center coupler was loose so I put a drop of thin CA on a needle and wicked it into the ring and locked it in place. Didn't get on the Rhodium so there was no clean up necessary.

I have attached several shots of the completed pen.
 

Attachments

  • sP1000595.jpg
    sP1000595.jpg
    92.2 KB · Views: 389
  • sP1000594.jpg
    sP1000594.jpg
    90 KB · Views: 255
  • sP1000593.jpg
    sP1000593.jpg
    90.4 KB · Views: 209
  • sP1000597.jpg
    sP1000597.jpg
    76.4 KB · Views: 207
  • sP1000596.jpg
    sP1000596.jpg
    89.4 KB · Views: 255
Signed-In Members Don't See This Ad

mrburls

Member
Joined
Sep 13, 2008
Messages
1,728
Location
San Antonio Tx.
I'd say Bree that the insanely expensive piece of snakewood was worth it.
Looks nice from all angles. Nicely done.

Keith "mrburls"
 

propencity

Member
Joined
Feb 8, 2009
Messages
337
Location
Pearland, TX
Beautiful pattern on that snakewood. Great job on the finish also; I'll have to remember your method of securing the end grain. Thanks for sharing.
 

Bree

Member
Joined
Jun 19, 2009
Messages
1,736
Location
Buffalo, NY
Hasn't cracked yet... knock on wood. And I don't think it will crack. There is no place for moisture to move. The end grain is sealed shut. The long grain is sealed on both sides. The blank was stable and dry and I let it sit to acclimate and relieve any internal stresses after I turned it.

Wood cracks for a reason. Eliminate the reasons that could cause it to crack and it is unlikely to crack. I think the culprit is usually the end grain. We butt it up against the pen parts and forget about it. But it doesn't take much movement to cause a crack. That little band of end grain is enough.

To demonstrate what I mean... consider a blank left unsealed on the end grain but covered with CA on the long grain. Remove the blanks so the bushings separate from the blank then put the bushings back on. Tighten it all back up and wet sand the CA. Moisture will very likely wick into the end grain and fog the CA from underneath. I have done it dozens of times... kicking myself every time.

When the pen is assembled. The end grain is no more sealed than it is when the bushings are flush and tight in the example. It doesn't take much to screw it up. So now I seal the pen blanks end grain with CA just like I was putting Anchorseal on the end grain of a bowl blank.

It's not a 100% cure but I think it reduces the tendency to check. Have done a number of ebony pens this way with no cracks on them yet.

Watch this vid and you can see just how fast stuff moves through the end grain... it's like a highway for moisture movement.

http://www.youtube.com/watch?v=VfJGQtnD_Aw&feature=related

This stuff might be very good for pen turners to stabilize end grain movement and cracking. I plan to try some... might even try it on some snakewood that I have left.
 

toolcrazy

Member
Joined
Dec 23, 2006
Messages
5,408
Location
Port Orchard, WA
Snakewood cracks due to the heating of the resin in the wood. I get this fact from a reliable authority. Hopefully your perseverance will pay off.

Gorgeous pen, BTW. Good Luck!
 

jlord

Member
Joined
May 16, 2009
Messages
133
Location
Whittier, CA
I always seal end grain with thin CA then 2 coats of thin on long grain & another 6 or 7 of med on long grain before wet sanding to 12000. Never any finish problems since doing this but I had a Snakewood pen crack almost 3 weeks after assembly. No more problems on any other type of wood just the one Snakewood. I took the pen apart & refinished it & it has been fine since.
 
Joined
Dec 3, 2008
Messages
1,641
Location
Atlanta , Georgia, 30041
I have a question, I have about 20 BF of snake wood with great patterns but how do you cut it to get the grain pattern to show all the way around the pen?
I don't ask many questions but I have tried but with limited success.:confused:
 

hunter-27

Passed Away Aug 14, 2013
In Memoriam
Joined
Oct 17, 2007
Messages
4,608
Location
Chadron, Ne, USA.
Hasn't cracked yet... knock on wood. And I don't think it will crack. There is no place for moisture to move. The end grain is sealed shut. The long grain is sealed on both sides. The blank was stable and dry and I let it sit to acclimate and relieve any internal stresses after I turned it.

Wood cracks for a reason. Eliminate the reasons that could cause it to crack and it is unlikely to crack. I think the culprit is usually the end grain. We butt it up against the pen parts and forget about it. But it doesn't take much movement to cause a crack. That little band of end grain is enough.

To demonstrate what I mean... consider a blank left unsealed on the end grain but covered with CA on the long grain. Remove the blanks so the bushings separate from the blank then put the bushings back on. Tighten it all back up and wet sand the CA. Moisture will very likely wick into the end grain and fog the CA from underneath. I have done it dozens of times... kicking myself every time.

When the pen is assembled. The end grain is no more sealed than it is when the bushings are flush and tight in the example. It doesn't take much to screw it up. So now I seal the pen blanks end grain with CA just like I was putting Anchorseal on the end grain of a bowl blank.

It's not a 100% cure but I think it reduces the tendency to check. Have done a number of ebony pens this way with no cracks on them yet.

Watch this vid and you can see just how fast stuff moves through the end grain... it's like a highway for moisture movement.

http://www.youtube.com/watch?v=VfJGQtnD_Aw&feature=related

This stuff might be very good for pen turners to stabilize end grain movement and cracking. I plan to try some... might even try it on some snakewood that I have left.
What is this "wet sanding" thing you speak of? :wink:

Nice pen!!!
 

Dalecamino

Local Chapter Leader
Joined
Jan 2, 2008
Messages
14,572
Location
Indianapolis, In.
Welcome back Bree. This snakewood is very nice. You did a good job on it and, thanks for the info. Looking forward to seeing more. Thanks for sharing with us.
 

Bree

Member
Joined
Jun 19, 2009
Messages
1,736
Location
Buffalo, NY
Lots of reasons why a piece of wood might crack... microcracks could have already been there which I think is very common as the wood checks from the pith like crazy... internal stress being relieved after turning is another biggie... imbalanced moisture movement from irregular drying etc.

I would also bet that a lot of these snakewood blanks come from branch wood which makes them subject to compression movement and relief. It's a small tree and due to the value, they would use as much of the tree as possible. Compression wood plus brittle checky wood to start with is a formula for cracks and odd warps.

So methinks you just try to eliminate as many of the reasons that can generate the crack before you go to finishing. Letting it acclimate and sit both before and after turning is probably the best thing you can do since the crack is easily fixed at this stage. The piece I had is quite old and dry so that was a bonus.

I guess you pay your money and take your chance.
:):):)
 

Bree

Member
Joined
Jun 19, 2009
Messages
1,736
Location
Buffalo, NY
Welcome back Bree. This snakewood is very nice. You did a good job on it and, thanks for the info. Looking forward to seeing more. Thanks for sharing with us.

Chuck... was I gone??? LOL! I have been lurking on and off. I have been busy upgrading equipment. Got myself a new Powermatic 3520-B and a nice Laguna LT18-3000 with my big Resaw King blade.

Traded a Satinwood pen for a HUGE block of the very last Elm tree in Franklinville NY last weekend. Dutch Elm got the tree... was about 6 feet in diameter before they felled it. Now I have a chunk big enough to make a 19"x19"x14" bowl with no pith and probably a few small one to boot from that block. And a 14" Diameter x 11" block with pith. hehehe

Been making bowls and stuff. Put the Powermatic on flat plate leveling casters... that was fun!
:biggrin::biggrin::biggrin:
 

Bree

Member
Joined
Jun 19, 2009
Messages
1,736
Location
Buffalo, NY
I have a question, I have about 20 BF of snake wood with great patterns but how do you cut it to get the grain pattern to show all the way around the pen?
I don't ask many questions but I have tried but with limited success.:confused:

Most snakewood hasn't got the snake pattern. I think only 15-20% of the wood actually has the good stuff. Which is why it is insanely expensive!! And why if I sell it, it will be insanely priced!. I don't sell my pens but if I did... that one won't go cheap.

Actually I didn't have to cut it... West Penn cut it. I simply selected the absolute best that they had in stock in the size that I could afford.
:eek::eek::eek:
 
Last edited:
Top Bottom