
You are using an out of date browser. It may not display this or other websites correctly.
You should upgrade or use an alternative browser.
You should upgrade or use an alternative browser.
Kara-nuri Closed End..
- Thread starter chriselle
- Start date
-
- Tags
- closed end kara-nuri
Signed-In Members Don't See This Ad
See more from chriselle


No, that's a little different technique that will leave you with a very pronounced pattern. This is a little more subtle. Just dab the urushi on with a sponge or loufa. For a slightly more dynamic or repetative pattern put a full coat of urushi and sprinkle small beads or seeds or pebbles even all over the blank. Once cured scrape them off with a wooden spatula and you are left with a fantastic moonscape. When I get around to doing a tutorial I'll probably do one with this technique.


Signed-In Members Don't See This Ad
Bree
Member
That's a real beauty! What a great job! Excellent.
:biggrin::biggrin::biggrin:
:biggrin::biggrin::biggrin:
Whaler
Member
That is awesome.
creativewriting
Member
Beautiful pen. The Urushi is great...I have seen a lot more of this recently.
Jim15
Member
Absolutely beautiful.
Mark
Member
That's a very nice pen. I hope she loves it.. Nicely Done.
PaulSF
Member
Absolutely gorgeous! That's the kind of work that really inspires me to try harder.
pensmyth
Member
Extremely beautiful. How do you make the blank?
Russianwolf
Member
and we are still waiting on the Urushi Tutorial!!!!!!!!
:biggrin:
Great looking pen.
:biggrin:
Great looking pen.
OKLAHOMAN
Member
You might have had fun doing this one but boy did I have fun looking at it:worship:!
Mrs Rojo22
Member
Beautiful!
Robin
Robin
broitblat
Member
Beautiful - I really enjoy what you do with urushi
-Barry
-Barry
David Keller
Member
It's beautiful. Count me as an urushi fan!
ldb2000
Member
Beautiful Urushi pen Chris . I'm gonna take some time and learn the Urushi technique . What are you mixing in with the base coat to get the mottling , eggs ?
chriselle
Member
Hey, thank you everbody. It's really hard to capture the depth and pattern with a photo....(I suck at photography despite having a pretty decent camera). You find yourself just zoning out staring at the ins and out of the patterns and like a nice burl or a worthless wood you never know what kind of pattern is going to appear.
And those are the kind of words that inspire me to try harder:wink:...thank you.
OK...You asked for it...:biggrin:
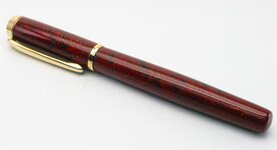
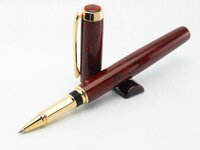
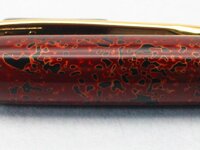
The blank material is hard Sakura. The reasons I use this are because I have a bunch of it, it's tight grained like maple, easy to turn, lightweight, and stable. But you can use any material. Urushi sticks to ANYTHING!!
There are two base coats of black urushi. On that, thick.. REALLY goopy black urushi is "splotched" haphazardly using a Loufa (sp?) sponge creating lots of valleys and hills. Once that cures a bit but still sticky pure gold powder is lightly brushed on. That is set to cure for a few days. Then a thin coat of clear is wiped on and set away to cure. Then using charcoal lubricated with olive oil some of the the high spots are knocked down. Then a thin layer of the black followed by red and red again. Between each layer you are keeping the high spots knocked down and building up the lowspots. On this pen it's about a 3 week process which is pretty quick on an Urushi timeline.
I promise sir...I will get one done.:wink:
Absolutely gorgeous! That's the kind of work that really inspires me to try harder.
And those are the kind of words that inspire me to try harder:wink:...thank you.
Extremely beautiful. How do you make the blank?
OK...You asked for it...:biggrin:
The blank material is hard Sakura. The reasons I use this are because I have a bunch of it, it's tight grained like maple, easy to turn, lightweight, and stable. But you can use any material. Urushi sticks to ANYTHING!!
There are two base coats of black urushi. On that, thick.. REALLY goopy black urushi is "splotched" haphazardly using a Loufa (sp?) sponge creating lots of valleys and hills. Once that cures a bit but still sticky pure gold powder is lightly brushed on. That is set to cure for a few days. Then a thin coat of clear is wiped on and set away to cure. Then using charcoal lubricated with olive oil some of the the high spots are knocked down. Then a thin layer of the black followed by red and red again. Between each layer you are keeping the high spots knocked down and building up the lowspots. On this pen it's about a 3 week process which is pretty quick on an Urushi timeline.
and we are still waiting on the Urushi Tutorial!!!!!!!!
:biggrin:
Great looking pen.
I promise sir...I will get one done.:wink:
Last edited:
chriselle
Member
Beautiful Urushi pen Chris . I'm gonna take some time and learn the Urushi technique . What are you mixing in with the base coat to get the mottling , eggs ?
No, that's a little different technique that will leave you with a very pronounced pattern. This is a little more subtle. Just dab the urushi on with a sponge or loufa. For a slightly more dynamic or repetative pattern put a full coat of urushi and sprinkle small beads or seeds or pebbles even all over the blank. Once cured scrape them off with a wooden spatula and you are left with a fantastic moonscape. When I get around to doing a tutorial I'll probably do one with this technique.
Jgrden
Member
WOW, very nice.
Rmartin
Member
That is a beautiful pen!