Concinna burl w/custom finial and cb ring

Signed-In Members Don't See This Ad
See more from Lenny

Lenny

Member
Joined
Jan 6, 2009
Messages
3,475
Location
Searsport, Maine
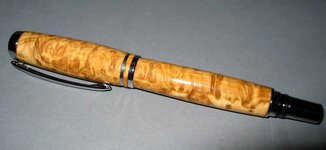
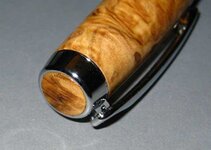
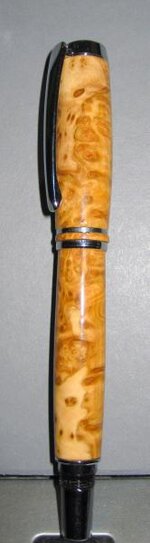
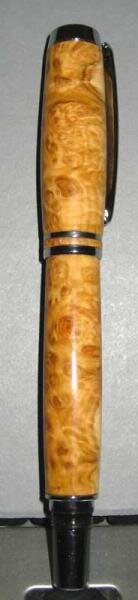
After seeing a recent pen I made from Tulipwood where I had replaced the plastic finial with a custom one turned from the same wood (see turbowagon's article in the Library) Don Ward challenged me to "next time" also replace the black plastic ring on the centerband.
Here's what I came up with ....

Thanks to Don for giving me a reason to try something 'more'.:wink:
also thanks to
Exoticblanks for the nice piece of Concinna burl :)
Smitty for his group purchase of the Jr. Gent I's :)

Thanks for looking!
 

Attachments

  • IMG_4276.jpg
    IMG_4276.jpg
    20.3 KB · Views: 274
  • IMG_4274sm.jpg
    IMG_4274sm.jpg
    19.5 KB · Views: 243
  • IMG_4271.jpg
    IMG_4271.jpg
    13.7 KB · Views: 222
  • IMG_4273.jpg
    IMG_4273.jpg
    13 KB · Views: 197
Signed-In Members Don't See This Ad

LeeR

Member
Joined
Nov 13, 2010
Messages
630
Location
Fort Collins, Colorado
Lenny,

Great looking pen! Please elaborate on how you replaced the plastic ring. I am not familiar with this kit (I've made about 20 pens so far ...), so unclear if the band is easily disassembled.
 

Lenny

Member
Joined
Jan 6, 2009
Messages
3,475
Location
Searsport, Maine
Lenny,

Great looking pen! Please elaborate on how you replaced the plastic ring. I am not familiar with this kit (I've made about 20 pens so far ...), so unclear if the band is easily disassembled.

The centerband comes with two rings, one Chrome (or whatever the plating is) the other black plastic. It will slip right off ... In fact I usually drop them a few times before getting the pen assembled. :biggrin:
The finial, on the other hand, has to be knocked out with a punch. Not diificult to do though. Turbowagon's tutorial in the library also mentions another tutorial by JohnCrane where he discusses the process.
All I did was drill a slightly larger hole in a piece of soft wood. placed the cap over it upside down, and gave the finial a tap with a small punch.
 

David Keller

Member
Joined
Nov 30, 2009
Messages
1,618
Location
Enid,OK
Very nice... I think the upgrades really make the finished product so much more than a 'kit pen'. Kudos.
 

jskeen

Member
Joined
Oct 11, 2007
Messages
1,754
Location
Crosby, Texas, USA.
Hey, nice job on the pen in general and the CB looks very well done. Did you CA it onto the center coupler, or just slide it on and let the top chrome band hold it on till you assembled the cap? Are the finial and CB really black plastic, or are they black enameled brass like the jg2's?
 

phillywood

Member
Joined
May 10, 2010
Messages
2,067
Location
San Antonio, TX, 78250, USA
Lenny, you did a very nice job, and I agree with Don, it looks much more elegant this way and although I have not worked with that kit, I can't imagine how cheap it will look with the plastic CB. However, the way you did it makes it much more beautiful and more of a hand made pen than the kit pen. I appreciate that you shared it with us. Now, I am off to read about Joe's tutorial.
 

Lenny

Member
Joined
Jan 6, 2009
Messages
3,475
Location
Searsport, Maine
Hey, nice job on the pen in general and the CB looks very well done. Did you CA it onto the center coupler, or just slide it on and let the top chrome band hold it on till you assembled the cap? Are the finial and CB really black plastic, or are they black enameled brass like the jg2's?

I meant to add just a drop of CA when assembling but pressed it together without thinking.:redface:
As for the cb ring I don't know for sure if it's plastic or brass, but it sure seemed like plastic...:confused:
 

wizard

Member
Joined
Aug 27, 2009
Messages
3,569
Location
Houston, Texas
Lenny, You did a wonderful job and that is a beautiful pen! The wood as well as the customizations really make it stand out! Thank you for showing. Regards, Doc
 
Top Bottom