Bayonet Cap Concept pen

Signed-In Members Don't See This Ad
See more from skiprat

skiprat

Passed Away Mar 22, 2022
In Memoriam
Joined
Oct 19, 2006
Messages
7,812
Location
In a Skip in Wales
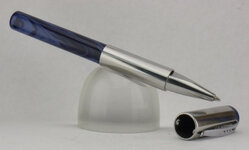
In this thread I was playing with the idea of having a cap with a Bayonet type connector instead of threads.

I'm pretty happy how it came out, but I think a bit more refinement would make it better. I don't like the transition from the sleeve to the nib.

Inside the cap are two little pins ( SS Hammer Rivets) They locate along the flats of the nib and then the cap pushes the spring loaded body sleeve further up the blank. The cap is then turned 90deg left or right, the spring then holds the pins in two matching indents hidden by the sleeve.

I wanted to have narrow grooves in the nib for the pins to go in, but I broke my last two small end mills. So I just used a big end mill and made the flats.

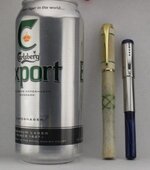
This pen is pretty small ( just smaller than a Baron ) The blue stuff is Bowling ball that I got from Jeff ( the Apprentice Scroller ) ages ago

Hope you like, and comments and criticisms welcomed:biggrin:
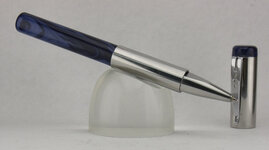
 

Attachments

  • BayonetConcept1.jpg
    BayonetConcept1.jpg
    48.8 KB · Views: 636
  • BayonetConcept2.jpg
    BayonetConcept2.jpg
    44.5 KB · Views: 740
  • BayonetConcept3.jpg
    BayonetConcept3.jpg
    48.9 KB · Views: 674
Signed-In Members Don't See This Ad

skiprat

Passed Away Mar 22, 2022
In Memoriam
Joined
Oct 19, 2006
Messages
7,812
Location
In a Skip in Wales
..... . I think the flats are better then the slots would have been , it gives it a more refined look .

Butch, I agree completely. I prefer the flats as well so just made this sketch to mod it some time this weekend. I don't like that little gap.

At the the moment the sleeve looks like A. But if I notch a section off the top and bottom and add thicker plates, I can weld them in and turn them down again so that it looks something like D. ...........well that's the theory anyway:rolleyes::biggrin:


Thanks all, for the comments:wink:
 

Attachments

  • Slot.jpg
    Slot.jpg
    30.4 KB · Views: 384

David Keller

Member
Joined
Nov 30, 2009
Messages
1,618
Location
Enid,OK
I like it a lot. I've had a few complaints about caps coming unscrewed and ruining shirt pockets. I think this looks like a much more secure mechanism... Besides all that, it's a really nice looking pen.
 

skiprat

Passed Away Mar 22, 2022
In Memoriam
Joined
Oct 19, 2006
Messages
7,812
Location
In a Skip in Wales
.......... You deserve another pint.

LOL Bruce I'm having one right now:biggrin: Then bed:beat-up: ( gone 1am now )

In this pic you can see how small it is. It's next to a Baron ( and my pint ):biggrin:

G'night....:biggrin:
 

Attachments

  • BaronConceptandPint.jpg
    BaronConceptandPint.jpg
    24 KB · Views: 225

nava1uni

Member
Joined
Mar 30, 2008
Messages
4,936
Location
San Francisco, CA, USA.
Beautiful pen once again. I don't think that your mind ever stops working out little steps or how to do things because you are always coming up with new and amazing creations
 

ldb2000

Member
Joined
Sep 11, 2007
Messages
5,381
Location
Laurence Harbor, NJ, USA.
Butch, I agree completely. I prefer the flats as well so just made this sketch to mod it some time this weekend. I don't like that little gap.

At the the moment the sleeve looks like A. But if I notch a section off the top and bottom and add thicker plates, I can weld them in and turn them down again so that it looks something like D. ...........well that's the theory anyway:rolleyes::biggrin:


Thanks all, for the comments:wink:

How about instead of welding the flats you drill out a piece of bar stock leaving just enough at the bottom of the bore then machining out the flats from the material you left at the end ? I would think that would be easier then welding and machining the outside and you wouldn't see any of the welding and turning at the end .
 

Mark

Member
Joined
Oct 12, 2009
Messages
2,536
Location
Pottstown PA
How do you do it? Yesterday it was an idea. Today it's reality. Kudo's my friend. Nicely Executed.
 

skiprat

Passed Away Mar 22, 2022
In Memoriam
Joined
Oct 19, 2006
Messages
7,812
Location
In a Skip in Wales
How about instead of welding the flats you drill out a piece of bar stock leaving just enough at the bottom of the bore then machining out the flats from the material you left at the end ? I would think that would be easier then welding and machining the outside and you wouldn't see any of the welding and turning at the end .


Butch, that is a good idea, so I sketched out what I thought you mean.

What I need to end up with is the oval shaped hole in E

Now that I drawn it, it dawned on me that I'd have two problems.
First is I don't have the facilities or even the capabilitiy to mill the end of the slot so that it matches the inside diameter of the tube. Second is that there is a ridge that holds the spring pushes against. I didn't show it on these drawings but you can see it on the original thread. ( the red part )

On the right of this drawing is how I think I can do it. In one of my replies above, I showed the weld - in plates as being horizontal, but in fact they can be vertical as this can be pretty thin.
My stainless welding is ok (ish :rolleyes: ) But I only have an arc welder, wish I had a MIG welder!!:redface:
 

Attachments

  • milling.jpg
    milling.jpg
    29.4 KB · Views: 196

workinforwood

Member
Joined
Mar 1, 2007
Messages
8,173
Location
Eaton Rapids, Michigan, USA.
Awesome pen Steve. Definitely a pen I'd like to examine in person. You would do really well at a pen show like in Chicago. People seem to really appreciate the pens with home made components. My home-made sierra type pen with the pin stripes has been one of the favorites at my booth...it's kinda weird with all I have to offer, that's been the one everyone has been talking about. People are fascinated with the look of that metal too. You need to get some and give it a try.
 

skiprat

Passed Away Mar 22, 2022
In Memoriam
Joined
Oct 19, 2006
Messages
7,812
Location
In a Skip in Wales
Jeff, the Chicago show is already on my definate to-do list one day, but when I go, it will be 'incognito':wink:
Besides, our Ed is providing the 'entertainment' this year and how can you compete against that???:biggrin:
 

jttheclockman

Member
Joined
Feb 22, 2005
Messages
19,148
Location
NJ, USA.
Awesome pen Steve. Definitely a pen I'd like to examine in person. You would do really well at a pen show like in Chicago. People seem to really appreciate the pens with home made components. My home-made sierra type pen with the pin stripes has been one of the favorites at my booth...it's kinda weird with all I have to offer, that's been the one everyone has been talking about. People are fascinated with the look of that metal too. You need to get some and give it a try.


Jeff

Copuld we see the pen you are talking about??? You probably shown it but I do not recall it. Thanks
 

ldb2000

Member
Joined
Sep 11, 2007
Messages
5,381
Location
Laurence Harbor, NJ, USA.
Butch, that is a good idea, so I sketched out what I thought you mean.

What I need to end up with is the oval shaped hole in E

Now that I drawn it, it dawned on me that I'd have two problems.
First is I don't have the facilities or even the capabilitiy to mill the end of the slot so that it matches the inside diameter of the tube. Second is that there is a ridge that holds the spring pushes against. I didn't show it on these drawings but you can see it on the original thread. ( the red part )

On the right of this drawing is how I think I can do it. In one of my replies above, I showed the weld - in plates as being horizontal, but in fact they can be vertical as this can be pretty thin.
My stainless welding is ok (ish :rolleyes: ) But I only have an arc welder, wish I had a MIG welder!!:redface:

Diagram A is what I was thinking and ending with E when you are done . The chamfers from the drill bit will give you the shoulder for the spring to stop at or if you have a long enough end mill you could flatten them out . As for milling the flats , I have seen you make an amazing flame pen using files . Just file out the sides leaving the flats you want . Allot of work but I think it would look cleaner then welding and filling any imperfections . I'm no good at CAD so I can't really draw it but I think you get the idea .
 

skiprat

Passed Away Mar 22, 2022
In Memoriam
Joined
Oct 19, 2006
Messages
7,812
Location
In a Skip in Wales
Diagram A is what I was thinking and ending with E when you are done . The chamfers from the drill bit will give you the shoulder for the spring to stop at or if you have a long enough end mill you could flatten them out . As for milling the flats , I have seen you make an amazing flame pen using files . Just file out the sides leaving the flats you want . Allot of work but I think it would look cleaner then welding and filling any imperfections . I'm no good at CAD so I can't really draw it but I think you get the idea .

I thunked and thunked and even thunked some more and it's starting to get a bit over complex for a pen. :redface: At the moment, the sleeve rotates freely around the nib ( because it doesn't have that funny shape. ) But if I manage to get the shape, as it passes over the nib, then I'm going to have to ensure that it can't rotate once it is pushed past the nib or it won't go on again unless I turn it to align the shape with the nib again.
I don't have CAD either. I do my sketches in Windows Paint which gives me a huge bitmap file. I then open it with Picassa which by some weird magic will save it as jpeg, which can then be resized without too much loss.


Are you saying you need end mills? :tongue:

LOL Charlie :biggrin::wink: as you well know.....I have a special cupboard dedicated to storing hundreds of them.:tongue: I just had a rummage through them and found some bull nose slot drills that should do the trick nicely.
I wonder where they came from???:confused::biggrin:
I might have another go but incorporate 4 or six grooves as a pattern so they look ok.

I'm busy pratting around with one of those $12 pens. I used a beautiful piece of Stabilised Mossy Oak Burl that I got from Alex ( Alticiii ) Just got to finish the cap in the morning.
Beer time now:biggrin:
 

NewLondon88

Local Chapter Leader
Joined
May 15, 2008
Messages
5,077
Location
Claremont NH
I just got a PSI catalog in the mail, and I've gotta say the pen on the
cover looks like they took a page from your book.. right down to the
nuts and washers. (no bolts, though .. that would be too obvious)

ps .. I still have end mills.. :tongue:
 

Attachments

  • PSI.jpg
    PSI.jpg
    59.1 KB · Views: 188

ldb2000

Member
Joined
Sep 11, 2007
Messages
5,381
Location
Laurence Harbor, NJ, USA.
I thunked and thunked and even thunked some more and it's starting to get a bit over complex for a pen. :redface: At the moment, the sleeve rotates freely around the nib ( because it doesn't have that funny shape. ) But if I manage to get the shape, as it passes over the nib, then I'm going to have to ensure that it can't rotate once it is pushed past the nib or it won't go on again unless I turn it to align the shape with the nib again.
I don't have CAD either. I do my sketches in Windows Paint which gives me a huge bitmap file. I then open it with Picassa which by some weird magic will save it as jpeg, which can then be resized without too much loss.

Sorry for keeping this going but the idea really rocks . The spinning problem is an easy one , just leave a lip on the nib section the same size as the sleeve , the sleeve wouldn't go beyond the flats so it couldn't spin . It would also make the nib/sleeve transition smoother as well . Since the cap pins push the sleeve back and the cap fits over the sleeve the lip on the nib would never be seen or felt .
As for milling the hole in the sleeve , use your cross slide as a milling table and one of those slotting bits to do the cutting . You would still need a bit of clean up with the files but it would save time .
 
Top Bottom