
Wmcullen
Member
Polygonal Twist Jig used on a Router Table

I made five extra sets of the plastic jig components (the parts in blue) to share.
They're not for sale but I will entertain a swap: perhaps in exchange for exotic wood blanks or segmenting and inlay materials. Make me an offer... but the goal is to get the jig parts to folks who want to use them... so making a donation to a charity could also be a trade I'd make.
I am also posting the 3d geometry file for anyone who wants to print it themself.
If you want more information about what this is and how I've been using it, here are some recent posts:
21: Coffee Ground Spiral
20: Polygonal Facets
19: Facets with a Twist
As always, these jigs are provided as-is and used at your own risk.
Details:
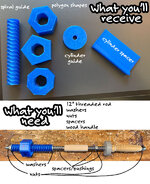
Important- This is not the complete jig, just the 3D printed pieces. Some assembly and additional parts are required.
International inquiries fine.
If you're interested, please PM me. I'll post here when the jigs are gone. Thanks!!

Assembly
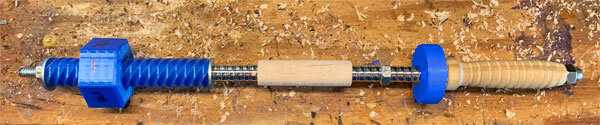
From right to left, I assemble the parts in this order:
washer/handle/cylinder/spacers/nut/more spacers/wood/spacers/washer/nut/spiral and polygon/washer/nut/nut.

Hints:
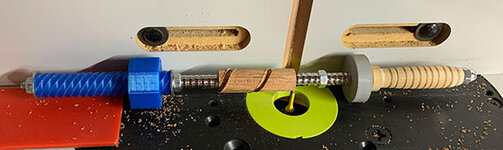
- I recommend using stop blocks (in red above) to brace against.
- Tighten nuts often to avoid having the wood "travel" as it goes through the router.
- Take every precaution to ensure the router bit will only cut what it is supposed to cut.
- Number polygon sides with a sharpie marker to track which sides you've already cut.
- (Optional) Unless using the octagon, tape the cylinder spacer between the cylinder and the back fence to keep the jig about parallel with the fence.

These parts are printed plastic and may not last if damaged.
The jig is provided as-is and is used at your own risk.
I made five extra sets of the plastic jig components (the parts in blue) to share.
They're not for sale but I will entertain a swap: perhaps in exchange for exotic wood blanks or segmenting and inlay materials. Make me an offer... but the goal is to get the jig parts to folks who want to use them... so making a donation to a charity could also be a trade I'd make.
I am also posting the 3d geometry file for anyone who wants to print it themself.
If you want more information about what this is and how I've been using it, here are some recent posts:
21: Coffee Ground Spiral
20: Polygonal Facets
19: Facets with a Twist
As always, these jigs are provided as-is and used at your own risk.
Details:
Important- This is not the complete jig, just the 3D printed pieces. Some assembly and additional parts are required.
International inquiries fine.
If you're interested, please PM me. I'll post here when the jigs are gone. Thanks!!
Assembly
From right to left, I assemble the parts in this order:
washer/handle/cylinder/spacers/nut/more spacers/wood/spacers/washer/nut/spiral and polygon/washer/nut/nut.
Hints:
- I recommend using stop blocks (in red above) to brace against.
- Tighten nuts often to avoid having the wood "travel" as it goes through the router.
- Take every precaution to ensure the router bit will only cut what it is supposed to cut.
- Number polygon sides with a sharpie marker to track which sides you've already cut.
- (Optional) Unless using the octagon, tape the cylinder spacer between the cylinder and the back fence to keep the jig about parallel with the fence.
These parts are printed plastic and may not last if damaged.
The jig is provided as-is and is used at your own risk.
Attachments
Last edited:
")