
Over the past week I've had a lot of requests from people asking about the scallops I put on my pen. While it's not a new concept it should be noted that it is fairly simple to do. I hope to be able to show and explain how I did my pens so others can make them as well.
First of all, let me provide the link to the PDF that Mr. Gisi did some time ago. This breaks it down and advances the idea of how they are done.
Link: http://www.distinctiveturnings.com/tutorials/ScallopPensByMarkGisi.pdf
Obviously, turners can choose to modify and move beyond these steps, but I'm just showing what I did. I'll start with some pictures and then explain.

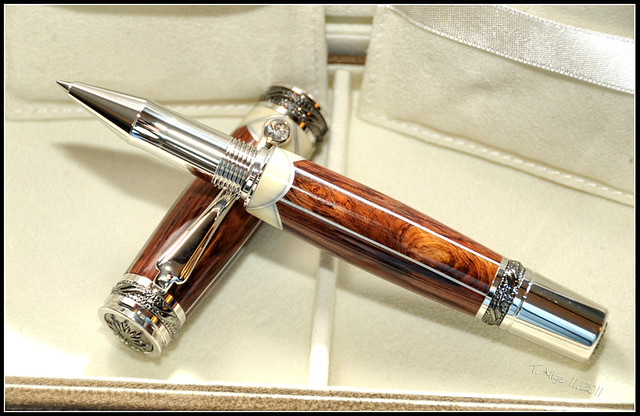
The end result:
Okay, so the steps are fairly simple as seen by the images.
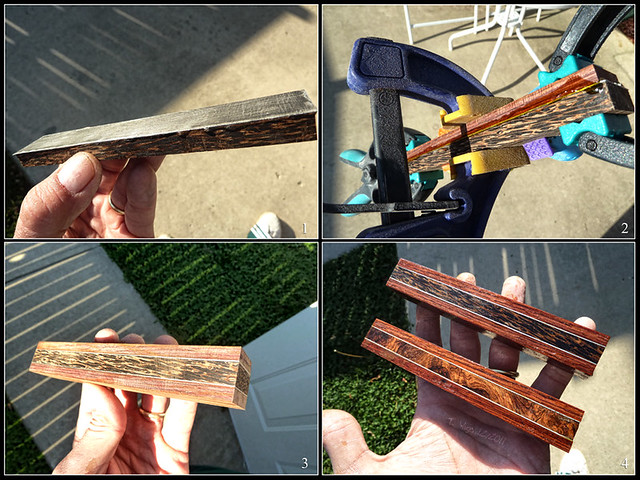
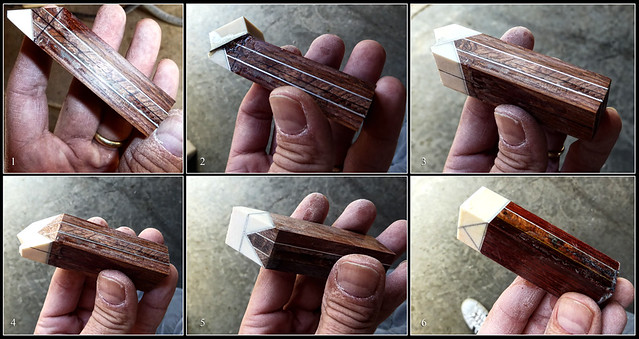
Step 1: I rip materials to desired thickness on a saw lengthwise.
Step 2: I rip my scallop material lengthwise and then in sections. About 8 to 10 out of a blank
Step 3: I score/sand the accent material (Styrene, Aluminum, Brass, etc.)
Step 4: I use Medium CA glue and secure the materials together.
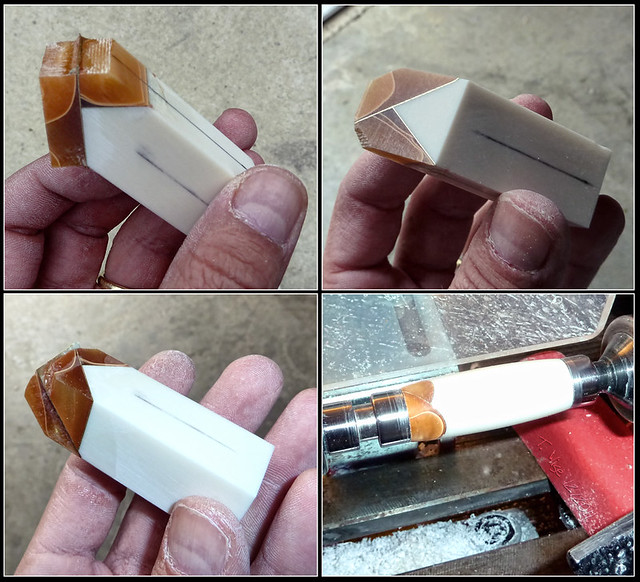
Step 5: I mark my blank for upper and lower barrel lengths and cut.
Step 6: I find the center on all four sides and mark them with perm marker.
Step 7: I adjust my guard on the disk portion of my sander to 45 degrees
Step 8: I sand to to the center of the blank at the 45 until I reach middle point.
Step 9: I use Medium CA to secure the accent material and use one of the scallop accents.
Step 10: I sand the overhang material flush to the original blank.
Step 11: Flip your blank over and do the other side the same way.
Step 12: When all 4 sides are done square up the scalloped end just shy of the "V"
Step 13: Coat entire blank in Thin CA
Step 14: Tape blank and drill from scallop side first. Helps to keep it together.
Step 15: coat inside of blank with thin CA to add more strength.
Step 16: Insert and secure brass tube of choice.
Step 17: SHARPEN your tools!!!!
Step 18: Take your time and cut slowly to round.
Step 19: Add more thin CA as you turn to keep the segments and scallops tight. I do this a couple times.
Step 20: Sand, polish, and enjoy:biggrin:
As noted, it's fairly easy to do. I don't have any special tools or fancy jigs for this. I use a sander and a small jet band saw. I use a lot of CA and most of the times half the skin off of my fingers end up on the blank before I sand it off. I hope this helps people understand the process. If anyone has further questions please feel free to ask. I'm always willing to help. The big thing is...take your time! You'll see the results happen before your eyes and if you cut corners you'll see it in the end result.
Take care and best wishes.
First of all, let me provide the link to the PDF that Mr. Gisi did some time ago. This breaks it down and advances the idea of how they are done.
Link: http://www.distinctiveturnings.com/tutorials/ScallopPensByMarkGisi.pdf
Obviously, turners can choose to modify and move beyond these steps, but I'm just showing what I did. I'll start with some pictures and then explain.
The end result:
Okay, so the steps are fairly simple as seen by the images.
Step 1: I rip materials to desired thickness on a saw lengthwise.
Step 2: I rip my scallop material lengthwise and then in sections. About 8 to 10 out of a blank
Step 3: I score/sand the accent material (Styrene, Aluminum, Brass, etc.)
Step 4: I use Medium CA glue and secure the materials together.
Step 5: I mark my blank for upper and lower barrel lengths and cut.
Step 6: I find the center on all four sides and mark them with perm marker.
Step 7: I adjust my guard on the disk portion of my sander to 45 degrees
Step 8: I sand to to the center of the blank at the 45 until I reach middle point.
Step 9: I use Medium CA to secure the accent material and use one of the scallop accents.
Step 10: I sand the overhang material flush to the original blank.
Step 11: Flip your blank over and do the other side the same way.
Step 12: When all 4 sides are done square up the scalloped end just shy of the "V"
Step 13: Coat entire blank in Thin CA
Step 14: Tape blank and drill from scallop side first. Helps to keep it together.
Step 15: coat inside of blank with thin CA to add more strength.
Step 16: Insert and secure brass tube of choice.
Step 17: SHARPEN your tools!!!!
Step 18: Take your time and cut slowly to round.
Step 19: Add more thin CA as you turn to keep the segments and scallops tight. I do this a couple times.
Step 20: Sand, polish, and enjoy:biggrin:
As noted, it's fairly easy to do. I don't have any special tools or fancy jigs for this. I use a sander and a small jet band saw. I use a lot of CA and most of the times half the skin off of my fingers end up on the blank before I sand it off. I hope this helps people understand the process. If anyone has further questions please feel free to ask. I'm always willing to help. The big thing is...take your time! You'll see the results happen before your eyes and if you cut corners you'll see it in the end result.
Take care and best wishes.
Last edited:

 Please help!!!:befuddled:
 Think I got this right and hope to scallop my first pen.