Penmaker's Challenge Continues

Signed-In Members Don't See This Ad

soligen

Member
Joined
May 11, 2010
Messages
1,085
Location
Sterling Heights, Michigan
I loved the challenge series Butch did over the summer. I learned a lot, and it opened this rookie pen turner's eyes to so many possibilities. So, even without a formal challenge, I have continue to challenge myself, and thought it would be fun to put my latest up for a new entry in the challenge series.

My Hat is off to everyone from whom I have learned so much. This challenge is dedicated to all of you.

Rules:

What rules? As there is no prize other than a rewarding experience , the only rules are to challenge yourself, have fun, and be safe.

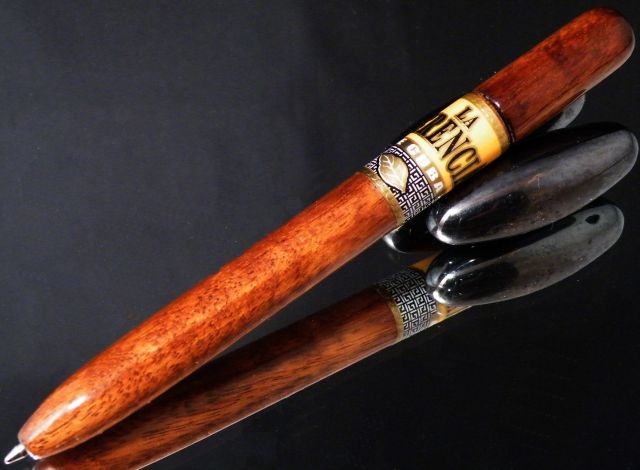
This is a highly modified cigar kit (Ultra Cigar in this case, but you can use either). This is a true one piece barrel from the tip of the nose cone to the clip. It is finial activated.


2_DSCN1085b.jpg


Here are a few tips to avoid a few pit falls:
Choose a hard, dense wood. I used Osage Orange (accents are Paduk). You will want at least a 6" blank. For a first try I recommend 6.25 to 6.5.

I used a narrower tube in the lower barrel. I used an old aluminum arrow shaft that was a size I liked. A 7mm tube can work too.

This was not all done on the lathe as in Butch's challenges. The only thing on here that I dont know how to do on the lathe is the "spiral" segmentation.

Maybe you could do this without a collet chuck, but I sure don't know how I would do it without one. In addition to standard size collets, I used 9/16 (pen body) and 5/16 (8mm activator tube)

For the hole for the parker refill I used a #39 drill bit. If you do this with a slimline kit, the hole is smaller for a cross refill (try a # 48)

Do not try to press parts against the tip of the pen (DAMHIKT). Chuck the pen in a collet chuck and press parts using your lathe tail stock.
Let the challenge (and fun) begin!! I'm looking forward to seeing what you guys come up with!

Discussion in this thread on techniques for this challenge is encouraged!
 
Last edited:
Signed-In Members Don't See This Ad

EBorraga

Passed Away July 17, 2022
In Memoriam
Joined
Oct 19, 2009
Messages
4,049
Location
Louisville, KY
Holy Schnike's Batman. I'm sure Butch will be proud when he see's this Beauty. Not sure about trying to replicate, but I'll be in the shop alot this next week. Was gonna do a bunch of Bandsaw Box's, but looks like I now must try feabilishly to attempt this challenge.
 

ldb2000

Member
Joined
Sep 11, 2007
Messages
5,381
Location
Laurence Harbor, NJ, USA.
BRAVO !!!! Great pen Dennis !!!! I love the shape and the feathers and the finial operation and the ....... EVERYTHING !!! You definitely raised the bar on this one . Count me in on this challenge .
 

RAdams

Banned
Joined
Apr 5, 2009
Messages
2,983
Wowza!!

That is pretty snazzy!


I will give it a go as well. Is there a deadline? And if not, How long did this one take you to make?
 

soligen

Member
Joined
May 11, 2010
Messages
1,085
Location
Sterling Heights, Michigan
Ron,

I thought about a deadline, but as the holiday season is often busy for some people, I decided not to state a deadline. I'll be happy to keep the thread going as long as there is interest.

How long did it take me? Well, I dont really track my time, and as this is the first prototype, there was a lot of stopping to think time. I had the idea for the full one piece barrel in August, but my first (abandoned) thought on how to so this was to basically make the pen innards first, then cast PR around it. I abandoned this becasue I was trying to shape one end of a tube to a nose cone taper, but couldn't get enough taper with my tools on hand, and that technique would have precluded a wood design and left out anyone who wasnt a home caster.

I also took 2 hunting trips and made several other pens while I was working on this, so I have no idea how many hours I spent. But also realize I work slower than most people.

For anyone:

Post and discuss any questions on how to do this. It is stated as a challenge, but the key thing is the learning opportunity. Give it some thought, and if you need help, ask!

Also, the article on the single barrel twist pen by workinforwood in the IAP home page is a great resource of information for something like this, but the way I did it, I did not have to use any taps or dies.
 

turbowagon

Member
Joined
Sep 2, 2009
Messages
1,067
Location
Tucson, AZ
I'd like to participate in the challenge. I love your example pen.

Do you have any tips for holding the pen in a collet chuck without marring the body?
 

soligen

Member
Joined
May 11, 2010
Messages
1,085
Location
Sterling Heights, Michigan
I'd like to participate in the challenge. I love your example pen.

Do you have any tips for holding the pen in a collet chuck without marring the body?

Welcome to the challenge! You can use blue panter's tape. Also, if the pen tapers, you can put several layers on the thiner side of where the collet grips to built up the thickness so the pen doesn't wobble.
 

turbowagon

Member
Joined
Sep 2, 2009
Messages
1,067
Location
Tucson, AZ
OK, here goes... here is my sorry first attempt / prototype.

This is probably the ugliest pen I ever made, and I botched the finish, but I learned a lot and have some ideas for improvement with the next one.

Myrtlewood modified Aero:

ugly_modified_aero.JPG


- Joe
 
Last edited:

RAdams

Banned
Joined
Apr 5, 2009
Messages
2,983
Joe,

When i first saw that you uploaded a picture already, my first thought was "Jeesh this guy is AMAZING":eek:.


Then the picture loaded........:eek::eek::eek::befuddled::eek::eek::eek:

I would have to agree. That is definately the ugliest pen you have ever posted!:biggrin:

But, at least you are doing the challenge, and with ncredible speed as well!

I look forward to seeing the final product from you.
 

ldb2000

Member
Joined
Sep 11, 2007
Messages
5,381
Location
Laurence Harbor, NJ, USA.
This is my entry for this challenge , it should have been posted last night but my batteries were dead in the camera and I had to wait for them to charge . It's a kitless cigar pen . It's made with some Mesquite and a cigar tube and transmission . I got the cigar band from Peter (aggromere) , thanks peter .


ctubbs

Member
Joined
Sep 12, 2010
Messages
3,588
Location
Murray, Kentucky
Good looking pen, Butch. Great finish and the fir top to body is excellent. Photos on a mirror are difficult at best and yours come off without a hitch. Congratulations on a great pen and photos.
Charles
 

soligen

Member
Joined
May 11, 2010
Messages
1,085
Location
Sterling Heights, Michigan
More Tips

I'll be traveling for the holiday, so may not be able to post for several days - access is uncertain.

SPOILER ALERT

STOP READING IF YOU DONT WANT TO SEE HOW I DID THINGS AND WANT TO FIGURE IT OUT FOR YOURSELF


To help people out who want to participate, but need to help developing the techniques to do this, what I am going to do is periodically post how I did some aspect for making this pen. I would love to hear from others how you did things, becasue I am sure there are multiple ways to get there.

To start, the first thing to be solved in this challenge is step drilling. Here is how I solved that issue. The first picture shows the bits I used to do this. From left to right, in the order I used them:

1) The bit that fits the lower tube. This is a standard size bit, and was BARELY long enough to use (compare to length of #2).

2) a temporary tube (lower tube size). This is a recycled aluminium arrow shaft. I chose this for the simple reason that the ID is a good fit for items 3 & 4. A 7mm tube will work too - you would just need to narrow down the 1/4 dowel for items 3 & 4 a little bit. This is a temporary tube used as a guide when using 3 & 4 below. You want a good fit to 3 & 4 as the purpose of this tube is to compensate for dowel rods that arn't perfectly straight.

3) This bit cuts the pocket for the spring you can see the blue tape I used to mark the depth of cut.

4) This bit makes the hole for the refill tip. This is a standard fractional bit one size smaller that the #39 bit I used for the final size. I didn't want to commit the expensive #39 bit to be epoxied into a dowel, so I widened the hole later.

5) Bit for drilling the hole for the 10mm tube.

6) A story stick. When held up to the blank, it shows me the transition points and inner diameters. This is so I didn't over turn the pen. I used transfer punches to see where each shoulder was.

7) #39 bit. Used after the fact to widen the hole for the refill tip.

I did all the drilling from the same side of the blank, and yes, the hole wandered a little. I was about 1/32 off center on the far side, so I re-trued the blank between centers (without tubes) before inlaying the paduk.

For items 3 & 4, I used 1/4 dowel, end drilled on the lathe, then epoxied in the bit. To reduce run-out from the bit wandering while being drilled, reamed the hole a bit so it wasn't a snug fit to the bit. I then used the lathe to hold the bit in place while the epoxy cured (second pic). It's not perfect, but it turned out surprizingly well.
 

Attachments

  • DSCN1088.JPG
    DSCN1088.JPG
    58.4 KB · Views: 201
  • DSCN1090.JPG
    DSCN1090.JPG
    51.7 KB · Views: 161
Last edited:

turbowagon

Member
Joined
Sep 2, 2009
Messages
1,067
Location
Tucson, AZ
SPOILER (Highlight text below to read):

Great idea on the drill bit extenders!

For my prototype pen, I drilled a 23/64" hole for the aero tube, then drilled a 7mm hole as far as the bit would reach. Next I used a long Colt 7mm bit to drill to the spring depth. I reversed the blank and drilled the refill hole with a 7/64" bit (I believe). I didn't know if the refill/spring would operate properly with the 7mm step hole, but it did.
 

soligen

Member
Joined
May 11, 2010
Messages
1,085
Location
Sterling Heights, Michigan
SOILERS: Highlight to read

For my prototype pen, I drilled a 23/64" hole for the aero tube, then drilled a 7mm hole as far as the bit would reach. Next I used a long Colt 7mm bit to drill to the spring depth. I reversed the blank and drilled the refill hole with a 7/64" bit (I believe). I didn't know if the refill/spring would operate properly with the 7mm step hole, but it did.

7mm is works, its just wider than you need. A narrower hole gives you a little more room to narrow down the nose cone.

I like the color change you did on the spoilers.
 

ctubbs

Member
Joined
Sep 12, 2010
Messages
3,588
Location
Murray, Kentucky
Dennis, thank you for the tutorial. It is craftsmen such as yourself willing to share their hard earned knowledge that make this site as great as it is. Thank you and have a great and safe trip.
Charles
 

soligen

Member
Joined
May 11, 2010
Messages
1,085
Location
Sterling Heights, Michigan
SOPILER ALERT


Thanksgiving was great! back in town now, so I figure its time for the next spoiler on the challenge.

The clip is recessed, but we did that in Butch's challenge 3. The finial twist means that the clip needs some new way to be held in place. On my pen the twist is at the lower side of the paduk ring (i.e. the paduk is part of the finial and does not secure the clip).


To hold the clip in place, I re-purposed the threaded nib coupler. The nib coupler is already made to press fit a 10mm tube, and is made from brass, so it turns fairly easily with woodworking tools, and since it already press fits, precise turning is not required.

I started by drilling out the nib coupler. I measured the activator tube and transmission, and used the smallest bit that would allow them to pass through the hole. An 8mm bit should be right, but my 8mm is a brad point - not good for this. I used the closest (by 64ths) twist bit I had.

The process of drilling out teh hole removed the threaded portion of the coupler. I then turned the band down - leaving just enough to it would secure the clip. If you have done a polaris pen, what you want is a clip retainer similar to what the polaris kit has. Whan you hake the finial, you will need to have a recess to accomadate this clip retainer and allow the finial to be flush.

As in Butch's challenge 3, the clip ring needs to be enlarged so that the press-fit portion of the coupler will fit through it. I used a dremel for this.
 

Attachments

  • DSCN1094.JPG
    DSCN1094.JPG
    47.5 KB · Views: 154
Top Bottom