....but I hope to make it this weekend. 
Instead of getting drunk sitting downstairs in the hotel pub, I'm sitting in my room playing with ideas for a new ( for me anyway) type of cap. I guess you could call it a Bayonet fitting. It works like many quick-connectors that are available mainly for the electrical industry.
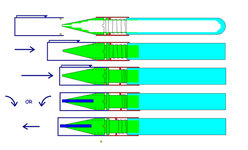
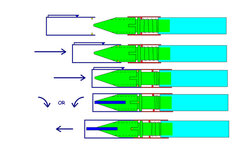
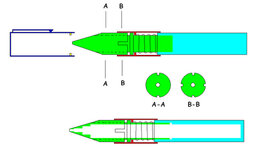
Just inside the cap, there will be two small pins ( the yellow bits). These will slide along grooves milled into the front section of the nib. They will get so far and then push the spring loaded red bit further onto the body of the pen. They will stop when they bottom out in a groove cut around the nib. Now the cap can be turned either clock or anti-clockwise so the pins then line up with short blind grooves cut towards the front of the nib.
The spring will hold the cap back.
I'm planning on making the nib ( all the green part ) and the cap from stainless steel. I'm not sure what to use for the blank body yet ( the blue section), but I probably will use a nice bit of Bakelite or perhaps a 3D Maze blank from Creative Dimensions ( Charlie and Co )
I can't remember if that 3D blank is B2B or Wasp shaped? If it's not B2B, then unfortunately I won't be able to use it as the red bit will need to slide over it.
The red part will probably be a piece of knurled aluminium as it will be the area where the pen is held.
The two visible grooves in the nib for the cap pins need only be about a millimeter deep.
If anyone can think of any possible pitfalls or other ideas to make it better then I'd love to hear them.:biggrin:
.....now roll on the weekend
I'm working at a shared RAF / USAF Comms base at the moment and there are two Yanks that must have been exposed to the radar too long :biggrin: Great guys but both nuttier than a squirrels breakfast!!!!:biggrin:
Sorry for waffling on....:redface:
Me thinks it time for a pint...
Instead of getting drunk sitting downstairs in the hotel pub, I'm sitting in my room playing with ideas for a new ( for me anyway) type of cap. I guess you could call it a Bayonet fitting. It works like many quick-connectors that are available mainly for the electrical industry.
Just inside the cap, there will be two small pins ( the yellow bits). These will slide along grooves milled into the front section of the nib. They will get so far and then push the spring loaded red bit further onto the body of the pen. They will stop when they bottom out in a groove cut around the nib. Now the cap can be turned either clock or anti-clockwise so the pins then line up with short blind grooves cut towards the front of the nib.
The spring will hold the cap back.
I'm planning on making the nib ( all the green part ) and the cap from stainless steel. I'm not sure what to use for the blank body yet ( the blue section), but I probably will use a nice bit of Bakelite or perhaps a 3D Maze blank from Creative Dimensions ( Charlie and Co )
I can't remember if that 3D blank is B2B or Wasp shaped?
If it's not B2B, then unfortunately I won't be able to use it as the red bit will need to slide over it.The red part will probably be a piece of knurled aluminium as it will be the area where the pen is held.
The two visible grooves in the nib for the cap pins need only be about a millimeter deep.
If anyone can think of any possible pitfalls or other ideas to make it better then I'd love to hear them.:biggrin:
.....now roll on the weekend
I'm working at a shared RAF / USAF Comms base at the moment and there are two Yanks that must have been exposed to the radar too long
:biggrin: Great guys but both nuttier than a squirrels breakfast!!!!:biggrin:Sorry for waffling on....:redface:
Me thinks it time for a pint...
") . I would suggest instead of grooves for the pins to lock into when inserted and twisted ,you might consider small indents to locate the pen in closed position ,only to stop damage if someone tries to "unscrew cap" without first pushing against the spring pressure the cap would then pop out of the indent easily for turning and removal. I may have misread it entirely though hehe, Have fun with it ,cheers John
. I would suggest instead of grooves for the pins to lock into when inserted and twisted ,you might consider small indents to locate the pen in closed position ,only to stop damage if someone tries to "unscrew cap" without first pushing against the spring pressure the cap would then pop out of the indent easily for turning and removal. I may have misread it entirely though hehe, Have fun with it ,cheers John ... I will be excited to see the results.:biggrin: