T+D---aligning cap and barrel to grain or pattern

Signed-In Members Don't See This Ad

Dan_F

Member
Joined
Nov 8, 2007
Messages
959
Location
Spokane, WA, USA.
Well, I'm now able to make passable threads with the tap and die. The next hurdle is how to make sure the cap and barrel will line up after screwing on the cap. I don't mean the 1 in 3 chance of starting on the correct thread, I mean stopping the rotation in precisely the right spot so that if there is grain or pattern to the blank, it will line up.

In vintage pens, this is done by adjusting the height of the inner cap, so that when it makes contact with the front of the section, the cap is aligned in it's proper orientation. It stops the pen from going in any further. The inner cap also seals the chamber housing the nib, to aid in preventing it from drying out.

So the question is, what methods have been adopted by you intrepid explorers to solve this problem? I find that the end of the threads themselves do not provide a very precise stop. I tried leaving a ridge at the end of the tenon to function as a stop, but I can't predict well enough where the threads are starting to make that a dependable stop. The die also seems to be tapered, so it doesn't cut right to the shoulder. I tried turning it around after initially cutting the threads, then running it over again to clean up the shoulder area, as someone suggested in another thread, but it just ended up stripping out the threads I had just cut.

I know that with many blanks this wouldn't even be an issue, as there is no discernible pattern or figure to align with. But it would seem a good idea to have consistency, so that things are done the same way whether there is figure or not.

I will continue experimenting at any rate, but a little guidance would sure be appreciated.

Thanks,

Dan
 
Signed-In Members Don't See This Ad

Texatdurango

Member
Joined
Apr 23, 2007
Messages
4,649
Location
Show Low, Arizona
Use solid colors! :biggrin:

I tried a few times to get the pattern to align by making the cap a bit longer then after threading it I started trimming the lower edge until the pattern lined up with the lower barrel but it was such a hassle. I found it was easier to get a counterbore and remove the inner threads from the cap.

Even then it wasn't 100% accurate since removing material made the pattern change a little.

Now I use patterns where it's not so noticable when the two halves meet.

Sure would be interesting to see if anyone has mastered this problem.
 

ldb2000

Member
Joined
Sep 11, 2007
Messages
5,381
Location
Laurence Harbor, NJ, USA.
I have to agree with George . I have spent TOO much time trying to get the two half's to match to no avail . In most cases when I use Tru-Stone there are several patterns that match closely so I just look for the best match of the three and leave it at that .
One problem as George has said , is when you take off a little from the cap you change the pattern and lose any alignment you had to begin with , and another problem is when you cut your blank to start you take the kerf out of the pattern and lose a match between the ends anyway making it hard to match the patterns .
I'm all ears if anyone has a way around this problem .
 

Dan_F

Member
Joined
Nov 8, 2007
Messages
959
Location
Spokane, WA, USA.
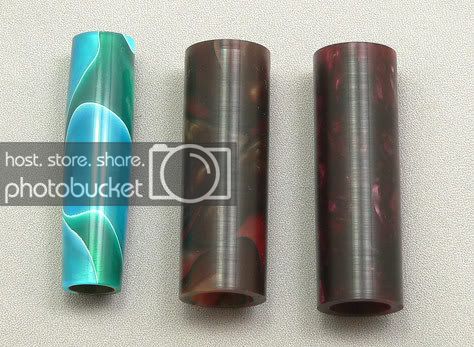
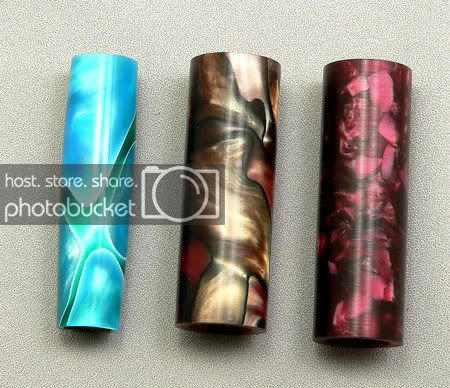
Even with wood, you lose the kerf and a little extra material to squaring to the tubes, so it's never perfect. With many acrylics though, there is a definite "sidedness", or polarity. Two opposite sides reflect light, the other two absorb. Even the chip patterns have this characteristic, except for the new "Invisiview" blanks, which have found a way to avoid it. Many of the Truestones also have a "grain", such as the Malachite. This illustrates what I mean by polarity:

P1020081.jpg


P1020080.jpg


There are very few acrylics which don't have some degree of this characteristic. If the polarity of barrel and cap don't match, it would look pretty bad. So I'm hoping the brain trust here can figure out a way to address it. Unfortunately, spatial visualization is a particularly weak point for me, I must have been hiding under the table when that gene was passed out. But here are a couple of ideas.

Use an inner cap like the commercial pen makers use. It could be a fussy business getting this adjusted, but it would stop the barrel from screwing in beyond a given point, by stopping the leading edge of the section. There is a description of how this can be measured with a simple home made tool that I saw over on the FPN website, I'll see if I can find that again and post a link here.

The other idea would involve something akin to a washer, a disc of material, the thickness of which would be determined by what is needed to stop the cap's rotation at the desired point. This is similar to what the kits do, they have some of the metal fitting act as a stop. This would at least prevent one from removing any additional pattered blank material, and could function as a design element. It would be adjusted by scraping from the thread end of the cap while in a collet chuck, before the cap is turned to shape. It would have to butt up against a shoulder in the barrel.

A third means would be to make a center band/thread coupler much like the kits use, such as Bruce documented here: http://www.penturners.org/forum/showthread.php?t=8415 That would make a lot of extra work, including painting the inside of the tubes in many blanks, but alignment could be set when the inner part is glued in, similar to the way the kits are aligned.

Dan
 

BRobbins629

Passed Away Dec 28, 2021
In Memoriam
Joined
Mar 8, 2006
Messages
4,037
Location
Richmond, VA, USA.
This is a great topic, but I think the only good solution is a mechanical stop such as you describe. You can always tighten a thread just a little more so I don't think playing the the tap and die or even threading on the lathe will ever get you there.
 

marcruby

Member
Joined
Feb 22, 2008
Messages
1,175
Location
Warren, Michigan, USA.
The traditional way on turned boxes (not pens) is to turn a bead or two at the juncture. Maybe a small contrasting band whose thickness you could adjust would make it look like you had a match even if you really didn't.
 

DaveM

Member
Joined
Mar 2, 2007
Messages
136
Location
Houghton Lake, Michigan
I am working on this problem too. Right now, I am experimenting with turning a shoulder at the base of my tenon, and having the rim of the cap butt up against it securely. By shaving a little bit off ofthe end of the cap, I can adjust the alignment. I still have aways to go, but it is showing some promise. I do have to drill out the outer 1/8" or so of the cap, as the die won't cut right up to the shoulder of the tenon. That makes clearance for the ends ofthe threads. When I get it right, I will post some pics, but I am spending most of my time on the real world right now.

Good Luck,
Dave
 

Texatdurango

Member
Joined
Apr 23, 2007
Messages
4,649
Location
Show Low, Arizona
Well I got back home and finally have some time to visit my shop again. I got to thinking about this problem and remembered why I just gave up trying to match the cap with the body.

Looking at the sketch below, imagine having a blank with a random pattern and separating the cap from the body by cutting at "B/C".

Then you will want to cut some threads on the lower body but regardless of how long or short the tenon or where you start the threads, you will eventually wind up trying to mate the two halves together by trying to match up surface "A" with surface "C", which will not line up unless you have a very repeating pattern or grain.

It's not the same as when we were cutting a blank and inserting two halves into tubes then pressing into metal connectors that basically allowed for a pretty good alignment with very little material loss.
 

Attachments

  • matching blank halves.jpg
    matching blank halves.jpg
    20.7 KB · Views: 188

VisExp

Member
Joined
Oct 1, 2007
Messages
2,738
Location
Palm Coast, FL, USA.
George, I may be completely out of my depth here, but what if you cut the blank in two and then tapped female threads in both the upper and lower barrels. Then turn and thread a male ferrule out of another matching blank. Screw and glue the ferrule into the lower barrel. Then when the upper barrel is screwed onto the ferrule the pattern will line up less the kerf of what you used to make the initial cut in the blank. Using a scroll saw that kerf could be as little as 10 to 15 thou.
 

DCBluesman

Passed Away Mar 3, 2016
In Memoriam
Joined
Aug 22, 2004
Messages
7,679
Location
WOODBRIDGE, VIRGINIA
We aren't alone in this problem. My suggestion would be to make a section and an upper cap insert from ebonite, then use traditional methods to insure alignment. Look at the way Omas handled the problem.

attachment.php
 
Last edited:

BRobbins629

Passed Away Dec 28, 2021
In Memoriam
Joined
Mar 8, 2006
Messages
4,037
Location
Richmond, VA, USA.
I think Dave has the right idea to make a hard stop which will be needed along with the suggestions of others to use alternate materials or another piece for the male threads if you are anal about matching grains and patterns. In some recent pens I have made, the ones where the transition of the threads to the low barrel has a shoulder either of metal, plastic, ebonite or whatever, has a hard stop if the cap hits it. If the transition is such that there is no shoulder or the cap is bored out to completely go over the bottom section and there is no other internal stop on the cap, the threads can always be tightened a little more.
attachment.jpg
 

Attachments

  • Transition.jpg
    Transition.jpg
    36.9 KB · Views: 267

Dan_F

Member
Joined
Nov 8, 2007
Messages
959
Location
Spokane, WA, USA.
We aren't alone in this problem. My suggestion would be to make a section and an upper cap insert from ebonite, then use traditional methods to insure alignment. Look at the way Omas handled the problem.

attachment.php

Lou---Perhaps I'm a bit dense, but I'm not sure what you mean. This pen seems to be a snap cap.

Dan
 

Dan_F

Member
Joined
Nov 8, 2007
Messages
959
Location
Spokane, WA, USA.
I guess I'm more concerned with getting the general reflective vs non reflective sides to line up than precise lines of a pattern, which, from Georges illustration, appears to be pretty difficult. If you recess the threads into the cap by a half inch or so, it would seem to be impossible to have a linear match. But for the crush type blanks, where there is no linear pattern, I would still want to be able to match reflective to reflective surfaces (see pics in my second post in this thread).

Dan
 
Last edited:
Top Bottom