Mini Review NewLondon88's no cork mold

Signed-In Members Don't See This Ad

OKLAHOMAN

Member
Joined
May 17, 2006
Messages
10,228
Location
Costa Rica
A few weeks ago Charlie (NewLondon88) wanted some Beta testers for his idea of a mold that you would not have to have to use corks, or stoppers, also would not have to fill with BB's or clay to keep the resin out of the tubes when casting skins, labels or any other tubed casting.
As everyone stepped backward one step I fell asleep and remained where I was so I received the mold a week or so ago and just now had a chance to test it.

This mold was a prototype and only held 2 tubes for one pen. It was not made for resale and was rough looking but functional.

I was skeptical that under pressure the built in stoppers would keep resin out of the tubes. I usually fill my tubes with clay and use corks glued to 1x1 thin strips of wood (cut up Paint stirrers). The mold eliminated the use of clay, corks and 1x1's and as a side benefit 50% or more PR.But would it work?

It's been a little cold the last few days so I heated the PR in my toaster oven to get it thin and pourable as water thinking that the thinner the pr the more chance that it would seep into the tubes under pressure.

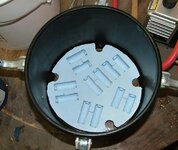
Mixed my activator, poured and placed into the pot at 40PSI for 2 hrs. below are pictures of the final results. Not a drop of PR in the tubes.

Below are the results in pictures:
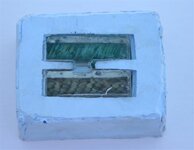
First the Mold:
IMG_1269-1.jpg


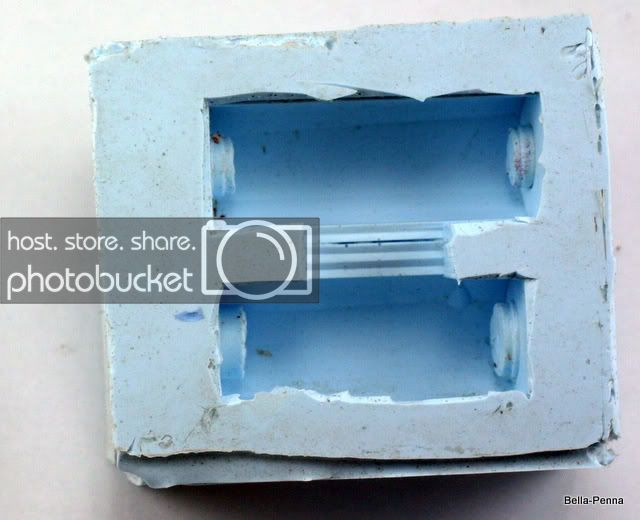
Told you it's a prototype:wink:
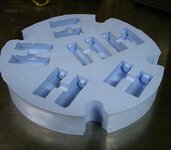
Second, the pour:
IMG_1267-1.jpg


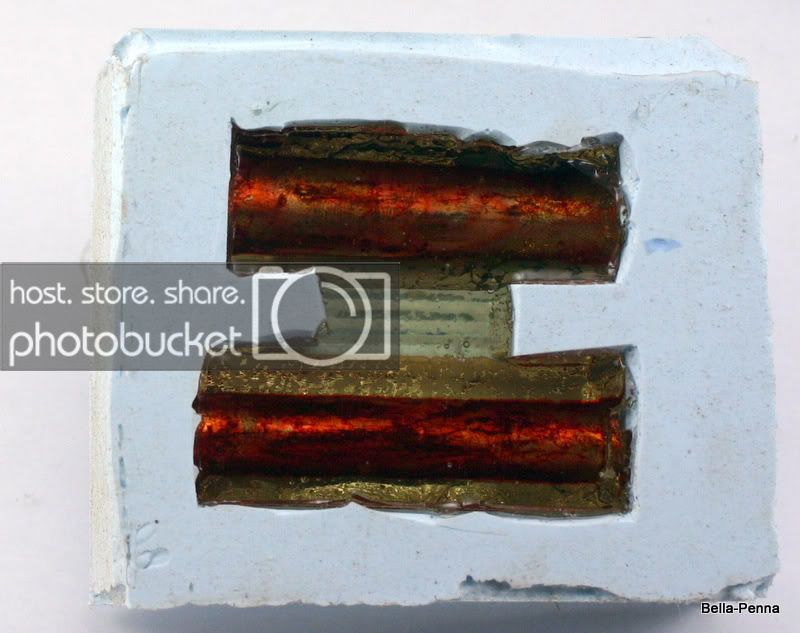
Still not impressed?

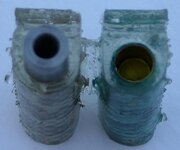
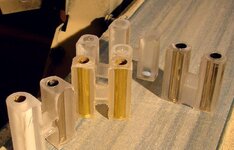
3rd removal of the finished casting and looking down the tubes:

IMG_1268-1Medium.jpg


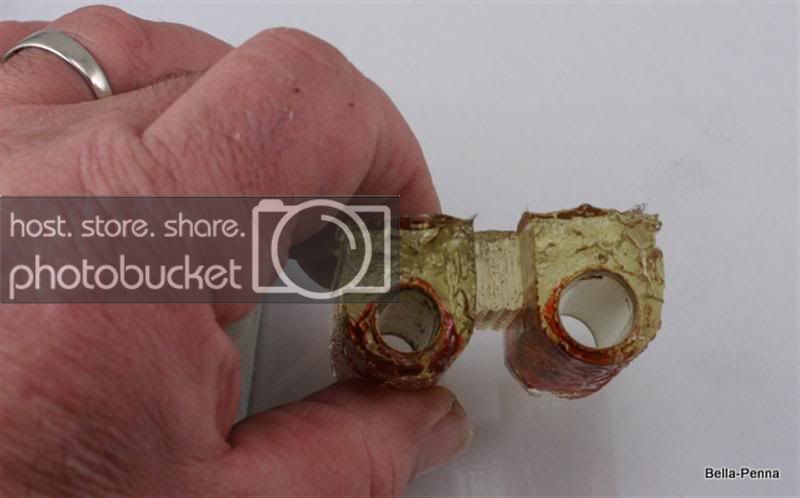
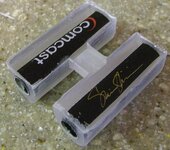
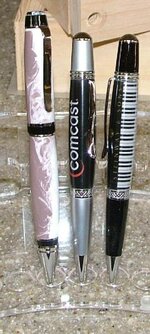
Not a drop in the tubes and ain't that a good looking hand? Now for the finished casting made into a pen:
IMG_1270-1.jpg
 
Signed-In Members Don't See This Ad

thewishman

Member
Joined
Mar 9, 2006
Messages
8,182
Location
Reynoldsburg, Ohio, USA.
Looks like a winner. Would that system need a different mold (for those using British spelling - mould) for each pair of tube sizes?

(I wish my ordered pressure pot would get here!)
 

NewLondon88

Local Chapter Leader
Joined
May 15, 2008
Messages
5,077
Location
Claremont NH
Great looking hand!

Chris, yes there would be a different mold for each pen type, since the pour would
yield a top and bottom already sized according to pen kit.
I've purchased tubes for every pen kit from CSUSA so far, and have several from other
suppliers. But, given the correct dimensions of tube length and ID, any kit is possible.

Production molds are 4 pens to a mold, or 8 Sierra / Wall St / Elegant Beauty so far.
More are being added.

Roy, thanks for the testing and feedback. Your recommendations are being included in
the production molds.

And yes, that was a prototype. The real molds won't be nearly that ugly. :biggrin:
 

wdcav1952

Activities Manager Emeritus
Joined
Mar 18, 2004
Messages
8,955
Location
Montgomery, Pennsylvania, USA.
Charlie, that is a great idea! My son does a bit of casting and he is, well, a bit patience impaired shall we say. This would really work well for him. Please keep us posted on your progress.
 

wolftat

Product Reviews Manager
Joined
Aug 19, 2007
Messages
5,377
Location
Fairfield, CT, USA.
As a second beta tester I have to agree with Roy about the molds. They are a fantastic idea. I am an Alumilite user and these worked great with it.I had a blank that I was turning blow out on me, it looked like it was time to strip it off the tube and start over, then I remembered that Charlie had sent me this mold and figured it was worth a shot. I placed the blown up blank in the mold and poured in some resin and threw it in my pot. It was a great save, it was ready to be returned in an hour or so and the pen was ready on schedule. I am getting ready to cast some snakeskins and will do a follow up when I am finished, but I expect there to be no problems. Charlie, thanks for letting me try this mold, it is a great idea and I will be buying some from you when you start production.
 

NewLondon88

Local Chapter Leader
Joined
May 15, 2008
Messages
5,077
Location
Claremont NH
Glad that worked out, Neil. I just got back from the machine shop, they're helping me
to get the masters together. My wallet really hurts now.
I should be able to start shipping Sierras, Jr Gents/ Jr Statesmans by next week, and
Emperors, Jr Emperors, full gents and cigars by the week after.
Fingers crossed..
 

broitblat

Member
Joined
Feb 9, 2006
Messages
3,226
Location
Bellevue, WA, USA.
I think it looks like a great idea!

A few other thoughts come to mind. These are just off the top of my head, so I may be missing some obvious reasons why these aren't good ideas, but I thought I'd throw it out to the folks that actually know how to make things...

I wonder about variations for casting tubes that have things glued to the exterior (e.g. carbon fiber, shell, etc.). These sometime extend beyond the end of the tube (to be trimmed later) so a slightly longer "cork" section might help.

Also, if the stopper sections were pointed on the end, the same molds could be used to cast untubed blanks (coffee beans, pasta, etc.) and the point could be a guide for later drilling.

-Barry
 

NewLondon88

Local Chapter Leader
Joined
May 15, 2008
Messages
5,077
Location
Claremont NH
I wonder about variations for casting tubes that have things glued to the exterior (e.g. carbon fiber, shell, etc.). These sometime extend beyond the end of the tube (to be trimmed later) so a slightly longer "cork" section might help.

Nothing wrong with the idea, these are meant for label and skin casting but
so far the idea is to do the trimming before setting them in the mold. Not
to say these things can't be done, but I'm concentrating on what I can
handle so far (and already over my head!)

Also, if the stopper sections were pointed on the end, the same molds could be used to cast untubed blanks (coffee beans, pasta, etc.) and the point could be a guide for later drilling.
-Barry

I think some of the other mold makers are doing this already. The little
dimple is good for drill starting.

Again, nothing wrong with the idea.. but I could re-engineer over and over
and still come up with other things.. and I'm already in the hole for a fair
bit of money on what I have so far. Revisions will probably be an ongoing
thing as funds become available. So far, I saw a need and thought I might
be able to fill it.. that doesn't mean I won't see other needs later on :biggrin:
 

its_virgil

Member
Joined
Jan 1, 2004
Messages
8,125
Location
Wichita Falls, TX, USA.
I also tested the molds ... the molds I tested were for the sierra and Jr's. I made two casts with each using snake skins, except for one sierra and I cast a dyed blank that had been turned previously. The molds worked fine. The entire concept will save me the time of (1) inserting corks and the wooden standoffs, (2) purchasing corks, (3) cutting the wooden standoffs. There is plenty of resin thickness as can be seen with the picture with the sierra bushing inserted. I liked the idea and await the molds with more capacity than just one pen. Thanks Charlie for working on these.
Do a good turn daily!
Don
 

Attachments

  • mold and blanks.JPG
    mold and blanks.JPG
    27.9 KB · Views: 305
  • IMG_3400.jpg
    IMG_3400.jpg
    30.4 KB · Views: 311

NewLondon88

Local Chapter Leader
Joined
May 15, 2008
Messages
5,077
Location
Claremont NH
I also tested the molds ... the molds I tested were for the sierra and Jr's. I made two casts with each using snake skins, except for one sierra and I cast a dyed blank that had been turned previously.

oooo .. another use I didn't think of .. like Neil's re-casting.
So .. you cast a dyed blank that was already turned..to give it a PR finish?

I was thinking this afternoon that if someone had access to slip, they could
do their own ceramic pens, too.. but I doubt the brass would hold up to the
heat of a cone 2 :tongue:

ps.. Carl .. should be within the next week or so, but I have some backorders
to fill first. I can only make one mold a day so far..
 

OKLAHOMAN

Member
Joined
May 17, 2006
Messages
10,228
Location
Costa Rica
Don, did you overturn a dyed WOOD blank and then cast it? If so I'm intrigued how the heat of the PR as the MEK heated the resin affected the wood. It would make for a tough finish.....
 

its_virgil

Member
Joined
Jan 1, 2004
Messages
8,125
Location
Wichita Falls, TX, USA.
I did over turn the wood...just below the bushing. I've done several this way. Some of my firsts casts were with wood "skins" instead of snake skins. The stronger the grain pattern the better the effect. We know how the curved surface of the polished resin magnifies the skin pattern...it does the same for the wood. The nice finish over the wood is an added treat. I've not had the curing heat adversely affect the wood. This particular blank was a stabilized blank that I found in my cutoff bucket. Give it a try sometime. I think you'll like what you get.

Do a good turn daily!
Don

Don, did you overturn a dyed WOOD blank and then cast it? If so I'm intrigued how the heat of the PR as the MEK heated the resin affected the wood. It would make for a tough finish.....
 

broitblat

Member
Joined
Feb 9, 2006
Messages
3,226
Location
Bellevue, WA, USA.
Nothing wrong with the idea, these are meant for label and skin casting but
so far the idea is to do the trimming before setting them in the mold. Not
to say these things can't be done, but I'm concentrating on what I can
handle so far (and already over my head!)


I think some of the other mold makers are doing this already. The little
dimple is good for drill starting.

Again, nothing wrong with the idea.. but I could re-engineer over and over
and still come up with other things.. and I'm already in the hole for a fair
bit of money on what I have so far. Revisions will probably be an ongoing
thing as funds become available. So far, I saw a need and thought I might
be able to fill it.. that doesn't mean I won't see other needs later on :biggrin:

I hope my thoughts weren't taken as a criticism -- I think this is a great idea and can see how it would save a lot of time and hassle (and ruined blanks :frown:) in its current form. If I have the budget when these become available, I'd certainly be interested in getting some.

-Barry
 

lwalden

Member
Joined
Nov 3, 2005
Messages
1,238
Location
Trophy Club, Texas, USA.
I'm just wondering if this might not be an approach to use with Snakewood.......

I did over turn the wood...just below the bushing. I've done several this way. Some of my firsts casts were with wood "skins" instead of snake skins. The stronger the grain pattern the better the effect. We know how the curved surface of the polished resin magnifies the skin pattern...it does the same for the wood. The nice finish over the wood is an added treat. I've not had the curing heat adversely affect the wood. This particular blank was a stabilized blank that I found in my cutoff bucket. Give it a try sometime. I think you'll like what you get.

Do a good turn daily!
Don
 

NewLondon88

Local Chapter Leader
Joined
May 15, 2008
Messages
5,077
Location
Claremont NH
I hope my thoughts weren't taken as a criticism --

No, no .. nothing like that! :biggrin: Ideas don't happen in a vacuum .. I take
advice and ideas anywhere they happen.

I think this is a great idea and can see how it would save a lot of time and hassle (and ruined blanks :frown:) in its current form. If I have the budget when these become available, I'd certainly be interested in getting some.
-Barry

This is the IAP.. we tend to work well with budgets :wink:
 

babyblues

Member
Joined
Mar 8, 2007
Messages
658
Location
Portland, ME, USA.
That's a great idea, Charlie. I've been toying with wanting to try some double casting myself. If you don't mind me asking, what kind of silicone do you use for your molds and where do you get it? There are so many kinds of silicone rubber and I don't have a clue what makes one different from another.
 
Last edited:

NewLondon88

Local Chapter Leader
Joined
May 15, 2008
Messages
5,077
Location
Claremont NH
That's a great idea, Charlie. I've been toying with wanting to try some double casting myself. If you don't mind me asking, what kind of silicone do you use for your molds and where do you get it? There are so many kinds of silicone rubber and I don't have a clue what makes one different from another.

So far I've been using the Polytek TinSil 70-25 because it is soft. That
allows you to de-mold faster and cast again. I've also got some with a
Shore A hardness of 65, but if you try to de-mold too quickly, you'll warp
your casting trying to get it out of the mold.
I think I got mine from US Composites, but I'd have to check.

I never even thought about the double casting until Neil and Don
mentioned it, but once I read that I started thinking about doing double
castings for 'inlay' .. cast one color, turn a line in the blank and then
re-cast in a second color to fill in that line..
.. or turn and polish a blank, then have it laser engraved, sandblast an
image onto it, or apply a decal , or hand paint it, then cast again in clear

.. the possibilities are endless.

I've got my first full sized mold cooking now.
I think I'll bring it to the meeting on Sunday
 

NewLondon88

Local Chapter Leader
Joined
May 15, 2008
Messages
5,077
Location
Claremont NH
Getting closer..

Still need to work out a few refinements, but almost there
 

Attachments

  • Mold1.jpg
    Mold1.jpg
    37.1 KB · Views: 474

NewLondon88

Local Chapter Leader
Joined
May 15, 2008
Messages
5,077
Location
Claremont NH
Thanks .. I"m starting to fill some orders now, but only the Jr. Gent/Statesman
or the sierras so far.
But it's slow going, since making the mold takes the master out of commission
for a day ..
 

NewLondon88

Local Chapter Leader
Joined
May 15, 2008
Messages
5,077
Location
Claremont NH
Cigars, Full Gent/Statesman and Barons are on the list for the next masters, once
I recover a bit of the costs on the Sierras and Jr Gents..:tongue:

I can get a Sierra out by next week..
 

NewLondon88

Local Chapter Leader
Joined
May 15, 2008
Messages
5,077
Location
Claremont NH
Tried my own mold..

Finally got to try out one of my own molds for a real pen instead of
just test casting. Worked fine and I didn't even get any bubbles.
Scanned a friend's signature to put it on the pen and that came out OK
.. tried a homebrew ,too. Kinda looks like chocolate milk..
 

Attachments

  • Sierras3.jpg
    Sierras3.jpg
    29.2 KB · Views: 441
  • Sierras4.jpg
    Sierras4.jpg
    56 KB · Views: 463
  • Sierras7.jpg
    Sierras7.jpg
    36.6 KB · Views: 467

doddman70

Member
Joined
Apr 1, 2007
Messages
1,073
Location
Eugene, Oregon USA.
Wow!!! I gotta get me some of those! can you put me on the list for 1 sierra and 1 JR gent? and when you get to them I would be interested in a cigar and a ful size gent. How much are they?

Thanks Shane
 

NewLondon88

Local Chapter Leader
Joined
May 15, 2008
Messages
5,077
Location
Claremont NH
Got you on the list. I made some more this afternoon. Someone said to
dust the molds with talcum powder. Didn't make sense to me, but I had
some powdered marble that is pretty fine, so I used that.

The edges of the resin (where it touches the mold) have been coming
out with a rough surface, but with the powder they come out smooth.
No bubbles, either!
 

Attachments

  • Jerry.jpg
    Jerry.jpg
    59.9 KB · Views: 316
  • MoldPot.jpg
    MoldPot.jpg
    61.7 KB · Views: 285

NewLondon88

Local Chapter Leader
Joined
May 15, 2008
Messages
5,077
Location
Claremont NH
Got it.

I'm going to have to come up with some sort of ad to put in the
individual classifieds. First I've got to come up with a name..
 

Crashmph

Member
Joined
Dec 15, 2008
Messages
1,515
Location
South Riding, VA
"Pen Mold Casting Doohickey"

As soon as I get moved into my new shop I will have to get a few of these. As for a name... "Pen Mold Casting Doohickey"
 

jason_r

Member
Joined
Apr 1, 2008
Messages
405
Location
Chandler, AZ, USA.
My thoughts:

Great idea.
Love the rounded bottoms- always thought the square corners on molds were a waste.

This is a quick brainstorm- the details may not work on some of
these ideas.

In your future molds, can you have text in them saying what kind of mold
and how many oz/ml of resin each cavity takes? (I've started doing this on my
molds - at least the oz part just because I don't cast often enough to keep
them straight otherwise)

I'd like a smaller (and cheaper) - more like the prototypes mold. Or would someone
be interested in splitting (literally) one of these?
Future molds could be laid out a little differently to make them easier to cut up.

Are the round cutouts in the mold edges just to reduce excess mold rubber,
or are they designed so you could stack multiple molds in the PP at once.
(I'm betting a stiff board of some kind would be needed as well, but you don't
want to stick layers together)
If not, would you consider such a feature for future molds? Maybe a semicircle
depressions at 3-4 points where a marble could rest. (marbles instead of legs
on the board because 1. flat boards store easier 2. you could put the marbles in
first and not have to worry about exactly lining up the legs )

Do you have a plug for the bridge between the two cavities?
I'm envisioning the case where I want to cast one half a pen w/ a label
and use something else for the other half, or do different colors for
the two halves. (and can't tell from the pictures if it'd be possible to
fill the cavities so they're deep enough but don't flow through the bridge)
 
Last edited:

NewLondon88

Local Chapter Leader
Joined
May 15, 2008
Messages
5,077
Location
Claremont NH
My thoughts:

Great idea.
Love the rounded bottoms- always thought the square corners on molds were a waste.

Yep .. wasted resin.
This is a quick brainstorm- the details may not work on some of
these ideas.

In your future molds, can you have text in them saying what kind of mold
and how many oz/ml of resin each cavity takes? (I've started doing this on my
molds - at least the oz part just because I don't cast often enough to keep
them straight otherwise)

I've sent for an ID badge to be engraved. I didn't think about the oz, but
there's so many pen types that it would be impossible to keep them
straight if you had more than a couple. The ID badge would go into the
master so the mold would come out with the name and my info if you
needed it.

I'd like a smaller (and cheaper) - more like the prototypes mold. Or would someone
be interested in splitting (literally) one of these?
Future molds could be laid out a little differently to make them easier to cut up.

LOL .. I haven't even gotten my first check yet, and already
you're changing it. FWIW, I just made a smaller version this afternoon, it
holds 4 pen kits. The big round molds were made based on requests
from testers who do production runs.

Are the round cutouts in the mold edges just to reduce excess mold rubber,
or are they designed so you could stack multiple molds in the PP at once.

Both. It reduces the silicone a little (and at silicone prices, anything I can
do to bring down the cost will help) but the main reason was so that users
can make a shelf to hold the molds and stack them in the pressure pot.
A piece of 1/2" plywood works fine for a shelf, and it IS necessary to have
at least one.. even if it is only for the rounded bottom of the pressure pot.
But by putting the cutouts on the sides, you can put something there
(dowels?) to stack them. I pictured the dowels going up to the top, where
they can connect to handles to lift them out of the pressure pot, similar
to the arrangement Curtis (MesquiteMan) made when he gave away a
complete setup for the Bash.

FWIW .. you wouldn't need this with Alumilite. It sets up so fast, you
wouldn't have time to pour and then stack molds before it set up. :eek:

(I'm betting a stiff board of some kind would be needed as well, but you don't want to stick layers together)
If not, would you consider such a feature for future molds? Maybe a semicircle
depressions at 3-4 points where a marble could rest. (marbles instead of legs
on the board because 1. flat boards store easier 2. you could put the marbles in
first and not have to worry about exactly lining up the legs )

At almost 4 lbs per mold (empty) I don't think marbles would do any good
at supporting the molds .. or more accurately, I'm not sure the silicone
would support the weight of other molds on top of the marbles.. it might
just push it out of shape. But that's something I'll look at.

Do you have a plug for the bridge between the two cavities?
I'm envisioning the case where I want to cast one half a pen w/ a label
and use something else for the other half, or do different colors for
the two halves. (and can't tell from the pictures if it'd be possible to
fill the cavities so they're deep enough but don't flow through the bridge)[/quote]

Frankly, with the amount of resin you save with this mold, the tiny bit
used to fill the other half is negligible. I just cast 4 Sierras this afternoon
and I used 52 grams of Alumilite. If I remember right (others who cast
often can correct me if I'm wrong) I was using around 2 ounces per pen
when pouring them in Tupperware containers with corks, BB's and wooden
stands to hold them up. So .. about 2 ounces for 4 pens compared to
8 ounces. To cast two pens, half of a bathroom Dixie cup is going to be
too much resin. Looks like about a 75% savings in resin. Not such a big
deal on PR, but on a polyurethane resin, it's significant $$

There's some good ideas here for the DOOHICKEY MOLDS. :biggrin: I'm still
working on my first customer order, I'm not really locked into anything yet.
 
Signed-In Members Don't See This Ad
Top Bottom