Texatdurango
Member
I would like to share my thoughts with assembling a particular pen kit.
The kit is the Artisan fountain pen kit #050-4407 or #050-4408 and is sold by Craft Supply (http://www.woodturnerscatalog.com/) at the time of this post is currently selling between $8.50 and $10 depending on plating.
While this kit is not meant to be a high end kit, I find it is an easy to assemble kit with straightforward instructions and nice fitting parts with decent plating. Having personally used two in my desktop fountain pen rotation for over a year and having assembled a few dozen kits I would share the following:
What is unusual about this pen is that it is a "snap cap" meaning the lower body does not thread into the upper cap, instead the nib section snaps into a plastic liner inside the cap. Pens have been made using snap caps for many years, being proven to be a dependable method of capping a pen and learning this method opens doors to some interesting customized designs but I digress.
Turning the upper and lower blanks is no different than turning blanks from dozens of other kits. One difference is the way the clip is attached to the finial. The blank must be notched to allow it to fit around the top of the clip. In my opinion this gives the "hidden clip" look to the pen, a feature many find desirable in more upscale and customized "closed end" pens. Learning to notch a blank for a clip is good practice and a skill worthy of adding to ones skill set.
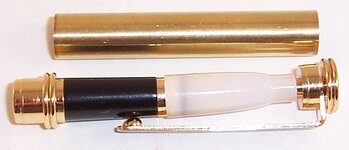
If there is a trick to the assembly of this kit it would be seating and adjusting the inner cap especially if it is the first time one tries it so I came up with an easier solution. Looking at the photo below you can see that by threading the plastic cap onto it's post before glueing and turning the blank then sitting the tube next to it, you can easily see how far to thread the cap on. This is an easy way of setting the cap just right so when the blank is turned and notched, it can be pressed together for a nice snug fit.
This is a thin pen compared to many kits, measuring approximately:
.535" diameter (depending on how fat you turn your blanks") )
)
5.6" long when capped
6.4" long posted
5" long non-posted
At a mere 35 grams with an acrylic body and rubber ink refill installed, it is a light pen for those who don't like a pen to equal the weight of a steel rebar rod.
My opinion of the kit:
Pros: The kit is cheap ($6.35 in a group buy) considering the cost of a nib and section alone is almost $5. It can be fitted with a replacement "upgraded" nib if desired. It is relatively quick and easy to assemble. Looks streamlined and without a bulky center coupler on the cap looks nice and balanced when posted. Both upper and lower tubes are the same length and upper and lower couplers the same diameter so you won't forget which is which. "Rolled over" coupler sections so if one is "a little off" it is very forgiving and won't be noticed as easily if the couplers had flat squared off edges.
Cons: While the pen can easily accommodate a standard ink converter, one is not supplied with the kit, but due to the price I can understand. The plating is adequate but the clip is a bit out dated and plain looking to me. The lower finial could be a bit shorter and still accommodate a converter, the added weight at that end of the pen isn't that desirable.
Summary:
I find this inexpensive kit just the ticket for those folks wanting to "try out" a fountain pen without spending a fortune. This is an easy pen to give as a gift to someone who might just want to return a few weeks later and order a nicer pen from me. :wink:
Below you can see how I nistall the inner cap before glueing and turning the tubes.
The kit is the Artisan fountain pen kit #050-4407 or #050-4408 and is sold by Craft Supply (http://www.woodturnerscatalog.com/) at the time of this post is currently selling between $8.50 and $10 depending on plating.
While this kit is not meant to be a high end kit, I find it is an easy to assemble kit with straightforward instructions and nice fitting parts with decent plating. Having personally used two in my desktop fountain pen rotation for over a year and having assembled a few dozen kits I would share the following:
What is unusual about this pen is that it is a "snap cap" meaning the lower body does not thread into the upper cap, instead the nib section snaps into a plastic liner inside the cap. Pens have been made using snap caps for many years, being proven to be a dependable method of capping a pen and learning this method opens doors to some interesting customized designs but I digress.
Turning the upper and lower blanks is no different than turning blanks from dozens of other kits. One difference is the way the clip is attached to the finial. The blank must be notched to allow it to fit around the top of the clip. In my opinion this gives the "hidden clip" look to the pen, a feature many find desirable in more upscale and customized "closed end" pens. Learning to notch a blank for a clip is good practice and a skill worthy of adding to ones skill set.
If there is a trick to the assembly of this kit it would be seating and adjusting the inner cap especially if it is the first time one tries it so I came up with an easier solution. Looking at the photo below you can see that by threading the plastic cap onto it's post before glueing and turning the blank then sitting the tube next to it, you can easily see how far to thread the cap on. This is an easy way of setting the cap just right so when the blank is turned and notched, it can be pressed together for a nice snug fit.
This is a thin pen compared to many kits, measuring approximately:
.535" diameter (depending on how fat you turn your blanks
)5.6" long when capped
6.4" long posted
5" long non-posted
At a mere 35 grams with an acrylic body and rubber ink refill installed, it is a light pen for those who don't like a pen to equal the weight of a steel rebar rod.
My opinion of the kit:
Pros: The kit is cheap ($6.35 in a group buy) considering the cost of a nib and section alone is almost $5. It can be fitted with a replacement "upgraded" nib if desired. It is relatively quick and easy to assemble. Looks streamlined and without a bulky center coupler on the cap looks nice and balanced when posted. Both upper and lower tubes are the same length and upper and lower couplers the same diameter so you won't forget which is which. "Rolled over" coupler sections so if one is "a little off" it is very forgiving and won't be noticed as easily if the couplers had flat squared off edges.
Cons: While the pen can easily accommodate a standard ink converter, one is not supplied with the kit, but due to the price I can understand. The plating is adequate but the clip is a bit out dated and plain looking to me. The lower finial could be a bit shorter and still accommodate a converter, the added weight at that end of the pen isn't that desirable.
Summary:
I find this inexpensive kit just the ticket for those folks wanting to "try out" a fountain pen without spending a fortune. This is an easy pen to give as a gift to someone who might just want to return a few weeks later and order a nicer pen from me. :wink:
Below you can see how I nistall the inner cap before glueing and turning the tubes.