Steps I use for Scalloping *Long*

Signed-In Members Don't See This Ad

wiset1

Member
Joined
Aug 25, 2010
Messages
2,222
Location
Florida
Over the past week I've had a lot of requests from people asking about the scallops I put on my pen. While it's not a new concept it should be noted that it is fairly simple to do. I hope to be able to show and explain how I did my pens so others can make them as well.

First of all, let me provide the link to the PDF that Mr. Gisi did some time ago. This breaks it down and advances the idea of how they are done.

Link: http://www.distinctiveturnings.com/tutorials/ScallopPensByMarkGisi.pdf

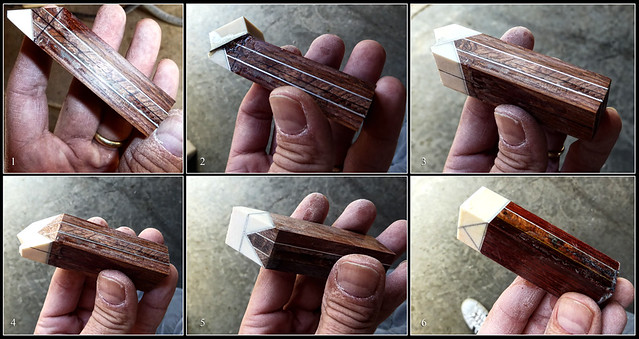
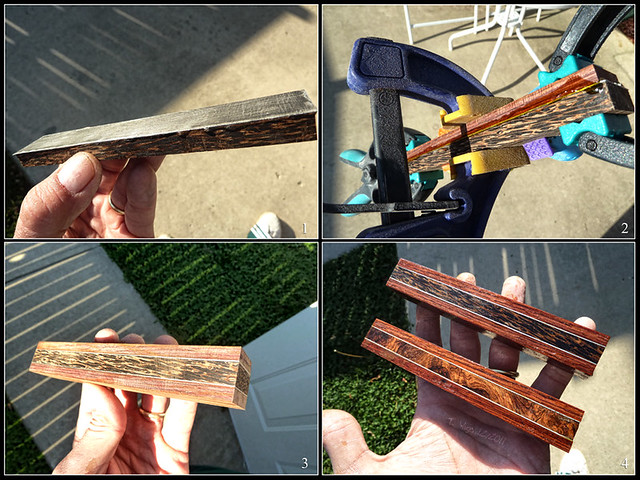
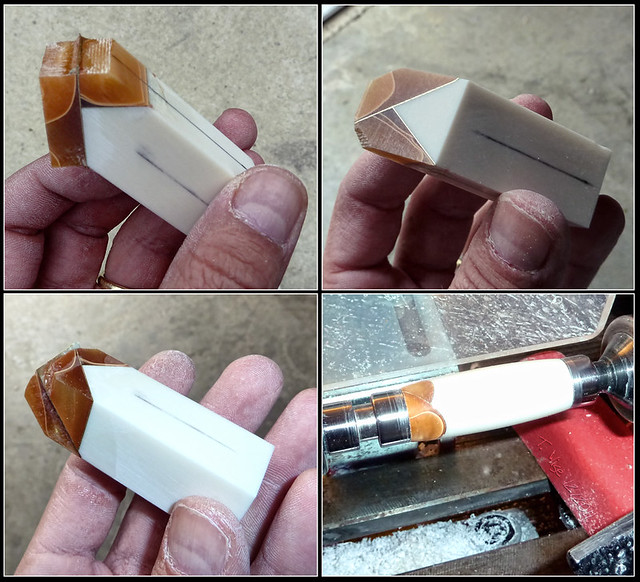
Obviously, turners can choose to modify and move beyond these steps, but I'm just showing what I did. I'll start with some pictures and then explain.
6449713695_c0056a391e_z.jpg


6415545669_c85c134017_z.jpg


6449713791_bf1bfda339_z.jpg


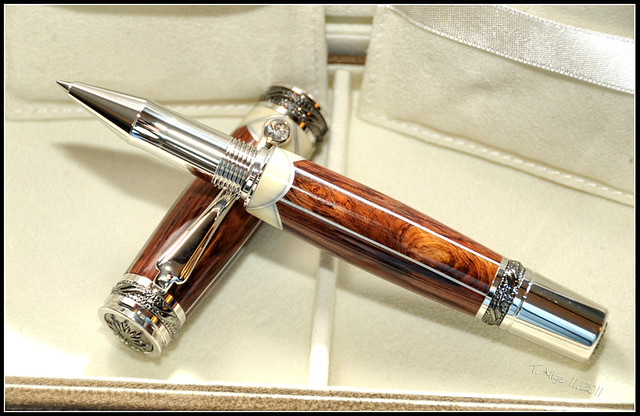
The end result:

6415545993_3b313d2d9f_z.jpg


Okay, so the steps are fairly simple as seen by the images.

Step 1: I rip materials to desired thickness on a saw lengthwise.
Step 2: I rip my scallop material lengthwise and then in sections. About 8 to 10 out of a blank
Step 3: I score/sand the accent material (Styrene, Aluminum, Brass, etc.)
Step 4: I use Medium CA glue and secure the materials together.
Step 5: I mark my blank for upper and lower barrel lengths and cut.
Step 6: I find the center on all four sides and mark them with perm marker.
Step 7: I adjust my guard on the disk portion of my sander to 45 degrees
Step 8: I sand to to the center of the blank at the 45 until I reach middle point.
Step 9: I use Medium CA to secure the accent material and use one of the scallop accents.
Step 10: I sand the overhang material flush to the original blank.
Step 11: Flip your blank over and do the other side the same way.
Step 12: When all 4 sides are done square up the scalloped end just shy of the "V"
Step 13: Coat entire blank in Thin CA
Step 14: Tape blank and drill from scallop side first. Helps to keep it together.
Step 15: coat inside of blank with thin CA to add more strength.
Step 16: Insert and secure brass tube of choice.
Step 17: SHARPEN your tools!!!!
Step 18: Take your time and cut slowly to round.
Step 19: Add more thin CA as you turn to keep the segments and scallops tight. I do this a couple times.
Step 20: Sand, polish, and enjoy:biggrin:

As noted, it's fairly easy to do. I don't have any special tools or fancy jigs for this. I use a sander and a small jet band saw. I use a lot of CA and most of the times half the skin off of my fingers end up on the blank before I sand it off. I hope this helps people understand the process. If anyone has further questions please feel free to ask. I'm always willing to help. The big thing is...take your time! You'll see the results happen before your eyes and if you cut corners you'll see it in the end result.

Take care and best wishes.
 
Last edited:
Signed-In Members Don't See This Ad

thewishman

Member
Joined
Mar 9, 2006
Messages
8,182
Location
Reynoldsburg, Ohio, USA.
You literally put yourself into your work. Glad you sand off the skin (ewwww)!:monkey:

Thanks for the pics and the narrative. You sure do create some beautiful work.:)
 

SteveG

Member
Joined
Dec 21, 2009
Messages
2,989
Location
Eugene, Oregon 97404
Thanks for taking the time to produce this tutorial. I have blundered my way thru doing this type of scallop work after being inspired by others showing their work here. I plan to do more, and the prompting by your tutorial will certainly help me in that effort. When done well, it adds SO MUCH to the finished pen. Very nice work, and thank you!
 

Texas Sam

Member
Joined
Nov 19, 2011
Messages
1
Location
Texas
Great tutorial. Your pens are a work of art. Something I just dream about achieving.
 

wiset1

Member
Joined
Aug 25, 2010
Messages
2,222
Location
Florida
Thanks guys! I just hope that this will provide the tools needed to add something different into your collections. Best wishes and watch out for that CA...it likes to keep skin!
 

wiset1

Member
Joined
Aug 25, 2010
Messages
2,222
Location
Florida
I guess it's one way to tell who made the pen...DNA test, ha ha ha. I know some blood is in there if the CA didn't turn it into a rock.
 

wiset1

Member
Joined
Aug 25, 2010
Messages
2,222
Location
Florida
Tim thank you for a nice concise tutorial, well written and easy to grasp\And very nice photo work.

I hope to see some scalloping from you then:biggrin: I keep watching the "Show off your pens" section for others. I know it's a real pain in the butt to do, but it really is worth the effort.
 

wiset1

Member
Joined
Aug 25, 2010
Messages
2,222
Location
Florida
Feel free to ask any questions you have. I would ask that you also post it in the open forum instead of a PM so others can benefit from the question. Take care and best wishes for the holiday season. I just finished doing the prep work on 3 segmented / scalloped pens this weekend to include another odd segmented one. I hope to have them turned and on a kit by next weekend for posting...depending on how fast PSI can get my kits to me.
 

Rolland

Member
Joined
Dec 27, 2010
Messages
146
Location
Camp Verde, AZ
Thanks for posting, that is a very interesting and informative post, I am going to have to try that method. You do beautiful work.
 

wiset1

Member
Joined
Aug 25, 2010
Messages
2,222
Location
Florida
Can't wait to see what you come up with! I've already seen a couple hit the IAP and they look amazing. Best wishes
 

wiset1

Member
Joined
Aug 25, 2010
Messages
2,222
Location
Florida
If its just acrylics with accent brass or aluminum I'll use my finger to rub medium CA over those areas and then micro sand. If there's wood in the equation I'll always do a CA finish over the entire section.
 

barrysj

Member
Joined
Oct 2, 2009
Messages
125
Location
woodbridge va
rip?

Tim,

When you "rip" smaller segments, how do you keep them square?

It's one thing if you are dimensioning your own lumber, but when I get some of the exotic burls, they only come in normal blank size. I'd love to plane those things to get them square, but haven't found a safe way to do so....so....how do you get nice square thin lengths to put in your segments? Bandsaw?

Thanks,

Absolutely beautiful work by the way!

-Dude
 

wiset1

Member
Joined
Aug 25, 2010
Messages
2,222
Location
Florida
Tim,

When you "rip" smaller segments, how do you keep them square?

It's one thing if you are dimensioning your own lumber, but when I get some of the exotic burls, they only come in normal blank size. I'd love to plane those things to get them square, but haven't found a safe way to do so....so....how do you get nice square thin lengths to put in your segments? Bandsaw?

Thanks,

Absolutely beautiful work by the way!

-Dude

I bought the (Jet JWBS-10OS 10-Inch Band Saw with Stand) from Woodcraft a couple months ago to cut this wood for segmenting. From there I use my Rockwell RK7866 Belt Disc Sander to flush up the blade marks. If it's a difficult slab of wood I'll go to my woodshop here on the military base to use the Jointer/planer. I only really have 3 tools in my garage/shop...Band Saw, Lathe, and sander...oh yeah and a grinder to sharpen the tools if you count that.

As you can see in the pictures, I segment the entire length of the blank to ensure an overall balance. They tend to be 1 inch squared by about 6 inches long. From there it's just sanding and turning. Hope that helps, but the Band Saw is my new best friend:biggrin:
 

wiset1

Member
Joined
Aug 25, 2010
Messages
2,222
Location
Florida
More than happy! I would just ask that you try different materials and woods so there's something fresh and new floating around on the IAP :biggrin:
 

TonyBal

Member
Joined
Dec 12, 2011
Messages
51
Location
Jacksonville, Florida
Over the past week I've had a lot of requests from people asking about the scallops I put on my pen. While it's not a new concept it should be noted that it is fairly simple to do. I hope to be able to show and explain how I did my pens so others can make them as well.

First of all, let me provide the link to the PDF that Mr. Gisi did some time ago. This breaks it down and advances the idea of how they are done.

Link: http://www.distinctiveturnings.com/tutorials/ScallopPensByMarkGisi.pdf

Obviously, turners can choose to modify and move beyond these steps, but I'm just showing what I did. I'll start with some pictures and then explain.
6449713695_c0056a391e_z.jpg


6415545669_c85c134017_z.jpg


6449713791_bf1bfda339_z.jpg


The end result:

6415545993_3b313d2d9f_z.jpg


Okay, so the steps are fairly simple as seen by the images.

Step 1: I rip materials to desired thickness on a saw lengthwise.
Step 2: I rip my scallop material lengthwise and then in sections. About 8 to 10 out of a blank
Step 3: I score/sand the accent material (Styrene, Aluminum, Brass, etc.)
Step 4: I use Medium CA glue and secure the materials together.
Step 5: I mark my blank for upper and lower barrel lengths and cut.
Step 6: I find the center on all four sides and mark them with perm marker.
Step 7: I adjust my guard on the disk portion of my sander to 45 degrees
Step 8: I sand to to the center of the blank at the 45 until I reach middle point.
Step 9: I use Medium CA to secure the accent material and use one of the scallop accents.
Step 10: I sand the overhang material flush to the original blank.
Step 11: Flip your blank over and do the other side the same way.
Step 12: When all 4 sides are done square up the scalloped end just shy of the "V"
Step 13: Coat entire blank in Thin CA
Step 14: Tape blank and drill from scallop side first. Helps to keep it together.
Step 15: coat inside of blank with thin CA to add more strength.
Step 16: Insert and secure brass tube of choice.
Step 17: SHARPEN your tools!!!!
Step 18: Take your time and cut slowly to round.
Step 19: Add more thin CA as you turn to keep the segments and scallops tight. I do this a couple times.
Step 20: Sand, polish, and enjoy:biggrin:

As noted, it's fairly easy to do. I don't have any special tools or fancy jigs for this. I use a sander and a small jet band saw. I use a lot of CA and most of the times half the skin off of my fingers end up on the blank before I sand it off. I hope this helps people understand the process. If anyone has further questions please feel free to ask. I'm always willing to help. The big thing is...take your time! You'll see the results happen before your eyes and if you cut corners you'll see it in the end result.

Take care and best wishes.

First off, this is one of the nicest pens I have ever seen! Second off, I still do not understand how you created that scallop. The segmented part is easy enough to understand, but I don't see how you got from the last picture you showed during turning (the one with the scallop on the white piece of material) & the finished product. I would really like to try something like that, but I just don't understand! :confused: Please help!!!:befuddled:
 

wiset1

Member
Joined
Aug 25, 2010
Messages
2,222
Location
Florida
Just send me a PM with the steps you've taken and we'll work through it together and get you where you need to be.
 

Sawdust46

Member
Joined
Jan 7, 2011
Messages
281
Location
Melissa, Texas
I have made a few scallop pens using a maple burl and a contrasting wood such as walnut. I used 1/16" aluminum for the metal. The problem I have is as I sand to the finer grits the aluminum particles get stuck in open grain of the maple burl giving ita gray tint. Does anyone know how to stop the particles from getting in the grain or is there a way to clean the particles out after final sanding?

PS: my pens don't look nearly as good as yours!
 

wiset1

Member
Joined
Aug 25, 2010
Messages
2,222
Location
Florida
I have made a few scallop pens using a maple burl and a contrasting wood such as walnut. I used 1/16" aluminum for the metal. The problem I have is as I sand to the finer grits the aluminum particles get stuck in open grain of the maple burl giving ita gray tint. Does anyone know how to stop the particles from getting in the grain or is there a way to clean the particles out after final sanding?

PS: my pens don't look nearly as good as yours!

Well, after every couple of passes I stop the lathe and drizzle thin CA over the entire blank and let it rest for a second to soak in before I spritz it with accelerator. This adds strength AND saturates the material which basically stabalizes the material. By doing this it seems to seal up any open grains for me and when I sand the blank it's pretty much filled any major gaps that aluminum particles might get into. From there I'll spritz and clean the blank at least twice with accelerator to get rid of any excess dust or oils. DIRECTLY after that I'll soak a little thin CA on a paper towel and seal the blank. I do two laers of this and then I'll set the blank to the side for a while before coming back to do the full out CA finish on it. This seems to work for me...


Hope that helps
 

Freethinker

Member
Joined
Jun 26, 2007
Messages
275
Location
MO.
Tim, thanks for this tutorial, and for the great photos.

As soon as i saw the pics of your scalloped pens, I knew I had to TRY to make one like it.

I am just now completing my first one,....I will try CA for the gluing on the next one.......the epoxy is just too time consuming.

Also, i made a jig and cut the ends off on my Barnes micro saw.....but the sander seems a good option also. I was a little fearful that i would not be able to sand EXACTLY to the center line every time, thus throwing off the symmetry of the finished pen, ..... the jig on the saw places the blank in precisely the same position for each successive cut.

Again, terrific tutorial, and much thanks for sharing the info so that others can try to "up their game".
__________________
 

BOE

Member
Joined
Jan 18, 2012
Messages
5
Location
Amity Oregon
I love forums to learn new things, and I appreciate guys like Tim who share their knowledge. :good:

As I await my first order of kits from PSI (wishing now I had paid for the express shipping) I keep reading and learning. I found the guy who sells CA and that order has already arrived :smile-big:

I couldnt help myself, I read this thread a dozen times, went out and tried to glue up a scallop blank from some wood I had in the shop. Then I came in mid build and looked at the pics again to make sure I was doing it right :rolleyes: Think I got this right and hope to scallop my first pen.

Not sure how you guys work with CA and not get it on everything, I was lucky I wasnt attached to the work bench when I was done. :eek:
 

wiset1

Member
Joined
Aug 25, 2010
Messages
2,222
Location
Florida
Happy to help guys! Again, I can't take credit for this, but I am happy to show how I do it. Best wishes and be sure to take a break every now and again to help keep your sanity.
 

coaster25

Member
Joined
Jul 17, 2011
Messages
2
Location
Memphis,TN
Thanks for the inspiration!

Hi there,

I appreciate your tutorial and the fact that you were willing to share your knowledge on how to make these. I've never spent so much time making one pen, but it turned out great. I only wish there were more woodworkers like yourself willing to share what you've learned. Many would like to keep this sort of info to themselves. Thank you and all the fellow wood turners out there who continue to inspire me to try new projects.

Matt


Obstacles are what you see when you take your eyes off the goal!
 
Signed-In Members Don't See This Ad

Gilrock

Member
Joined
Oct 18, 2011
Messages
560
Location
Tucson, AZ
Not sure how you guys work with CA and not get it on everything, I was lucky I wasnt attached to the work bench when I was done. :eek:

In Home Depot probably the painting section you can buy a box of 100 disposable latex gloves for I seem to remember $5-$6. That should last quite a while. I like to wear just one glove on the hand that's holding the paper towel while the other hand is holding the CA bottle.

Gil
 
Top Bottom