Penmakers Challenge stage 3

Signed-In Members Don't See This Ad

DurocShark

Member
Joined
Jul 26, 2008
Messages
3,622
Location
Anaheim, CA
Blah. Tenon turned out of round. Needed to use a mandrel so I could use the cigar bushings (they didn't center on my drive center). Also munged up the coupler threads grinding the lip off.

This isn't going well. LOL!
 
Signed-In Members Don't See This Ad

ldb2000

Member
Joined
Sep 11, 2007
Messages
5,381
Location
Laurence Harbor, NJ, USA.
Don't feel bad Don . This is not an easy challenge , it was meant to slow everyone down and try to come up with solutions to the problems that are created when trying to use a kit in a way it was not designed to be used . As you can see by the high number of pens posted in this stage so far , it did slow everyone down a bit . All the techniques used in this stage are used in kitless work at one time or another , so if you ever want to ever go in that direction you will have the knowledge that you need to do it .
Keep at it , I'm sure you will get it
 

DurocShark

Member
Joined
Jul 26, 2008
Messages
3,622
Location
Anaheim, CA
This is what I get for working with a kit I don't know or particularly like. I'm not set up for it.

I may go back and do it again with a 7mm kit. But at the moment I'm fighting with the brakes on my Saab. Just came inside for a break.
 

ldb2000

Member
Joined
Sep 11, 2007
Messages
5,381
Location
Laurence Harbor, NJ, USA.
It's up to you Don , but this is supposed to be a challenge and it seems like that's what is doing so ..... This goes for everyone . If you are having a hard time with the cigar kits you can switch to a slimline and complete the challenge but you will learn more if you stick it out .
Another hint , when you grind down the coupler , put the transmission on to keep from damaging the threads on it .
Don if you need another coupler PM me your address and I can mail you one , I have several extras from my twist Telesto pens , I dont use the coupler on those .
 

Sylvanite

Member
Joined
Jul 18, 2006
Messages
3,113
Location
Hillsborough, North Carolina, USA.
Another hint , when you grind down the coupler , put the transmission on to keep from damaging the threads on it .
If you modify the coupler with the transmission on, be careful to keep the transmission clean. You might consider taping the holes on the ends. I've ruined transmisisons by getting brass dust in them and now I prefer to make all modifications with transmissions off.

Regards,
Eric
 

Rick_G

Member
Joined
Nov 30, 2007
Messages
1,994
Location
Bothwell, Ontario, Canada.
If you modify the coupler with the transmission on, be careful to keep the transmission clean. You might consider taping the holes on the ends. I've ruined transmisisons by getting brass dust in them and now I prefer to make all modifications with transmissions off.

Regards,
Eric

I used a failed transmission for this doesn't matter if it gets dust in it or not. Might want to save one of those old ones Eric.
 

handplane

Member
Joined
Aug 8, 2008
Messages
69
Location
Guantanamo Bay, Cuba
I'm taking next week off work and planning to do all three challenge pens. I will be using slimlines for all three since it's what I have. Cigar kits never appealed to me so I have never bothered ordering any. I may get a couple just to try something different. I do like the looks of them after they have been modified though. I have not done any lathe work for several weeks due my work schedule and it's time for some me time. I'll post pics as I get them done.
 

soligen

Member
Joined
May 11, 2010
Messages
1,085
Location
Sterling Heights, Michigan
I'm taking next week off work and planning to do all three challenge pens. I will be using slimlines for all three since it's what I have. Cigar kits never appealed to me so I have never bothered ordering any. I may get a couple just to try something different. I do like the looks of them after they have been modified though. I have not done any lathe work for several weeks due my work schedule and it's time for some me time. I'll post pics as I get them done.

Great! Butch has one more convert to the dark side of the force! :biggrin: I've learned a TON since doing these. I'm sure you will too.
 

ldb2000

Member
Joined
Sep 11, 2007
Messages
5,381
Location
Laurence Harbor, NJ, USA.
Darth Butch ???? It just don't sound right . I prefer the enlightened side of the force ... Obi wan Butch ... I like that better :biggrin:

Welcome to the fun Bryant . I look forward to your entries , hopefully you can learn some new techniques or improve those you already have . Either way , Have Fun and work safe :)
 

RHossack

Member
Joined
Nov 24, 2006
Messages
362
Location
Liberty Lake, WA, USA.
Now you guys have done it ... I guess I'll try my hand at these ...

I was looking at the pics of the pens and my wife says ... 'why can't you make one like those for me? I like fat pens (and hisbands apparently) ... can you make me a fat click pen that looks like those?'

Since a cigar doesn't have a click pen I think I'll try using slimline pro ...
 

ldb2000

Member
Joined
Sep 11, 2007
Messages
5,381
Location
Laurence Harbor, NJ, USA.
Hmmm a click cigar pen ... I like that idea . I think I'll give it a try :devil::biggrin:


Let's see now should it be a button click , like this


Or a cap click , like this


All joking aside Ron , it would be kind of hard to convert a slimline pro to a click cigar due to the different sized tubes . It can be done but you are going to have to deal with the differing tube sizes and come up with a new way to attach the clip . These two pens were designed using the click mechanisms from Richard Greenwald (http://richardlgreenwald.com/pen-parts-mechanisms-c-2_7.html)
They are basically kitless pens but I used the nib and clip on the button click and the nib and clip/finial on the cap click to save on building these parts .
 

maxman400

Member
Joined
May 25, 2009
Messages
3,111
Location
Omaha Arkansas
Lava Red Modified Cigar

Well here is my shot at it, it took about 3 1/2 hours but I Got to say I learned a lot. :confused:
Thanks Butch for taking your time to do this. :highfive:
 

Attachments

  • Cigar Pen Challange 003.jpg
    Cigar Pen Challange 003.jpg
    20.4 KB · Views: 180
  • Cigar Pen Challange 005.jpg
    Cigar Pen Challange 005.jpg
    19.3 KB · Views: 175

ldb2000

Member
Joined
Sep 11, 2007
Messages
5,381
Location
Laurence Harbor, NJ, USA.
Great looking pen Max . I like the CB treatment it separates the blanks without breaking up the look up .
I'm glad everyone is learning from these challenges . I still think this is the best way to learn , it makes you think about about how the pens are designed not just how to put them together .
I was worried that this stage was a little too hard , in fact I still am a little , cigar pens do present some challenges when you try to modify them but they are really nice when your done .
Remember that if you feel you can't figure it out with a cigar kit then use a slimline . It removes a couple of the hardest parts but you will still end up with a nice pen when you are done .
 

Papa Bear

Member
Joined
Nov 2, 2008
Messages
150
Location
Burleson,Texas
stage 3 pen

Here is my stage 3 pen,again using the alt ivory and orange left from stage 2 and adding some aluminum to accent the chrome.I don't remember where I got this blue blank but it was full of pin holes!The same MO,no saws,all drilling and parting done on the lathe.I have been using my collet chuck alot more since starting these challenges.
 

handplane

Member
Joined
Aug 8, 2008
Messages
69
Location
Guantanamo Bay, Cuba
I got started on this today. I am using this also as a way to get better with the skew. I made a parting tool out of a 1.5" putty knife and it works great. If nothing else I have a new tool to play with now. I did have one bit of excitement though. I was putting a PR blank in the scroll chuck and got distracted by the wife and walked away for a bit. When I came back to the lathe I assumed that I had tighten everything. I was wrong!!! Luckily I make it a point not to stand in front of the lathe when turning it on. As soon as I hit the switch the chuck opened and the blank went flying. To my surprise it did not break even after hitting the ceiling fan then the concrete floor. It was one of Ed's blank BTW. I put everything back in the lathe and made sure all was tight and the tail stock in place before turned it on again. I'll actually get to turning pens tomorrow. I was waiting for some new drill bits so I stopped today with nothing drilled yet.
 

Mr Vic

Member
Joined
Aug 11, 2008
Messages
1,865
Location
Falcon, CO
Finally got to work on mine a bit yesterday. Took it slow and shot a bunch of process pictures. Didn't like the look of the domed finial so flattened it out and in the process broke through where the brad point had drilled deeper. It's repaired and multi coats of CA curing. Final sanding and assembly tomorrow I hope.
 

soligen

Member
Joined
May 11, 2010
Messages
1,085
Location
Sterling Heights, Michigan
Mine is in progress too. Glued up the blanks Sunday and worked on it some last night.

I was planning on pressing the finial into the upper barrrel and do final turning there for a perfect fit, but I dont have the right size collet to chuck it up. I guess I'll have to use the micometer.

I didn't like how loose the lower part of the upper barrel fit over the brass tube. I CAed the inside of the barrel where there is no tube (used a q-tip), and I put on coats of CA on the exposed part of the brass tube to build it up until I had a tight fit that doesnt bind with the twist action. I'm sure the fit will wear over time, but it will start out right on. I pressed the pen together in the rough to check the fit - I'm liking it.

I've also turned this about as thin as I dare.

I'm going real slow - dont want to mess it up now.
 

Mr Vic

Member
Joined
Aug 11, 2008
Messages
1,865
Location
Falcon, CO
Challenge 3 complete

It's finally complete! Banksia and Blackwood. The finial has a triangle shped hole I filled with a black glitter and CA. IO alos replaced the black metal trim ring on the nib with Blackwood. Only real issue is a slight out of round that becomes apparent when you extend the tip. Might disassemble to work on recessing the clip. The finial is a press fit..
 

Attachments

  • Challenge-3a.jpg
    Challenge-3a.jpg
    49.8 KB · Views: 161
  • Challenge-3b.jpg
    Challenge-3b.jpg
    51 KB · Views: 147

ldb2000

Member
Joined
Sep 11, 2007
Messages
5,381
Location
Laurence Harbor, NJ, USA.
Great pen Vic . Nice combo of woods and kit and nice added touch with the blackwood instead of the plastic on the nib . Watch your clearance inside the upper tube if you try to recess the clip , you'll have to cut away a little of the barrel and you'll loose a little more when you counter bore for the clip recess .
 

soligen

Member
Joined
May 11, 2010
Messages
1,085
Location
Sterling Heights, Michigan
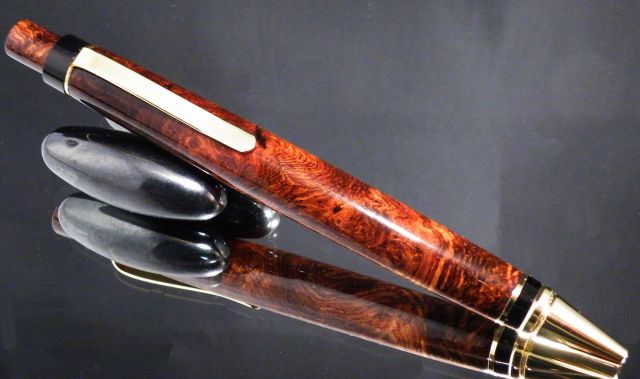
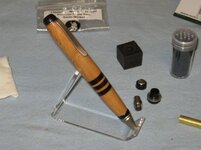
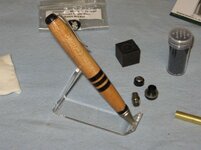
This has been a comedy of errors for me. Been a couple times that I thought the project was a complete write off and I would need to start over with a new kit & blank. Right now, it looks OK - I just need to finish the finial and glue it in. Here is a list of issues I have had. I'm probably not remembering them all. Part of the reason I'm writing this "book" to the thread is to try to remember everything I learned.

I tried chucking up the 8mm tube with the finial attached. Didn't have the right size collet, so used a drill chuck. This crushed the 8mm tube. Luckily the finial tenon I made is pretty long, so I cut off the crushed portion and there is still enough left inside the finial tenon to operate the tranny. Used a jam chuck instead to get the tenon turned to size.

I had to put the upper and lower together to turn on a mandrel. I put a spacer between them while making the tenon, but the spacer broke out and the tool touched the lower. Had to make the lower a little shorter to remove the damage. Using a tube as a spacer instead of the upper barrel caused a big wobble – must have been some glue on the end of the tube inside the blank.

I has an issue doing final trimming on the CB because there was no tube there. I didn't want to cut a tube from another kit as a spacer (the obvious solution). I can't remember what I did, but it is square. I'll need to get some extra 10mm tube before I do this again.

When I started finishing, I had a low area. I messed with the finish for a long time, then finally got out the skew and took all the finish off and evened everything up. I learned one of the issues I've had with my joints is that when I apply CA to the barrels separated, it builds slower right on the edge, creating a valley when they are put together. I thought I had to keep them separate to keep from glueing them together. This time I left them together for the entire finish build and no issue – and the joint is much better (perfection still pending)

I pressed in the center union (the part the tranny screws on) so it would act as a center bushing for support while turning. I ended up not being able to trim the excess CA because the barrel trimmer would not insert fully (don't have the right size collet to do it on the lathe). I punted using some PSA sandpaper on a bushing, but it didn't sand square enough. When I pressed in the nib, the center union got pressed in too far because I didn't leave enough of a lip when I altered it. This made a noticeable bulge in the tube. Took a really long time to get the thing apart. The inside of the nib needed to be reamed out a bit after all the pounding. I forced the 10mm tube into my 3/8 collet and cranked it tight to press the tube back to size. Up-side is I was now able to use the barrel trimmer to remove the excess CA square to the tube.

The recess fit is excellent, but I marred the finish while filing in the notch. I sanded and buffed it out. Still debating putting a couple more coats of CA on before final assembly as the repair didn't take care of it all. I had put on some blue masking tape, but not everywhere. Lesson – cover all finished surfaces with blue masking tape when hand filing.

Had a lot of trouble getting the center union aligned, partially to the compounding of mistakes. Because of my trimming issues, I ended up a little short (slightly less then 1/32) in the lower. So, I pressed in the center a little less to compensate (I didn't leave an adequate shoulder to align it anyway.) I had some binding issues in my test fittings. Ended taking off all the CA I put on the exposed tube to make a custom fit. Still turned stiff. Discovered I could see how much it was off my pushing on the upper barrel without finial and seeing how much the tranny was off. Took a number of tries pushing the tranny back and forth to get it centered, but now there is absolutely no binding. I have to wonder if the alignment will get knocked out of the pen gets dropped. I used blue loctite, but it was already set before I had it tweaked.

Had the whole pen done except the finial was still in the rough – just the tenon containing the 8mm tube was sized (tight hand press fit). I went to test the tenon with the recessed clip to be sure the recess was deep enough (its right on). Now I find out that the tenon does not fit through the hole in the clip. Pulled out an appropriately sized drill bit and started drilling – mistake. The bit caught on the little clip and twisted it all up. I thought it was a write off. I finally got it bent back to what seems to be acceptable shape with only one small nick in the plating. I chucked up some sandpaper on a dowel to work on the hole – didn't work very well. Then I remembered that a while back I picked up a cheap HF dremel tool, which worked pretty well.

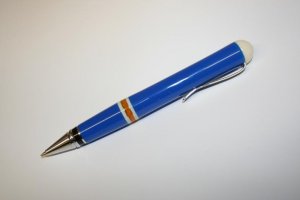
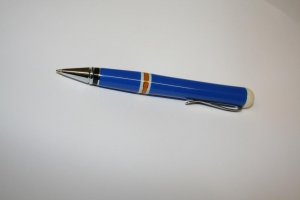
Just need to shape and finish the finial. It may be the weekend before I can get a pic of the finished pen posted.

Another thing I learned – I need more collets.
 

Sylvanite

Member
Joined
Jul 18, 2006
Messages
3,113
Location
Hillsborough, North Carolina, USA.
Honeycomb Hickory and Walnut

Here's mine. I elected to leave the kit trim rings off the nib altogether. I turned down the nib coupler (in addition to the transmission coupler) so that the lower barrel blank could extend down to occupy that space. I reamed out both couplers with a "D" bit, so the lower barrel would slide onto a 1/4" mandrel. I also didn't use the kit upper tube, finial, or finial coupler. I step-drilled the upper barrel blank with 25/64" and "P" bits. I drizzled thin CA glue in the hole, both to strengthen the wood (which was a bit punky) and so that the upper blank would slip over the lower tube with minimal play. I knocked the finial coupler out of the 8mm tube, sanded away the flared section, and glued the tube into the small hole. Then I mounted the upper and lower barrel blanks together on the mandrel, and used a bushing from an 8mm kit at the finial end. That way, I could turn and sand the entire pen body as a unit - so the union is as seamless as possible. The finial has a press-fit tenon about 1/2" long. I mounted the upper barrel in a collet chuck, pressed in the finial, and turned it to match. I separated all the parts, applied CA for the finish, and then re-joined them for sanding. After buffing, I pressed all the parts back together.

My original design was to recess the clip in the trim ring, but it wound up too thin to hold. Also, the finial tenon loosened up with assembly/disassembly, so I put a couple layers of thin CA on it to keep things snug. In the end, I find I don't really care for the pen proportions, but it was interesting to make.

Thanks again for the challenge,
Eric
 

Attachments

  • Challenge3.jpg
    Challenge3.jpg
    39 KB · Views: 186

Sylvanite

Member
Joined
Jul 18, 2006
Messages
3,113
Location
Hillsborough, North Carolina, USA.
How did you account for the changes to the nib to keep the length of the barrel correct ?
The nib coupler has an integral trim ring, and a black-painted screw-on trim ring. I assembled them, pressed both couplers (nib and transmission) into the tube, mounted it on a mandrel, and turned everything down to flush with the tube OD. Then I glued on the blank. I was very careful not to get any glue on the threads, and to glue the blank flush with the edge of the trim ring. That preserved the lower barrel length so that the refill extends correctly.

Regards,
Eric
 

Stevej72

Member
Joined
Apr 30, 2006
Messages
1,603
Location
Billings, MT, USA.
A friend of ours removed some trees from their parents yard several years ago, Juniper I think. She wanted me to make a pen out of some of the wood for her mothers birthday. Here's what I came up with.

This is a KC Twist kit. Usually the longer tube is on the bottom. On this pen I put the longer tube to the top, turned a tenon and glued on the CB rings that are made of Purple Heart. The Purple Heart finial did press fit fairly well, but I took it back out and added a little epoxy to make sure it stayed in place.

She said she would probably order 5 more pens for herself and each of her siblings.
 

Attachments

  • Juniper.jpg
    Juniper.jpg
    47.5 KB · Views: 154
Last edited:

soligen

Member
Joined
May 11, 2010
Messages
1,085
Location
Sterling Heights, Michigan
Here it is, the pen from hell. Made from Philippine Persimmon and Redheart.

I'm still not happy with the fit on the finial. I wanted the transition to be as good or better than the CB joint, but didn't achieve it. I'm not sure I can without being able to turn the finial attached.

The other thing is that on the flat top I could not get the same sheen as the rest of the pen. (not visible in photo).

The thin recess wall cracked a little when I final assembled. I sanded and re-buffed the crack so you cant feel it with a finger (or even hardly see it). Not sure if it will get worse.

Making this pen was painful, but I guess that's where learning comes from.

1_IMG_0106.JPG
 

soligen

Member
Joined
May 11, 2010
Messages
1,085
Location
Sterling Heights, Michigan
Eric,

I really like the nib mod - it mitigates what I like least about the cigar pen. But I have a question.

On the kit I have there is the band on the nib (that you left on) and it bevels toward the rest of the pen at about 45 degrees. I dont see this bevel on your pen. Did you trim this off (being carful of the plating) or did the kit you use not have this bevel? soemthing else? If you look at my pen, I'm refering to the bevel just before the black band.

Thanks.
 

ldb2000

Member
Joined
Sep 11, 2007
Messages
5,381
Location
Laurence Harbor, NJ, USA.
Each of the challenges someone made an outstanding pen , this is the one for this stage . This pen is absolutely , totally awesome Dennis . Your overall design and build is perfect and that finish is stunning . BRAVO !!!!!
 

soligen

Member
Joined
May 11, 2010
Messages
1,085
Location
Sterling Heights, Michigan
Thanks Butch. The design idea was fairly simple. I wanted the CB at the 1/3 mark (so I did the math), and I wanted the CB & finial to be the same width. I also wanted it as thin as possible, but I may have pushed this too far for durability - time will tell. The recess wall is no more than 1/32 - probable a little less. The tenon had only bout 1/32 as well. Good thing its a dense wood.
 
Last edited:

soligen

Member
Joined
May 11, 2010
Messages
1,085
Location
Sterling Heights, Michigan
Hey Butch

No rush or pressure - just wondering for planning when you think the next challenge will be, and what kit or other materials we should have on hand to be ready.

Thanks
 

ldb2000

Member
Joined
Sep 11, 2007
Messages
5,381
Location
Laurence Harbor, NJ, USA.
I was thinking about a more advanced cigar pen for the next one but interest seems to be waning so I'm not really sure . We have the cartridge pen contest going on right now and the PITH coming up next and with summer now in full swing people just don't have the time or energy .
If I'm wrong , let me know and I can come up with a few more ideas .
 
Signed-In Members Don't See This Ad

Mr Vic

Member
Joined
Aug 11, 2008
Messages
1,865
Location
Falcon, CO
Butch,

I for one would love to see more Challenges. I skiped #2 as I've done both tenioned center bands and custom finials. I was going to try your kitless challenge about a year ago but found I was in over my head (so I quit digging). Come along way since and projects like these guide the learning process.

Which ever way you, go thanks for all the inspiration..
 
Last edited:
Top Bottom