Penmakers Challenge stage 3

Signed-In Members Don't See This Ad

ldb2000

Member
Joined
Sep 11, 2007
Messages
5,381
Location
Laurence Harbor, NJ, USA.
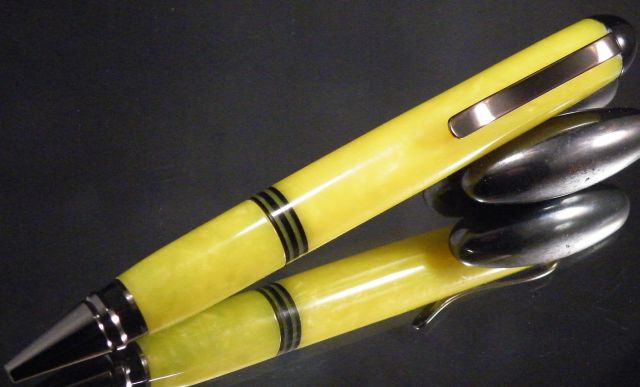
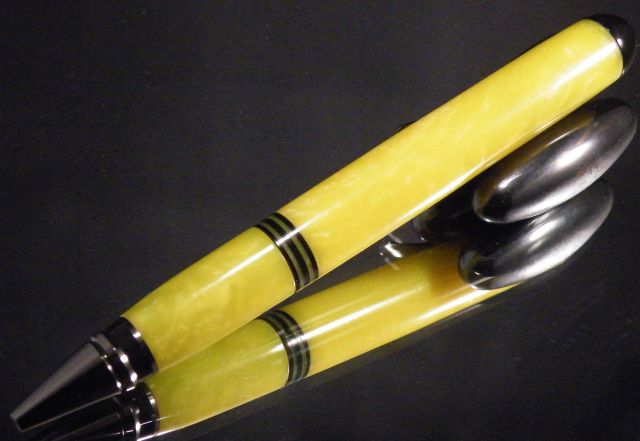
This is a modified cigar pen made for the Penmakers challenge stage 3 . It is made with yellow pearl and black PR with parts from a black Ti cigar kit .
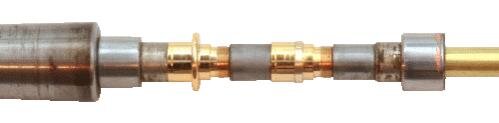
This design is the reason for the tenon at the centerband, there is no tube to support the segmenting . This time I managed to remember to recess the clip . The only thing I don't like about this pen is I should have painted the black segments white or yellow before I glued them up , the two yellow segments are over powered by the black segments and painting them would have allowed the yellow segments to show up better . I did glue the finial in on this one because of the transmission activator tube .
If you don't have a cigar kit or can't figure out how to make it work you are welcome to use a slimline kit and make a similar design . This one slowed me down a little , getting everything laid out . I like the overall design of this pen and it will be my new carry pen for awhile .
Have fun and work safe . As usual I will be around to answer questions but I will not give a tutorial just hints on how to do it . I'm sure everyone will be able to figure it out with a little thought and some logic .
All cutting and drilling was done on the lathe but if you don't have a scroll chuck or collet chuck you can use your DP for drilling . A hint on the activator tube , the transmission is 8mm .


Signed-In Members Don't See This Ad

maxman400

Member
Joined
May 25, 2009
Messages
3,111
Location
Omaha Arkansas
Butch I don't know about the painting problem, It looks good on this end. I was tied up on part two but I will be working on this one.
 

DurocShark

Member
Joined
Jul 26, 2008
Messages
3,622
Location
Anaheim, CA
Well, I've figured out how to make it. Now I need time to actually make it.

Anybody got any time to spare? I could use some.
 

ed4copies

Local Chapter Manager
Joined
Mar 25, 2005
Messages
24,527
Location
Racine, WI, USA.
Time is the great equalizer, we all have the same amount each day!!!

(You will never regret spending it with your family-all other uses are optional)
 

ldb2000

Member
Joined
Sep 11, 2007
Messages
5,381
Location
Laurence Harbor, NJ, USA.
Time is something you are going to need for this one , there are a few design challenges to work out . Don't forget to make a tenon for the CB because there is no tube under it and a butt joint will break if it is stressed taking it apart to refill .
A drill press won't be the best way to drill some of the parts so if you can drill on the lathe you will be much better off , if you can't I would advise you to get the equipment to do so , you will never regret spending the money .
You guys really whipped my butt with the beautiful pens you made on the first two stages , let's see if you can do it again here . Good luck everyone .
 

ed4copies

Local Chapter Manager
Joined
Mar 25, 2005
Messages
24,527
Location
Racine, WI, USA.
Butch,

Just stopped by---PROMISE to be serious!!!!

Would it help to show the pen open? For those who may not realize where the joint is--like me!!!

The refill is standard, the bottom tubes can't be "messed with" much, so I assume the whole upper section is supported at the black and yellow band, where you have incorporated the tenon. But, seeing it open would answer the mechanical questions.:confused::confused:

Just a thought!!!

(Serious enough???):rolleyes::rolleyes::rolleyes:
 

ldb2000

Member
Joined
Sep 11, 2007
Messages
5,381
Location
Laurence Harbor, NJ, USA.
Gary , stage 2 is still open to posting so "get er done" and get it posted . As I said in the casual forum this stage is going to run for at least 3 weeks (I figure it will take longer to figure out this design) and I may extend it if it isn't enough time for some people . This isn't a contest so I'm not rushing anyone , it should be done in your leisure time and not take away from important things .

Ed , Remember this is a challenge and showing the pen apart would give away too much of the design and this would just become a tutorial and I really don't want to debate those again , but you are correct the lower part is set up like a normal cigar with the transmission on the end of the lower tube but the upper part of the pen goes over the whole lower assembly and turns at the joint about an inch from the nib . You really can't see the joint so well , it's at the lower black stripe . The pen is designed along the lines of a PSI Longwood . I like this design because it gives a long blank to show off the looks of the blank . Like the Longwood , the upper tube is only in the upper couple of inches of the blank and the lower half of the blank slips over the lower tube so it has no support glued in to it which is why I put the CB on a tenon , the design is quite strong . Hope this helps .

Oh , and STOP being so darn serious . Sheesh , I go on one little tirade and everyone gets soooooo serious . Lighten up PLEASE !!! . This is going to be fun OR ELSE !!! :biggrin::biggrin::biggrin:
 

soligen

Member
Joined
May 11, 2010
Messages
1,085
Location
Sterling Heights, Michigan
This is my first cigar too. Just got done examining all the parts and thinking about it.

I see three ways I could do this with it with this kit - depending on how many kit parts I want to modify.

I'm gunna pass on the step drilling option, so I need to modify at least 2 parts. How many did you modify butch?
 

ed4copies

Local Chapter Manager
Joined
Mar 25, 2005
Messages
24,527
Location
Racine, WI, USA.
You guys should use the cigar!! I have sold over a thousand (best guess) and NEVER a return for tranny problems!!

(Remember these were all made before China became a source, so this may NOT hold true any more)

The changes you will make for this pen can also be used to make a great "casing pen", if you like the Parker refill better than the cross-type. It's really a more versatile kit than most have explored.

(Please don't hurt me, Butch!!!!)
(He's a big guy!!! I'm worried!!)
 

ldb2000

Member
Joined
Sep 11, 2007
Messages
5,381
Location
Laurence Harbor, NJ, USA.
For you folks that have never made a cigar pen , there are modifications to be made to the kit parts to make this work . While they are not hard , if you don't know how a cigar is built it may be difficult to make the modifications . The transmission coupler has a shoulder that must be removed so the upper part of the pen can be slid over the lower assembly , a dremel or grinder is the easiest way to do this but you could even carefully break the ring off with a pair of pliers and clean up the coupler with a file . The finial has an inner tube that slips over the transmission to operate the pen . You could either replace the finial with a new finial with the activator tube attached or try to use the stock activator tube and make a new finial to put on the top of the pen but the bushing that holds the activator tube is threaded and holds the clip in place so you will have to work around those problems . If you would rather use a slimline kit that would be ok and would avoid those problems . the choice is yours .
 

truckfixr

Member
Joined
Aug 19, 2008
Messages
285
Location
Jourdanton, Texas
"... If you would rather use a slimline kit that would be ok and would avoid those problems . the choice is yours ".

Isn't the main purpose of these challenges to get us out of our comfort zone? One could make a pen similar to your's pretty easily with a twist kit. The cigar kit will force us to think. That's always a good thing.
 

ed4copies

Local Chapter Manager
Joined
Mar 25, 2005
Messages
24,527
Location
Racine, WI, USA.
For you folks that have never made a cigar pen , there are modifications to be made to the kit parts to make this work . While they are not hard , if you don't know how a cigar is built it may be difficult to make the modifications . The transmission coupler has a shoulder that must be removed so the upper part of the pen can be slid over the lower assembly , a dremel or grinder is the easiest way to do this but you could even carefully break the ring off with a pair of pliers and clean up the coupler with a file . The finial has an inner tube that slips over the transmission to operate the pen . You could either replace the finial with a new finial with the activator tube attached or try to use the stock activator tube and make a new finial to put on the top of the pen but the bushing that holds the activator tube is threaded and holds the clip in place so you will have to work around those problems . If you would rather use a slimline kit that would be ok and would avoid those problems . the choice is yours .

If you happen to own a lathe and a Jacob's chuck, you can grab this piece by the protruding threaded end and run your tailstock up to hold everything steady, then turn off the shoulder using a normal "bastard file".

(Of course, I just make kits, so this is all information I have been TOLD---no implication of experience should be taken!!!!)
 

ldb2000

Member
Joined
Sep 11, 2007
Messages
5,381
Location
Laurence Harbor, NJ, USA.
Isn't the main purpose of these challenges to get us out of our comfort zone? One could make a pen similar to your's pretty easily with a twist kit. The cigar kit will force us to think. That's always a good thing.

Yes it is , however I understand that money is tight everywhere and some might be reluctant to take a chance on wasting a kit or two trying something they have never done before . I really would like everyone to have some fun with this so I will stand behind using a slimline to create a pen . It will still be a pen that some have never made before so there will still be something learned which is the ultimate goal of these challenges .
 

ldb2000

Member
Joined
Sep 11, 2007
Messages
5,381
Location
Laurence Harbor, NJ, USA.
Ed , you are again correct you could use a Jacobs chuck however I will STRONGLY advise against using anything in the MT on the headstock if you don't have a Drawbar to hold it in place or without using the tailstock to support it and keep it from coming out of the headstock and becoming a dangerous projectile . Safety is still "Job One" during these builds . No one is allowed to get hurt and if you do you will not be allowed to continue ..... NO EXCEPTIONS !!!
 

ed4copies

Local Chapter Manager
Joined
Mar 25, 2005
Messages
24,527
Location
Racine, WI, USA.
If you happen to own a lathe and a Jacob's chuck, you can grab this piece by the protruding threaded end and run your tailstock up to hold everything steady, then turn off the shoulder using a normal "bastard file".

(Of course, I just make kits, so this is all information I have been TOLD---no implication of experience should be taken!!!!)

Seriously,

It has worked for me dozens of times in making casing pens. Keep speed slow (500-600 RPM) Filing that shoulder takes less than a minute. Does get warm, take it out with a needle nose--don't touch for 5 minutes or so.

ALWAYS have eye protection. NEVER touch metal in your lathe!! HOT has a whole new meaning!~:eek::eek::eek:
 

soligen

Member
Joined
May 11, 2010
Messages
1,085
Location
Sterling Heights, Michigan
Another question - didnt apply to you since you didn't use wood, but if wood, should thre be a finish on the inside where there isnt a tube? Applying CA in there would be tricky.
 

truckfixr

Member
Joined
Aug 19, 2008
Messages
285
Location
Jourdanton, Texas
Yes it is , however I understand that money is tight everywhere and some might be reluctant to take a chance on wasting a kit or two trying something they have never done before . I really would like everyone to have some fun with this so I will stand behind using a slimline to create a pen . It will still be a pen that some have never made before so there will still be something learned which is the ultimate goal of these challenges .


Good points. I'm sure to add to my limited knowledge through attempting this challenge. :)
 

Sylvanite

Member
Joined
Jul 18, 2006
Messages
3,113
Location
Hillsborough, North Carolina, USA.
Since we're already discussing ways of modifying the coupler, here is my preference. Some brands of cigar pen coupler will simply slide onto a standard 1/4" mandrel. Some don't quite go on and need to be reamed with a letter "D" (preferred but 1/4" will work in a pinch) drill bit. Once on the mandrel, it is easy to turn the brass shoulder down with a scraper. The coupler doesn't get hot, and if you catch the brass dust on a paper towel, you can save it to use for infills later.

Regards,
Eric
 

Attachments

  • Mandrel.jpg
    Mandrel.jpg
    7.2 KB · Views: 214

Sylvanite

Member
Joined
Jul 18, 2006
Messages
3,113
Location
Hillsborough, North Carolina, USA.
... if wood, should thre be a finish on the inside where there isnt a tube? Applying CA in there would be tricky.

If you feel the wood could use a little extra strength, then after drilling (but before gluing in the tube), you can drizzle some thin CA glue around the inside of the hole. This will help harden soft woods on the interior of the pen. Once the glue cures, you may need to chase the hole again with the same drill bit.

Regards,
Eric
 

Stevej72

Member
Joined
Apr 30, 2006
Messages
1,603
Location
Billings, MT, USA.
I messed up my first try. The tenon turned out great, but I miscalculated the length of the upper section. Still might try and save it as that will be an additional challenge in itself.
 

ldb2000

Member
Joined
Sep 11, 2007
Messages
5,381
Location
Laurence Harbor, NJ, USA.
Good point Steve , a little late to help you but .... Don't forget to add in the extra length that the stock CB add to the overall blank length . I measure the blank against a completed cigar pen . I don't have that measurement right now but when I get it I will post it for those that don't have a completed cigar pen . That little bit of difference can make a world of difference when you are assembling your pen . Been there , done that , got the T-shirt
 

soligen

Member
Joined
May 11, 2010
Messages
1,085
Location
Sterling Heights, Michigan
Good point Steve , a little late to help you but .... Don't forget to add in the extra length that the stock CB add to the overall blank length . I measure the blank against a completed cigar pen . I don't have that measurement right now but when I get it I will post it for those that don't have a completed cigar pen . That little bit of difference can make a world of difference when you are assembling your pen . Been there , done that , got the T-shirt

Funny you should say :wink:. I just got done with my calipers.

Big Ben kit, The finished blank length (including the custom CB) is 4.25. Looks like you could go maybe 1/16 shorter in a pinch
 

RAdams

Banned
Joined
Apr 5, 2009
Messages
2,983
slick design Butch! I like the way that looks for sure! I am going to try something on my CB that should be interesting for sure!!
 
Signed-In Members Don't See This Ad

Sylvanite

Member
Joined
Jul 18, 2006
Messages
3,113
Location
Hillsborough, North Carolina, USA.
I don't have that measurement right now but when I get it I will post it for those that don't have a completed cigar pen . That little bit of difference can make a world of difference when you are assembling your pen .
The cigar kit is very forgiving about length variation in the UPPER barrel. Even if you leave off the centerband entirely, some brands will still go together. Others might require you to shorten the brass tube that contacts the transmission (a disk sander works great for this). Basically, as long as that tube firmly contacts the transmission, but doesn't bind it up, the pen will work. The length limit is when the transmission bottoms out against the finial (or coupler).

The LOWER barrel length, on the other hand, is a critical dimension.

I hope that helps,
Eric
 
Top Bottom