A Penmakers Challenge Stage 2

Signed-In Members Don't See This Ad

PenMan1

Member
Joined
Jul 8, 2009
Messages
6,380
Location
Eatonton, Georgia
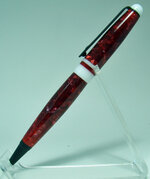
Here it is - my second entry, which I like much better. And I think its sold!! my first sale! I just need to figure out a price.

The blank came as part of an unlabeled assertment - I think its Zebrawood - someone please tell be otherwize if this isnt so. The accent wood is walnut. I was expecting a bit more contrast between the woods - oh well, the buyer likes it.

My first guess is desert Iron wood. I guess it could be zebrawood, but the zebra that I get is usually much lighter than this.
 
Signed-In Members Don't See This Ad

DurocShark

Member
Joined
Jul 26, 2008
Messages
3,622
Location
Anaheim, CA
If a cigar is required for 3, I'll probably skip it. I have no stuff for cigars, and not much interest in messing with them.
 

ldb2000

Member
Joined
Sep 11, 2007
Messages
5,381
Location
Laurence Harbor, NJ, USA.
Don , stage 3 can be done with a slimline as well . As I said I'll be using a cigar because it's fun to play with other kits as well and you end up with a more impressive pen . I will be adding one more modification to what's already been done .

By the way , I really like the design of your entry . It is different and looks really good . I think the wood has some great grain and the clip is cool .
 
Last edited:

DurocShark

Member
Joined
Jul 26, 2008
Messages
3,622
Location
Anaheim, CA
I can't find my bookmark for the site I bought it from. I'm sure someone else has a link... (And will share so I can re-add it to my browser.)
 

Rick_G

Member
Joined
Nov 30, 2007
Messages
1,994
Location
Bothwell, Ontario, Canada.
Rick, outstanding! ... that is some crazy looking wood there ... makes me want to look for some ash.

Thanks Ron, I originally bought 400 bd ft to redo my kitchen and it turned out to be full of powder post beetles. The guy I bought it from came tonight to pick it up. He refunded my money a couple weeks ago. Left me with some I had already cut. Most of it will wind up in the fireplace but there are about 6 pieces with grain like this. These came from the sides of a section of board where a branch had run through it on a 45 deg. angle with the length of the board. Likely only about a dozen sections like this in the 400 bd ft but I managed to keep about half. I do a lot of flatwork and have found the pieces I used to throw away because the grain was just to ugly and didn't go with the rest of the piece make the nicest pens.
 

ldb2000

Member
Joined
Sep 11, 2007
Messages
5,381
Location
Laurence Harbor, NJ, USA.
Hey Don , just a point of reference , You might want to pick up a cigar or three with those slims . I'm gonna be changing the way a cigar looks . When the build is done we will have cigars that look nothing like cigars .
 
Last edited:

mbroberg

IAP Activities Manager, Emeritus
Joined
Mar 9, 2009
Messages
5,958
Location
Columbus, OH
Hey Don , just a point of reference , You might want to pick up a cigar or three with those slims . I'm gonna be changing the way a cigar looks . When the build is done we will have cigars that look nothing like cigars .

Heck, that has happened to me before, and I wasn't even trying to be different!!
 
Joined
Jun 1, 2009
Messages
97
Location
Drakesville, Iowa
I hope you don't mind me adding this Butch, but here's a tip that might be useful to some. There have been some really beautiful pens so far and I'd hate to see someone spoil one.

If you unfortunately need to glue in your finial, then DONT put the glue on the finial tenon. Put a little inside the tube instead. If you put it on the tenon then it will gather up as you press it in an make a mess around your clip. If you use CA, it will probably ruin the plating.:wink:
dang! Wish I would have read this before I did that last pen. That is exactly what happened with mine. Put a little drop on the tenon and it spooshed out and ruined the coating! I"m going to have to disassemble and refinish. What a pain! I should always check the website first! haha Jim live and learn
 

Stevej72

Member
Joined
Apr 30, 2006
Messages
1,603
Location
Billings, MT, USA.
I really need to check into this forum more often. I didn't find these challenges until yesterday. I went ahead and did the stage one challenge and will start stage 2 so I can hopefully catch up. Thanks for doing these challenges, Butch!
 

mbroberg

IAP Activities Manager, Emeritus
Joined
Mar 9, 2009
Messages
5,958
Location
Columbus, OH
I just completed the stage 2 challenge. It's made of Madreperlato - Silver Grey and Blood Red blanks from Exotic Blanks.

I learned quite a bit about tenons doing this one. This is the 2nd pen I tried for this stage. The first on will still be a nice pen once it is done, but the center band will be segmented on the tube. I was determined to get the center band on a tenon. Once I figured out what I was doing wrong it was rather easy. I do need to read more about jam chucks. I ended up just using my Collet chuck to make the finial. The finial gave me some problem also. I would get a good tight press fit, but couldn't get the clip ring on the tenon. Once I got it to where I could slide the clip on I needed to glue it in the pen. You are looking at finial #3. I am also not thrilled with the glue joints of the center band and the lower red ring. They looked good and tight when I glued them up, but as i turned them there is a glue line showing.

No saws were used to construct the pen.


Constructive criticism is requested!!
 

Sylvanite

Member
Joined
Jul 18, 2006
Messages
3,113
Location
Hillsborough, North Carolina, USA.
The finial gave me some problem also. I would get a good tight press fit, but couldn't get the clip ring on the tenon. Once I got it to where I could slide the clip on I needed to glue it in the pen.
I had the same problem. When my tenon was a good press fit, the clip wouldn't slip on. I enlarged the hole with a dremel tool in order to get the pen together.

Regards,
Eric
 

mbroberg

IAP Activities Manager, Emeritus
Joined
Mar 9, 2009
Messages
5,958
Location
Columbus, OH
I had the same problem. When my tenon was a good press fit, the clip wouldn't slip on. I enlarged the hole with a dremel tool in order to get the pen together.

Regards,
Eric


AH HA!!:embarrassed: I should have thought of that. Had tunnel vision on getting that tenon right. Didn't even think about making the hole bigger.:bulgy-eyes:
 

ldb2000

Member
Joined
Sep 11, 2007
Messages
5,381
Location
Laurence Harbor, NJ, USA.
Great looking pen Mike . It's sometimes hard to get an invisible glue joint . If the two materials are different types of resins they usually have different densities and the joint will show , not much you can do about it except put a finish over it and with acrylic that's too much work for the results .
Jam chucks are easy to make and do a good job of holding the blank in place . It's best to use a good hardwood but even a pine 2X4 will work for a one-off . Just turn your wood to fit the chuck you are using and then turn the jam part to just a hair bigger then your tube and then jam your blank on . It should go all the way on tightly but not so tight that you have to hammer it on , just good and snug . Don't remove it from the chuck until you are done turning your blank because any variance from the chuck will be multiplied when you put it back in . I usually make new ones for each use but if you can mark the position in the chuck you may be able to use it over again .
 

soligen

Member
Joined
May 11, 2010
Messages
1,085
Location
Sterling Heights, Michigan
On jam chucks. I get the concept - mount up a peice of wood - put a hole in it. jam your work into the hole - tight.

What I dont get yet is why? Why would you do this over a collet or another kind of chuck?
 

soligen

Member
Joined
May 11, 2010
Messages
1,085
Location
Sterling Heights, Michigan
OMG - light bulb just went on. I had it backwards. I thought the jam chuck was a hole you pushed the pen into. You basically turn a dowel a tad bigger than your tube, then push the the pen part onto it.

That is very useful.

Now those past comments about jam chucks makes more sense to me.

I'm such a newbie lol.
 

PaulDoug

Member
Joined
Mar 2, 2008
Messages
3,488
Location
Benton City, WA.
I haven't paraticipated in these exercises but have been watching and learning. Butch this is a great idea you started here. Kind of a progressive tutorial. Thanks for doing it. Some awesome pens being made. Wish I didn't havae so many other things going on right now so I could join in.
 

ldb2000

Member
Joined
Sep 11, 2007
Messages
5,381
Location
Laurence Harbor, NJ, USA.
It's a tutorial without the spoon fed knowledge . It's a learn as you go or if you already know then it's an improve your technique as you go event . This stuff isn't rocket science , you just need to think logically about how something is done , to look at someone else's work and think "How did he do that ?" then work it out . If you think about it and try to understand what they did , anyone could do it . If you look at someones work and say "I could never do that" ..... you're right !
I have seen some amazing work done here by people who have never built anything other then a plain , stock pen kit and all they had to go on was a photo of a pen that I made and a brief statement that no saws were used to do it . I think that is pretty awesome .
Congrats to all who have played so far . Stick around , there ain't no obese females singing yet . The best is yet to come !
 

DurocShark

Member
Joined
Jul 26, 2008
Messages
3,622
Location
Anaheim, CA
One thing I didn't mention for mine was the cheap way I did my finial.

Turned the tenon to a press fit in a 7mm tube. Left the meat rough. I jammed it into an old slimline bushing, then chucked that bushing in my drill chuck mounted in my headstock. Turned and finished the finial, then popped it out of the bushing (had to remove it from the chuck so I could bang it with a 1/4" transfer punch).

Poor man's collet chuck!
 

soligen

Member
Joined
May 11, 2010
Messages
1,085
Location
Sterling Heights, Michigan
One thing I didn't mention for mine was the cheap way I did my finial.

Turned the tenon to a press fit in a 7mm tube. Left the meat rough. I jammed it into an old slimline bushing, then chucked that bushing in my drill chuck mounted in my headstock. Turned and finished the finial, then popped it out of the bushing (had to remove it from the chuck so I could bang it with a 1/4" transfer punch).

Poor man's collet chuck!

Exellent! I like it. That way the press fit is tested before you all the rest of the work.

I basically made a 1/2 inch dowel and chucked it in my drill chuck, turned the finial and parted it off.
 

Stevej72

Member
Joined
Apr 30, 2006
Messages
1,603
Location
Billings, MT, USA.
I hadn't checked into the forum for awhile and missed this challenge when it was first posted. Even though I was late I still wanted to start at the beginning, so I did the Challenge One pen (probably the wrong place to post it, but here it is). It is Bethlehem Olive Wood with Ebony.

My Challenge Two pen is acrylic and unfortunately I didn't have a lot to choose from, so I went with the blue and a darker blue CB and finial. I did both of them totally on the lathe and really enjoyed learning how to do it. I had a piece of HSS about .055 thick from a tool kit I bought for my metal lathe that worked great for cutting the slices off. I cut the tenon and glued the rings to it. Just about had the finial finished and decided I needed to take a little more off the diameter to fit into the tube, and it ended up a little too small, so I had to glue it.

I should have painted the tubes as you can see the tube on the trim I put just below the finial. Other than that I am happy with it.
 

Attachments

  • Penmakers Challenge 001_edited-1.jpg
    Penmakers Challenge 001_edited-1.jpg
    80.4 KB · Views: 187
  • Penmakers Challenge 002_edited-1.jpg
    Penmakers Challenge 002_edited-1.jpg
    18.8 KB · Views: 184

ldb2000

Member
Joined
Sep 11, 2007
Messages
5,381
Location
Laurence Harbor, NJ, USA.
Great job on both Steve . I really like the stage 2 pen , the acrylic and the satin kit go great together .
To everyone who had to or wanted to glue in the finials , don't worry the more you practice the easier it get and the more accurate you will become turning the tenons . Tenons are very important in both Modified kit and in kitless work and you will find that they make for stronger and better pens .
 

truckfixr

Member
Joined
Aug 19, 2008
Messages
285
Location
Jourdanton, Texas
I haven't posted very much, but I have lurked around for quite a while now. The pens many of you make are truly fantastic.

Here is my entry. It's a home-brew blank I made a while back before I had the means to use vacuum/pressure, so it has a few bubbles in the resin. The cap and center band rings are white corian. Constructive criticism welcome, of course.

Thanks,
Chuck.

pen.jpg


Last edited:

ldb2000

Member
Joined
Sep 11, 2007
Messages
5,381
Location
Laurence Harbor, NJ, USA.
That looks great to me . Nice blank and you did a good job with it .
Welcome to the group Chuck , glad you came out of the shadows and posted your pen . Don't be a stranger now , come join in the fun , we don't bite ....... well Cav does sometimes but we keep him locked up and well fed :devil::biggrin:

Sheese , I just noticed your from Texas , do all Texans make pens ??? :biggrin::biggrin:
 
Last edited:

Stevej72

Member
Joined
Apr 30, 2006
Messages
1,603
Location
Billings, MT, USA.
Hey Chuck, very nice work on both the blank and the pen. White Corian reminds me that I have a ton of that somewhere, I'll have to dig it out.
 

Stevej72

Member
Joined
Apr 30, 2006
Messages
1,603
Location
Billings, MT, USA.
Since the finial on my last pen was to loose and had to be glued, I decided to give it another try. Maroon acrylic and white Corian with black tactile finish. Not sure how much I like the black with the white, but I'm reasonably happy with the pen, especially since I got the finial to press fit.
 

Attachments

  • Marroon 001_edited-1.jpg
    Marroon 001_edited-1.jpg
    84.7 KB · Views: 152

ldb2000

Member
Joined
Sep 11, 2007
Messages
5,381
Location
Laurence Harbor, NJ, USA.
Great job Steve . Nice color - kit combo . Corian is great stuff for modified kit and kitless work , Tru-stone is another great material , it's very stable and works well .
 
Signed-In Members Don't See This Ad

ldb2000

Member
Joined
Sep 11, 2007
Messages
5,381
Location
Laurence Harbor, NJ, USA.
I'm working on it . I was doing some yard work the other day and my back went out again so I've been laid up for the last few days . I felt a little better this afternoon and got a little time in the shop . I managed to get the blank turned round and drilled and I even got the CB done . I'll get back to it as soon as I can . It should be up in a day or two .
 
Top Bottom