Yeah, the more i fiddle with it, the cooler it is i guess. The recessed clip has alot of potential and that is my main happiness with it. I know it isn't perfect, but at least it got me out of settling for the pieces of metal they put in the bag. I won't "redo" it until i dont know when, but i will revisit this exact design again. I really like the potential.

You are using an out of date browser. It may not display this or other websites correctly.
You should upgrade or use an alternative browser.
You should upgrade or use an alternative browser.
A Penmakers Challenge Stage 2
- Thread starter ldb2000
- Start date
Signed-In Members Don't See This Ad
Signed-In Members Don't See This Ad
ldb2000
Member
As long as you are learning and advancing your skills then you are ahead of the game . These challenges are more about learning how to think about what you are building then the actual building itself .
Mr Vic
Member
Butch, Still pondering the best methods to proceed and my brain keeps coming back to a statement you made about the finial.
If you used a manderal would it not have a hole through it which is where the tenion should be? Or did you use an adjustable manderal like a jam pin chuck? Or don't ask until this stage is over?:wink:
By the way , my finial was made on a mandrel so I didn't have to worry about damaging it with the jaws of a chuck
If you used a manderal would it not have a hole through it which is where the tenion should be? Or did you use an adjustable manderal like a jam pin chuck? Or don't ask until this stage is over?:wink:
Rick_G
Member
The kitchen is going to take longer than I figured on. Build something 2 days finishing put it up then build another part.
So I took some time while waiting for the finish to dry. My #2 challenge pen.
Again a small piece of white ash that was around a spot where a large branch went through the board. The three pieces for the center band were drilled with a 10mm brad point bit and a tenon turned on the cap to match. Bottom end of the cap is approx. .5 in.. The blue for the center band is a leftover piece of Azurite Gemstone from another pen. Used an old mandrel as a pin chuck to turn the recess in the end of the CB. The center section of the center band is ash as well. I thought about using the gemstone for the finial but decided I liked the looks of the ash better. Built on a chrome streamline kit, the clip sticks out just a bit farther at the top giving a slightly better fit. Glued the piece of ash for the finial to a piece of 3/4" dowel and chucked it in my beall collet chuck for turning and finishing. I did glue it in because it want it to be permanent but it was a tight press fit.
Cut my blanks to rough length with the bandsaw and did my drilling on the drill press. There is just enough play in the tailstock of my drill press to make drilling on it a pain.
Like the first one this will be shipped along with a letter of support to one of our military personnel.
Last edited:
ldb2000
Member
Fantastic pen Rick . Your finish is awesome and that wood is too . To be able to see the chatoyance in the photo it must be amazing in person .
ldb2000
Member
Butch, Still pondering the best methods to proceed and my brain keeps coming back to a statement you made about the finial.
If you used a manderal would it not have a hole through it which is where the tenion should be? Or did you use an adjustable manderal like a jam pin chuck? Or don't ask until this stage is over?:wink:
That is why I said that an adjustable mandrel is required for these builds . That is exactly what I did . I used a mandrel rod in my collet chuck but an adjustable mandrel works the same way . I use it as a jam chuck with a little piece of masking tape to create a jam fit .
Oh by the way I don't use a tube in the blank that I made the finial from but still drill it for a 7 mm tube . That leaves enough room to add the tape to get a tight fit .
I also drilled the 5/16 hole for the slices to fit the tenon on the centerband the same way .
Last edited:
DurocShark
Member
I'm doing without an adjustable mandrel. I need to pick one up, though I'd prefer a collet chuck.
It only takes money!
It only takes money!
Rick_G
Member
Thanks Butch. It's a little darker in the photo but the chatoyance stands out in person. I had never thought about putting the CB on a tenon when I did them this way, I had alway just glued them to the end of the blank then drilled and inserted the tube. This way is more work but it does help increase the skill level which is the whole idea of this challenge.
Dalecamino
Local Chapter Leader
Is this the disaster dept.? :redface: I was going to try to hide the clip on this one but , didn't cut deep enough AND , part of the end of the wood broke off while sanding . I had too much length on my hacksaw blade parting tool and , didn't cut the tenon straight on the finial . So , the finial doesn't set level . Yes , I had to use glue . Had fun anyway ! ")
Attachments
ldb2000
Member
Rick , putting the CB segments on a tenon this time was just practice . The tenon serves no real purpose here because there is a tube but on the next build there won't be a tube to support the CB segments so there will have to be some other way to support the CB segments . A simple butt joint will not hold up very long if there is no tube , the wall thickness is just too thin to give any surface area for the glue to stick to and the CB will break apart very easily .
ldb2000
Member
It looks good anyway Chuck .Don't feel bad about the clip I kinda did the same thing . I turned the blank too thin to recess the clip . I could take it apart and cut the top a little bit to where I have enough meat to recess the clip but then my tenon would have to be shortened and wouldn't hold in as well and would have to be glued in place , so it stays as is .
Dalecamino
Local Chapter Leader
Thanks Butch ! My sentiments exactly ! :biggrin:It looks good anyway Chuck .Don't feel bad about the clip I kinda did the same thing . I turned the blank too thin to recess the clip . I could take it apart and cut the top a little bit to where I have enough meat to recess the clip but then my tenon would have to be shortened and wouldn't hold in as well and would have to be glued in place , so it stays as is .
David M
Member
1st thing No trees was harmed in making this pen....
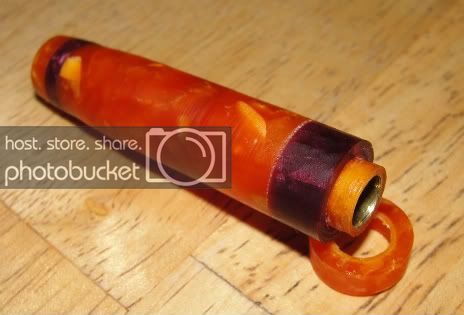
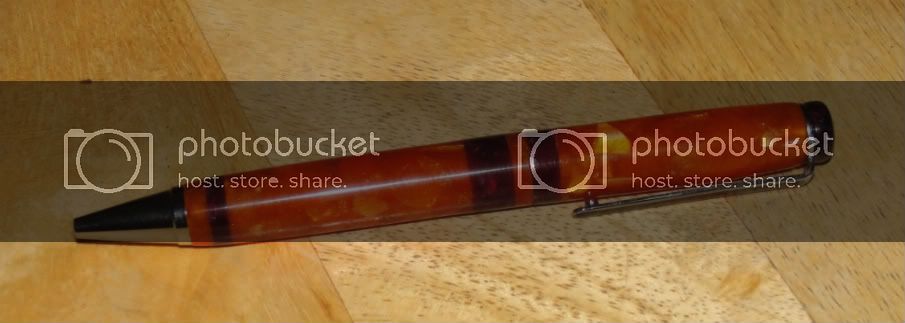
Ok my 1st pen wasn't a slimline , sorry , oops . I was playing for the challenge , that was fun .It was a little slow using a parting tool to do the cutting . So this is a slimline .... sorta ... Didn't want to us a new kit when I have some pens that could be salvaged for this so , you know how hard it is to save the parts from a slimline pro gel click pen..... the need ( nib ) and clip is all that was usable and with a cigar part or three ... i did make tenions one at the tip clip end ( had to cut the threads off the top cigar tube and I drilled it out to 1/4 inch / .250 . made a small tenion so the clip wouldnt move after the top was presses in . I was thinking should have checked but .006 oversize ( .256 ) was a tight press . The upper part dont have a tube all the way ( like a cigar ) so I made a tenion with a purple sleeve that is steeped over the lower part where the trans screw into ( didnt i say it has a parker style refill ).so here is some pictures of my slimline pro / was click pen....

The the pen
dont rake me over the coals it not a true slimline twist ... or the tenions are on both ends of the center wher they connect .....
another fun pen to make
David
http://i637.photobucket.com/albums/uu93/davidspen/DSC01134.jpg
Ok my 1st pen wasn't a slimline , sorry , oops . I was playing for the challenge , that was fun .It was a little slow using a parting tool to do the cutting . So this is a slimline .... sorta ... Didn't want to us a new kit when I have some pens that could be salvaged for this so , you know how hard it is to save the parts from a slimline pro gel click pen..... the need ( nib ) and clip is all that was usable and with a cigar part or three ... i did make tenions one at the tip clip end ( had to cut the threads off the top cigar tube and I drilled it out to 1/4 inch / .250 . made a small tenion so the clip wouldnt move after the top was presses in . I was thinking should have checked but .006 oversize ( .256 ) was a tight press . The upper part dont have a tube all the way ( like a cigar ) so I made a tenion with a purple sleeve that is steeped over the lower part where the trans screw into ( didnt i say it has a parker style refill ).so here is some pictures of my slimline pro / was click pen....
The the pen
dont rake me over the coals it not a true slimline twist ... or the tenions are on both ends of the center wher they connect .....
another fun pen to make
David
http://i637.photobucket.com/albums/uu93/davidspen/DSC01134.jpg
ldb2000
Member
David , David , David .... 20 lashes with a wet noodle for not following the rules ..... oh wait .... there really isn't any rules ..... NEVERMIND!! :biggrin:
As long as your having fun and either learning something new or honing your skills then it's alright .
It is a good looking pen though . I like the blank and nice way to recycle .... Save a plastic tree !!! :biggrin:
As long as your having fun and either learning something new or honing your skills then it's alright .
It is a good looking pen though . I like the blank and nice way to recycle .... Save a plastic tree !!! :biggrin:
,,
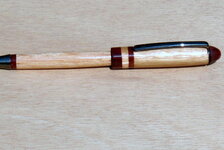
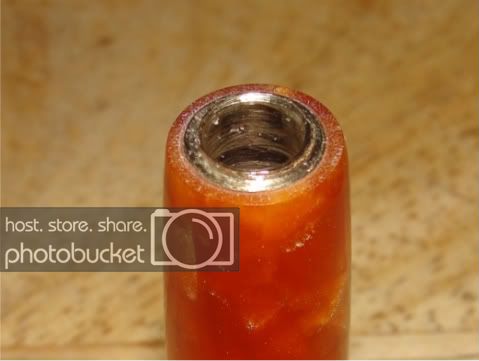
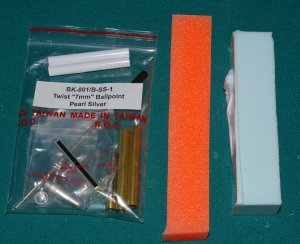
Butch; Can't thanks you enough for your challenge, really appreciate your time. I didn't make the first challenge, 4 children!! Anyway I did make the second challenge. I had some alumilite that was absolute junk, but this is not a looks thing for me, just a learning experience. two pics, one of the parts, the second is the pen. This took some thinking and am still debating some of the things I did and how I could improve on the techniques.
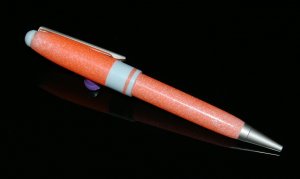
Butch; Can't thanks you enough for your challenge, really appreciate your time. I didn't make the first challenge, 4 children!! Anyway I did make the second challenge. I had some alumilite that was absolute junk, but this is not a looks thing for me, just a learning experience. two pics, one of the parts, the second is the pen. This took some thinking and am still debating some of the things I did and how I could improve on the techniques.
ldb2000
Member
I actually like it Randy . That blank has a cool look to it , like a candy orange flake . I'm not sure if you used white tubes or painted the tubes or blank white but it seems to be showing white under the orange . With a blank like that you should have painted the tubes/blank with an orange or yellow paint , it would have given it a deeper look . You can sometimes get a really wild look by accenting the colors .
Your workmanship on the pen looks great , and the satin kit fits it perfectly . Overall , good job !!!
Your workmanship on the pen looks great , and the satin kit fits it perfectly . Overall , good job !!!
Mr Vic
Member
Great like it is Randy. Now I have to go check the freezer for a Cream Cycle....
Sylvanite
Member
My Stage 2 Pen
Here's my version of the Stage 2 pen. The centerband segments are on a tenon and the finial is press-fit. No saws were used to cut the pen parts.
I stuck to maple and blackwood, but made the slices a little thinner and angled the ends. I also did a recessed clip.
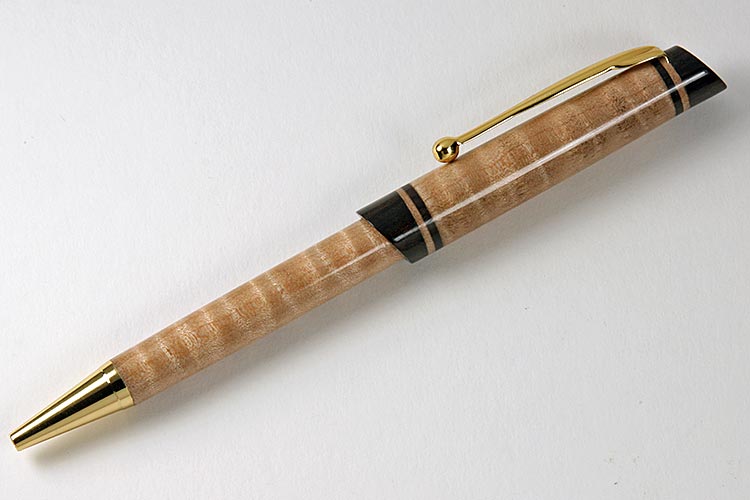
I hope you like it - it was instructive to make.
Regards,
Eric
Here's my version of the Stage 2 pen. The centerband segments are on a tenon and the finial is press-fit. No saws were used to cut the pen parts.
I stuck to maple and blackwood, but made the slices a little thinner and angled the ends. I also did a recessed clip.
I hope you like it - it was instructive to make.
Regards,
Eric
Last edited:
ldb2000
Member
Show off .... :biggrin: ..... and you should , that is absolutly stunning . I think you should be running this thing . That is the best pen shown so far , sorry everyone . I said to best my effort and you did .... by miles !!!
mbroberg
IAP Activities Manager, Emeritus
Eric,
I hope you don't mind, but I put a picture of your pen in my "Ideas" folder. By, "Ideas", I mean, "I am going to make a pen like that sometime". Nice job.
I hope you don't mind, but I put a picture of your pen in my "Ideas" folder. By, "Ideas", I mean, "I am going to make a pen like that sometime". Nice job.
ldb2000
Member
Ok , now the speculation begins and please don't tell yet how you did it , wait a couple of days . I have an idea of how you did the angle without a saw . Time to think everyone , there won't be a tut for this one . First correct answer wins a 'Case of Notoriety'
mbroberg
IAP Activities Manager, Emeritus
Ok , now the speculation begins and please don't tell yet how you did it , wait a couple of days . I have an idea of how you did the angle without a saw . Time to think everyone , there won't be a tut for this one . First correct answer wins a 'Case of Notoriety'
Just off the top of my head, a belt or disk sander? Probably need to make a jig with the proper angle to hold the piece.
Sylvanite
Member
Ok , now the speculation begins and please don't tell yet how you did it , wait a couple of days . I have an idea of how you did the angle without a saw . Time to think everyone , there won't be a tut for this one . First correct answer wins a 'Case of Notoriety'
I think a more interesting, and more instructive challenge would be to see how many different ways we can come up with. I chose a way that seemed straightforward to me, but I'd love to see better ideas.
Regards,
Eric
ldb2000
Member
Ok that works , the most inventive way , that can actually be done , so no beavers !!!, wins .
David M
Member
angle cut befor drilled , off center then drilled ? nice pen ....
Sylvanite
Member
Darn - I was planning to claim that I gnawed it to shape.... the most inventive way ... no beavers !!!
Now I'll just have to say "I whittl'd it" (neither is true, though - I can't draw or cut a straight line without a straightedge, fence, sled, some sort of jig, or computer assistance).
Thanks Butch, for the challenge of a press-fit finial. It turned out to be integral to the creation of this pen. I pressed it in, and knocked it out several times along the way.
Regards,
Eric
DurocShark
Member
Hurting my wrist last night means I probably won't get this one finished.
That's ok, I wasn't happy with what I was doing with it anyway.
That's ok, I wasn't happy with what I was doing with it anyway.
ldb2000
Member
Don't worry Don there's plenty of time get better and if you want to play stage two is active for a week and a half before stage 3 starts and 2 will stay open for at least a week after 3 begins . Take care of yourself first .
DurocShark
Member
I think the pleasure of working in the shop will get me in there sooner rather than later. But I have "production" work I need to do too. We'll see...
At least my bus is (just about) sold. I'm trying to talk the wife into a new table saw.
:biggrin:
At least my bus is (just about) sold. I'm trying to talk the wife into a new table saw.
:biggrin:
DurocShark
Member
Here's as far as I got.

I'm not a fan of cumaru. Fibrous and boring. At least this piece was.
I'm not a fan of cumaru. Fibrous and boring. At least this piece was.
PenMan1
Member
I think a more interesting, and more instructive challenge would be to see how many different ways we can come up with. I chose a way that seemed straightforward to me, but I'd love to see better ideas.
Regards,
Eric
Just messing around with the lathe last night, I took a speed square and got the tool rest EXACTLY parrallel to a rounded pen blank. Then I put a pencil "dot" where I wanted the angle to start, then used a compass, ruler and sharpie marker to make a 45 degree angled line on the tool rest. Then, I lined up my parting knife on the line and the blank. I turned on the lathe and made a 45 degree part.
I am sure this is NOT how you did it, but this actually worked pretty well and painlessly, 45 degrees was TOO much angle, but I THINK I can make something similar to your pen, which is a BEAUTY, using this method.
Sylvanite
Member
If you cut a conical section (which is what happens when you turn on-axis off-center and part at an angle), then you wind up with a domed surface, not a flat one.
Regards,
Eric
Regards,
Eric
soligen
Member
If you cut a conical section (which is what happens when you turn on-axis off-center and part at an angle), then you wind up with a domed surface, not a flat one.
Regards,
Eric
Well, if you glue each end to a larger disk/dowel, only off center, then you could get the angle - I might be a little scared to try this. It would actually give you a side section of a cone, instead of a straight cut, giving you a bit of a rounded profile - would be interesting. The more off center, then less rounded.
A disk sander seems easiest and most straight forward.
DurocShark
Member
Ok, here we go. I took a bunch of Advil and spent a few minutes in the shop:

I'm really not happy with the whole thing, but I hit the challenge points. The CB is over a tenon and all lathe cut. The finial is press fit. The clip is held by the finial (I'll be gluing that though... I don't trust it.)
I also really REALLY need to get some soft jaws for my vise! Look at those teeth marks!
I am lost now. I dont understand all the axis conical stuff...
what i mean is this... Take a pen blank. Segment the ends by parting off the appropriate pieces etc. glue it all up to make one solid blank. Then mount it between centers, only each end would be slightly off center in oposite directions. Round the blank. Now the ends are crooked because they were square, but you mounted off center. Now you mount the blank in a collet or similar and true up the ends, wich would give you flat ends that were square with the off center marks on each end. Once the ends and squared up, you re-mount to center on each end, and round it again. Then it is back to the collet. Now you can part off the finial piece, and set it aside for later. Then drill the hole. You now have a blank that is drilled and ready for tubes that is rounded, centered, and has flat angled ends.
Hope that clears up what i was trying to say... That seems to me would be the most A: involved on the lathe, which leads to B: The funnest way to do it! This is how i would attempt a similar result anyway....
soligen
Member
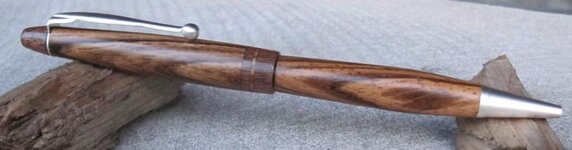
Here it is - my second entry, which I like much better. And I think its sold!! my first sale! I just need to figure out a price.
The blank came as part of an unlabeled assertment - I think its Zebrawood - someone please tell be otherwize if this isnt so. The accent wood is walnut. I was expecting a bit more contrast between the woods - oh well, the buyer likes it.
I REALLY need to know what a pen like this should sell for. Would some of you more experienced people please PM me with what you think is fair for this level of work? Thanks
On to the trials and learning. First in the "Accidental Learning" department. I targeted the finial diameter to be the same as the end of the barrel, but I hosed the finial's finish and had to sand it all off and re-finish, which made the finial too small by about .01 inches. I pressed it in anyway without glue just to see, and discovered it looked just right! In hind sight, since the pen tapers, and the clip band is in between the upper barrel and the finial, it makes sense it needs to be a tad smaller - happy accident!!
The trial was the lower blank blew up on me using the crappy 2 blade carbide barrel trimmer. A huge chunk broke out all the way down to the tube. I was going to toss this pen and start over, but I already had all the hard part done on the upper barrel. So with little to loose, I massaged the chunk back to shape and CAed it back together. I told some people at work there was an issue with the pen, and no-one could find it until I showed them the seam lines. Amazing how well it turned out. One of the cracks is inb the photo. Good luck finding it!
Oh Yea - CB on tennon - no saws - all parts on lathe.
One thing I noticed as well is the CD glue lines seem a hair more noticable than prior efforts. I used epoxy on the CB instead of CA becasue I wanted more open time to get things on right and the grain aligned. Is Epoxy know to have slightly more noticable glue lines? I kinda like them there (for this pen) as it adds a bit of definition.
Hardware is satin pearl. Finish is CA/BLO left at it's natural soft gloss.
Attachments
DurocShark
Member
That's beautiful!
Pens like that I do from $30 - $50. Depends on your market though.
Pens like that I do from $30 - $50. Depends on your market though.
Signed-In Members Don't See This Ad
Sylvanite
Member
Ah! You mean to turn it off-axis. Yes, that would allow you to cut a flat angle on the lathe. Doing that between centers might be tough though. You'd need either a very short (which for segments, would be fine) or very large diameter initial piece to get much of an angle. I also suspect that it wouldn't want to stay between centers.... Then mount it between centers, only each end would be slightly off center in oposite directions.
Keep the ideas coming!
Regards,
Eric