
Rich L
Member
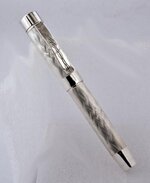
My initial penmaking over 10 years ago was designing metal barrels, fittings, etc from scratch but over the last three years it has been using other barrel stock (Conway Stewart) for the MetalWrite RR series. There were some other CS experiments that involved engraving different patterns on their barrels and although I'm not publishing those yet you could have seen them at the DC show. At least temporarily, I've finished up with the CS tasks and have embarked again on sole authorship of a silver pen design. As you'll notice, the basic shape is similar to others as I really like that shape and it fits with the constraints of the silver stock I have.
This exercise is a combination of some processes I've practiced in-house in forming silver to what I need. There was a thread a while back when I initially signed up with IAP that showed how I was making a coining die to show my logo on the finial of a pen. I employed that technique and tooling to make one for this pen.
http://www.penturners.org/forum/f56/coining-tassie-93064/
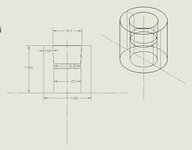
Additional forming/drawing processes were used to shape the cap finial and to draw down and taper the main barrel. Basically I had to make a couple of resizing dies to do that and fortunately the forming was not do dramatic as to require a large press or to do any annealing part way through. Resizing dies were made from 1" W1 drill rod, polished internally and not hardened, yet. I'll do that for the next one.
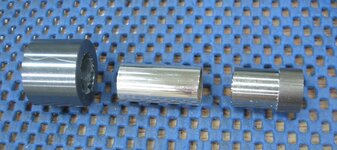
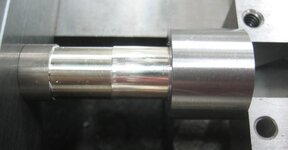
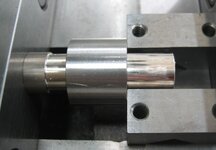
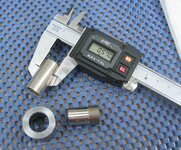
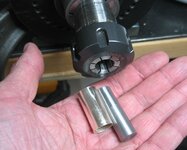
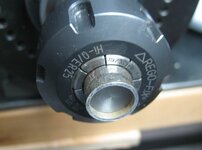
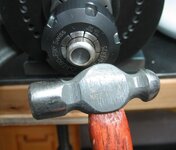
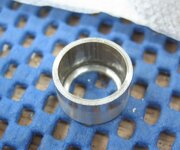
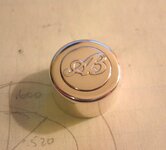
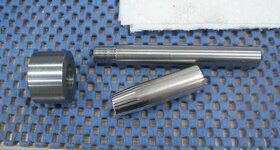
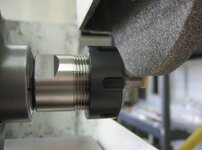
For the finial, my stock was .600 OD and I had to resize that to .570. That's not a horrible amount so the squeeze was easy. For the barrel, the stock was .500 OD and I needed to squeeze a 5º taper on the end to maintain wall thickness. For both the cap finial and the end taper on the barrel I needed to partially close the edges so light tapping with a hammer around the circumference closed them off sufficiently to cut the pockets for the coin logo and the mother of pearl (MOP) button. The first set of five pics is resizing the finial stock OD from .600 to .570. The second five is partially closing the end up so I can machine the internal pocket for the logo coin. The final die picture (the one with the long rod in it) is the taper die with the internal 5º taper. There was an additional guide bushing I made for this setup to insure the stock went in straight but it's not in the picture. The guide bushing was made with a .502 ID, not polished. Since the wall thickness of the tube was .040 (pretty thick) there was not OD enlargement of the barrel upstream of the taper during the squeeze even though I really had to crank on the vise to get the taper made. The stock is drawn tube, not annealed, so squeezing it down just made it harder. Hammering over the end, even more so.
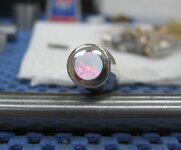
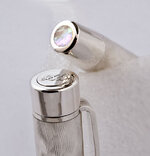
Cutting the MOP button was finally done after several experiments (failures) with methods to cut or grind a perfect circle without any chipping. I settled on fitting up the surface grinder and slowly ground a piece down to size. The fit had to be ~.001-.002 less than the counterbore so that the fit was smooth and precise and so that you could not feel any edge between the metal and the MOP. Finish sanding was done with 2500 grit wet paper and then polished with white rouge. The MOP button is fitted from the outside while the logo coin is fitted from the inside. Super glue initial placement and epoxy backup. The MOP is the "gold lip" type but I've actually ground down through most of the "gold" layer so it mostly resembles white lip.
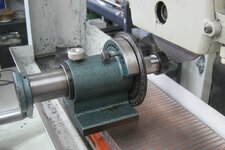
The next three pics are of the setup and final result of a trial MOP installation. Instead of using a toolpost grinder on a lathe (because I don't have one) I used a spin indexer on a surface grinder. To avoid heating and chipping the removal rate was ~.001 - .0015 at a time. Worked great.
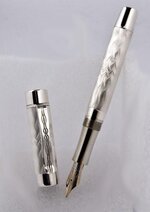
The section was made from 752 nickel silver and you might notice that the sheen of the nickel silver is a touch darker than the sterling. The threaded fitting in the barrel is also nickel silver. Internal fittings holding the finial and clip are aluminum. The main barrel is all one piece. Converter inside and a borrowed Bock nib that will be replaced by my own design when they come in. There is a threaded acrylic liner ( 4-start .75mm pitch) in the cap.
The clip is made from scratch from 14ga Argentium sheet and heat treated for springiness. The pattern on the clip is from the same pattern source (pattern bar) as the barrels. It takes about a hour each to engrave the barrel and cap and about 5 minutes to engrave the clip. All done by hand using a straight line machine (no motors).
There was lots of new tooling to make for this pen - coining dies, resizing dies and guides, extractors, special holders for the new barrel shapes to use on the straight line machine, and a bunch more miscellaneous things and gizmos that just had to be done to make progress. A lot more machining went into tooling than into the pen!
Hope you enjoy the tour. I'll be posting this on the other forum so you have the opportunity to read it twice or ignore it :biggrin:
Cheers,
Rich
This exercise is a combination of some processes I've practiced in-house in forming silver to what I need. There was a thread a while back when I initially signed up with IAP that showed how I was making a coining die to show my logo on the finial of a pen. I employed that technique and tooling to make one for this pen.
http://www.penturners.org/forum/f56/coining-tassie-93064/
Additional forming/drawing processes were used to shape the cap finial and to draw down and taper the main barrel. Basically I had to make a couple of resizing dies to do that and fortunately the forming was not do dramatic as to require a large press or to do any annealing part way through. Resizing dies were made from 1" W1 drill rod, polished internally and not hardened, yet. I'll do that for the next one.
For the finial, my stock was .600 OD and I had to resize that to .570. That's not a horrible amount so the squeeze was easy. For the barrel, the stock was .500 OD and I needed to squeeze a 5º taper on the end to maintain wall thickness. For both the cap finial and the end taper on the barrel I needed to partially close the edges so light tapping with a hammer around the circumference closed them off sufficiently to cut the pockets for the coin logo and the mother of pearl (MOP) button. The first set of five pics is resizing the finial stock OD from .600 to .570. The second five is partially closing the end up so I can machine the internal pocket for the logo coin. The final die picture (the one with the long rod in it) is the taper die with the internal 5º taper. There was an additional guide bushing I made for this setup to insure the stock went in straight but it's not in the picture. The guide bushing was made with a .502 ID, not polished. Since the wall thickness of the tube was .040 (pretty thick) there was not OD enlargement of the barrel upstream of the taper during the squeeze even though I really had to crank on the vise to get the taper made. The stock is drawn tube, not annealed, so squeezing it down just made it harder. Hammering over the end, even more so.
Cutting the MOP button was finally done after several experiments (failures) with methods to cut or grind a perfect circle without any chipping. I settled on fitting up the surface grinder and slowly ground a piece down to size. The fit had to be ~.001-.002 less than the counterbore so that the fit was smooth and precise and so that you could not feel any edge between the metal and the MOP. Finish sanding was done with 2500 grit wet paper and then polished with white rouge. The MOP button is fitted from the outside while the logo coin is fitted from the inside. Super glue initial placement and epoxy backup. The MOP is the "gold lip" type but I've actually ground down through most of the "gold" layer so it mostly resembles white lip.
The next three pics are of the setup and final result of a trial MOP installation. Instead of using a toolpost grinder on a lathe (because I don't have one) I used a spin indexer on a surface grinder. To avoid heating and chipping the removal rate was ~.001 - .0015 at a time. Worked great.
The section was made from 752 nickel silver and you might notice that the sheen of the nickel silver is a touch darker than the sterling. The threaded fitting in the barrel is also nickel silver. Internal fittings holding the finial and clip are aluminum. The main barrel is all one piece. Converter inside and a borrowed Bock nib that will be replaced by my own design when they come in. There is a threaded acrylic liner ( 4-start .75mm pitch) in the cap.
The clip is made from scratch from 14ga Argentium sheet and heat treated for springiness. The pattern on the clip is from the same pattern source (pattern bar) as the barrels. It takes about a hour each to engrave the barrel and cap and about 5 minutes to engrave the clip. All done by hand using a straight line machine (no motors).
There was lots of new tooling to make for this pen - coining dies, resizing dies and guides, extractors, special holders for the new barrel shapes to use on the straight line machine, and a bunch more miscellaneous things and gizmos that just had to be done to make progress. A lot more machining went into tooling than into the pen!
Hope you enjoy the tour. I'll be posting this on the other forum so you have the opportunity to read it twice or ignore it :biggrin:
Cheers,
Rich
Attachments
-
 die.jpg32.7 KB · Views: 385
 -
 IMG_0038.JPG89.5 KB · Views: 341
 -
 IMG_0041.JPG53.8 KB · Views: 304
 -
 IMG_0042.JPG74.4 KB · Views: 305
 -
 IMG_0037.JPG174.6 KB · Views: 368
 -
 IMG_0043.JPG106.2 KB · Views: 376
 -
 IMG_0044.JPG74 KB · Views: 356
 -
 IMG_0045.jpg42.6 KB · Views: 374
 -
 IMG_0053.JPG98 KB · Views: 354
 -
 IMG_0058.JPG60.7 KB · Views: 430
 -
 taper die trial.JPG103.1 KB · Views: 414
 -
 MOP grinding setup.JPG102.8 KB · Views: 432
 -
 MOP grinding.JPG87.3 KB · Views: 352
 -
 MOP installed finished.JPG83.2 KB · Views: 481
 -
 IMGP0005.jpg22.3 KB · Views: 565
 -
 IMGP0004.jpg61.5 KB · Views: 538
 -
 IMGP0001.jpg20.9 KB · Views: 589
 Only you and Bruce Boone have the capability to use technology and attention to detail to create a beautiful piece of art.