More Celtic Knot Questions

Signed-In Members Don't See This Ad

Ron4701

Member
Joined
Jun 27, 2011
Messages
3
Location
Sedro-Woolley, WA
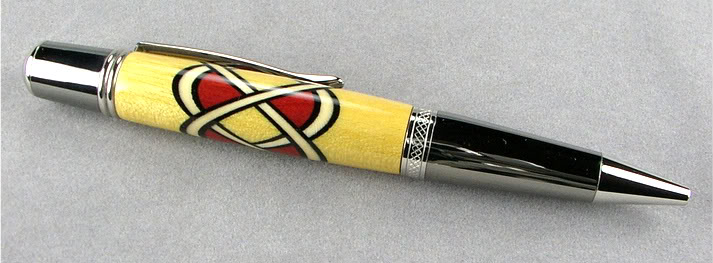
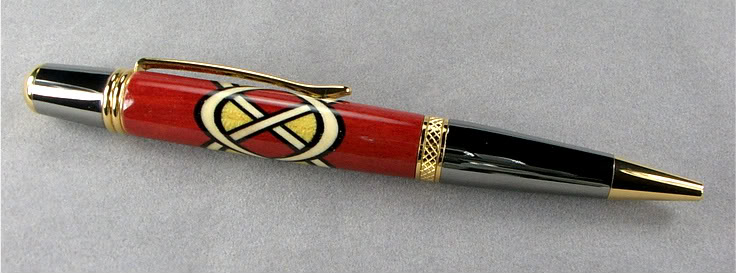
I've made pens with single ring laminations, but now I'd like to make some pens with celtic knots for Christmas gifts.
I understand the basics of making the cuts in the blanks thanks to tutorials I've seen on this and other sites. My questions concern the inlays.

I know the inlays must be the same thickness as the kerf, or slightly less to account for glue.

What is the best way to make inlays the proper thickness to fit a bandsaw kerf? A table saw is a tad too wide, but even then the inlays would have to be trimmed, somehow, to the kerf thickness.

Is grain orientation an issue?

I've seen 2 and 3 layer inlays that were still fairly thin. It seems the layers of the inlay must be paper thin. How is this done?

What is the recommended glue for securing the inlays (CA or epoxy)?

I'm assuming all, or most, inlays are wood. Would something like plastic work as well?

I've seen many inlays that are just too brightly colored to be natural wood color. Is this done by dying or staining the inlay?

Thanks,
Ron
 
Signed-In Members Don't See This Ad

KenV

Member
Joined
Oct 28, 2005
Messages
4,720
Location
Juneau, Alaska.
Ron -- time to do the homework and read before you ask the questions

Try

http://content.penturners.org/library/techniques/celticknot.pdf

I think you will have fewer and less general questions --


There are a huge number of variations and design options and many different ways to do things --

I understand the excitement -- been there and still get there with a new thread of an idea. The need to anchor the specifics so discussions are not all "it depends".
 
Last edited:

TomW

Member
Joined
Mar 23, 2009
Messages
1,436
Location
Allen, Texas
Doesn't matter what...glue...you...use....
..but...you...must...get...a...GREAT....bond....
..across...the...whole...inlay....as...each...glue...
..line...will...support..the...entire...blank...
..until...you...get...the...tube...glued...in...
 

Drstrangefart

Member
Joined
Sep 15, 2010
Messages
4,258
Location
Woodstock, Ga. U.S.A.
I use whatever is in the workshop to get the inlay thickness right. Usually a combination of bandsaw and sanding. I glue mine up with thick CA, and then flood leftover gaps with medium CA. Haven't had many problems yet.
 

randyrls

Member
Joined
Feb 2, 2006
Messages
4,829
Location
Harrisburg, PA 17112
Ron; Pick guard material for guitars can be used for inlays. It comes in differing thicknesses, colors, and color combination's.

7-1/4" circular saw blades are narrower (~.075") than 10" Table saw blades, but you sacrifice depth of cut. This usually isn't a problem.
 

JasonJ

Member
Joined
Jan 17, 2010
Messages
16
Location
Iowa
I looked up the kerf on the Diablo 7 1/4 blade and it is only .059 inches! The blade on my Byrnes is .055 inches. The Diablo blade in a table saw wouldn't be a bad way to go. My table saws give me a much more accurate and smoother cut than my bandsaw. I'm not knocking the versatility of the bandsaw though. I just haven't spent the time or money on aftermarket stuff to make mine useful for delicate segmenting. I just use it for resawing and rough cutting. I just bought the thin rip jig from Rockler for use on the table saw but haven't gotten it out of the box yet. That might help you rip thin slices accurately on the table saw if you can't find veneers or pick guard or metal sheet or combination of those for the kerf of your blade.
Good luck and stay safe!
On a side note I made a rookie mistake the other night and blew up a Celtic knot on the lathe while trying to drill it...didn't give the med. ca any time to cure. Made the cuts, glued in the slices, cleaned it up, chucked it up, started drilling and blew it up. Should have waited the cure time and supported the knot with tape while drilling. I should have also done the drilling in steps instead of trying to make one pass with a big a** drill bit.
 

jttheclockman

Member
Joined
Feb 22, 2005
Messages
19,145
Location
NJ, USA.
Ron, as noted there is alot of good info in the library. There are many ways to do the knot and also thickness of the knots as well as shapes of the knots. Some people like using a 30 degree cut as some like 45 degree and anything in between. Trial and error is the best way to learn. Just keep good notes if you stumble on something you really like. Using shims made from plastics can enhance a look and also metals.

Here is a couple using a 3/32 blade cut at 45 degree using black and white woods for the inlays. I don't like too thin of an inlay. I like to have the inlay pronounced more. Good luck.


yellowheartsierra-1.jpg


reheartsierra-1.jpg
 

AultMan

Member
Joined
Apr 19, 2011
Messages
40
Location
Ault, CO
I simply mark the thickness of the inlay on the blank with a sharp pencil and then sand the cut on a disc sander after cutting on the band saw. That way you control the thickness, not the saw blade. Jigs are helpful to control the angle, but not necessary if you have a steady hand.

As for materials, credit cards, plastic containers, aluminum cans...anything you can find that is thin. I like to buy the dyed wood vineer because they are all exactly the same thickness and I they are already less work for me.
 

Ron4701

Member
Joined
Jun 27, 2011
Messages
3
Location
Sedro-Woolley, WA
Thanks AltMan, that's the kind of info I was looking for. As stated earlier, I think I've seen most of the tutorials and have seen the video several times. They mostly concerned themselves with cutting the blanks and very little or nothing about what to use for inlays or how to make them fit. Thanks again, good info.
Cheers,
Ron
 

jttheclockman

Member
Joined
Feb 22, 2005
Messages
19,145
Location
NJ, USA.
I simply mark the thickness of the inlay on the blank with a sharp pencil and then sand the cut on a disc sander after cutting on the band saw. That way you control the thickness, not the saw blade. Jigs are helpful to control the angle, but not necessary if you have a steady hand.

As for materials, credit cards, plastic containers, aluminum cans...anything you can find that is thin. I like to buy the dyed wood vineer because they are all exactly the same thickness and I they are already less work for me.


I read this and was wondering if you have any photos of some of your knots???
 

Dorno

Member
Joined
Apr 18, 2009
Messages
185
Location
Newcastle Australia
I would also like to see some of your knots. You have all done a great job in doing them but at this stage they are only on my wish list.

Cheers Ian
 

Transam

Member
Joined
Feb 17, 2010
Messages
19
Location
Midlands UK
this is one done with acrylic.
Cut on a band saw with a metal blade fitted.
the inlay is a credit card cut up and glued with thin ca
knot1.jpg
 

ArtNewturner

Member
Joined
Aug 1, 2011
Messages
4
Location
Abilene, TX
I'm a newb in pen turning but I have some experience with veneers. You can glue layers of veneer in all sorts of combinations, colors and woods. Not too expensive either. To glue veneers, I've found the best glue comes from www.pro-glue.com. I use the dry resin cause a little goes a long way and comes in a clear version that can be dyed so you can get a paper thin line of color along the glue line. Only drawback is that it takes overnight to dry and veneers have to have quite a bit of pressure when clamping.
 
Top Bottom