JD Combs Sr
Member
I recently posted in "Show Off Your Pens" a modified Italian Locman. It involved making a replacement Stainless steel and faux black marble(thanks Exotic Blanks) barrel.
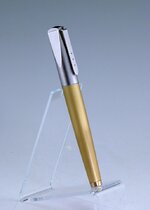
These are the final components of the modded pen.

Steps in modding the pen included:
- Purchase of a 13mm0.75 tap/die/drill set
- A cad drawing of the proposed barrel to get proper dimensions
- Turning and taping of the nib coupler
- Turning and tapering of the barrel finial
- Creating a "stepped" brass tube(ID lg enough for RB but small enough on finial end to allow for some marble material "meat".
- Drill and glue in the tube and turn the barrel to dimension
- Assemble and polish.
- Bead blast all SS to match cap finish.
Nothing about this was extremely hard but without pre-made components mistakes happen and some parts get remade.DAMHIKT Got the wrong dimension for the OD of the first nib coupler so had to make number two.
Used 304 SS but based on another thread I just read I probably should have used 303. The poster indicated that it could be shined like a mirror. The 304 color was a little darker then the cap SS. The 304 did turn and thread nicely though.
I glass bead blasted everything including the nib but not the cap. The other original parts started turning a little brassy from the blasting which got me to thinking that maybe the pen was actually satin chrome plated stainless rather then the all stainless that the customer thought it was and it is advertised to be. If it is satin chrome plated there may be a brass plating layer before the chrome is applied, just a guess on my part.
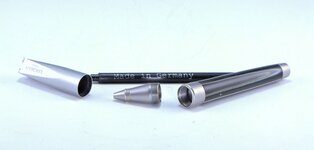
This shows the original barrel with the soft-touch paint removed and the entire thing bead blasted, note the how the finial end is also brassy looking. The finial and the nib coupler are pressed into the thin SS barrel body.
I made the finial end of the new barrel the same dimensions of the original but wanted to use 8mm tube to give me more marble thickness at its junture with the marble but even that was not enough. When I pressed in the nib coupler the thin barre cracked off some and I ended up having to make a longer finial to compensate for the break off.
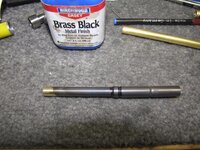
Here is a pic of the inside brass tube I made for it. Blackened with Brass Black.

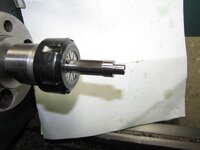
Something I learned in this project that I will apply to any future kit-less pens or barrels as in this case was that after drilling and tapping the coupler threads the tap makes a great mandrel and insures that future turning of the material is concentric with the threads just made.

Thanks for looking and all comments and critiques are appreciated.
These are the final components of the modded pen.

Steps in modding the pen included:
- Purchase of a 13mm0.75 tap/die/drill set
- A cad drawing of the proposed barrel to get proper dimensions
- Turning and taping of the nib coupler
- Turning and tapering of the barrel finial
- Creating a "stepped" brass tube(ID lg enough for RB but small enough on finial end to allow for some marble material "meat".
- Drill and glue in the tube and turn the barrel to dimension
- Assemble and polish.
- Bead blast all SS to match cap finish.
Nothing about this was extremely hard but without pre-made components mistakes happen and some parts get remade.DAMHIKT Got the wrong dimension for the OD of the first nib coupler so had to make number two.
Used 304 SS but based on another thread I just read I probably should have used 303. The poster indicated that it could be shined like a mirror. The 304 color was a little darker then the cap SS. The 304 did turn and thread nicely though.
I glass bead blasted everything including the nib but not the cap. The other original parts started turning a little brassy from the blasting which got me to thinking that maybe the pen was actually satin chrome plated stainless rather then the all stainless that the customer thought it was and it is advertised to be. If it is satin chrome plated there may be a brass plating layer before the chrome is applied, just a guess on my part.
This shows the original barrel with the soft-touch paint removed and the entire thing bead blasted, note the how the finial end is also brassy looking. The finial and the nib coupler are pressed into the thin SS barrel body.
I made the finial end of the new barrel the same dimensions of the original but wanted to use 8mm tube to give me more marble thickness at its junture with the marble but even that was not enough. When I pressed in the nib coupler the thin barre cracked off some and I ended up having to make a longer finial to compensate for the break off.
Here is a pic of the inside brass tube I made for it. Blackened with Brass Black.

Something I learned in this project that I will apply to any future kit-less pens or barrels as in this case was that after drilling and tapping the coupler threads the tap makes a great mandrel and insures that future turning of the material is concentric with the threads just made.

Thanks for looking and all comments and critiques are appreciated.
Last edited:

