Metal Lathe plunge!

Signed-In Members Don't See This Ad

MartinPens

Member
Joined
Apr 3, 2010
Messages
1,813
Location
Medford, Oregon, USA
Well, I've taken the plunge.
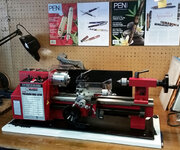
I jumped at the HF 7 x 12 which was on sale and then had a 20% coupon.

This is a wordy post as I am so full of info. Bear with me as I get through this.

I have scoured the threads, searched, youtubed, and read myself blind for two days. (just getting started) There is so much great info and resources on this site - it's amazing. I have followed many of the pointers from this site mini-lathe.com home page and will be reading on this site for a long time!

These threads are very awesome:

http://http://www.penturners.org/forum/f56/threading-using-taps-dies-131653/

http://http://www.penturners.org/forum/f56/tap-dies-reference-spreadsheet-132281/

The list goes on and on and the library has great resources on kitless pens as well.

So here is the main thing I'm wanting to hone down.
I usually over-buy stuff when I get something new and end up spending way too much money on stuff I don't need. I know many of you have given advice several times over and I have read many threads and posts. I'm trying not to duplicate my questions, but I'm need to ask them anyhow.

I would like to be able to:
--cut my own threaded fittings out of lightweight metal.
--use it to do more precision cuts for kitless pens - tap and die threading.
--make threaded aluminum mandrels.
--cut precision delrin bushings for between center turning work


So that's just a start.
I prefer collets over jawed chucks.
I want a sliding tail stock
I want precision holes in the middle of my turning stock

Here is what I'm looking at purchasing. Am I looking in the right direction or am I wasting money - in your opinion. (there is a similar thread to this, but it was for someone buying a larger metal lathe and I'm looking for advice for my smaller lathe)

Short Arbor Drill Chuck http://http://www.amazon.com/Drill-Chuck-2MT-Short-Arbor/dp/B002YPHS7M

Quick change tool post Quick Change Tool Post Set by A2Z CNC 2461 - LittleMachineShop.com

Tail stock cam lock kit http://www.littlemachineshop.com/products/product_view.php?ProductID=2018

Snap Ring pliers http://www.amazon.com/TEKTON-3578-Universal-Snap-Pliers/dp/B000NPPAUC/ref=sr_1_2?ie=UTF8&qid=1433036957&sr=8-2&keywords=snap+ring+pliers

Collet Chuck COLLET CHUCK FOR ER-32 (80MM DIAMETER.) (3901-5032): Cutting Tool Holders: Amazon.com: Industrial & Scientific

Collets http://www.amazon.com/AutoSets-12Pcs-Collet-Chuck-ER-32/dp/B00T9FLYG6/ref=sr_1_2?ie=UTF8&qid=1433044172&sr=8-2&keywords=er32+collets

Spanner wrench Red Collet Chuck Wrench Spanner for ER32 Clamping Nut - - Amazon.com

I need basic cutting tools that are already sharpened ( I don't want to make my own) I have no idea what kind of basic tools to buy that will fit the quick change tool post??? HELP

What else do you see as essential??
I hope this thread can also be helpful for others who have purchased mini precision lathe.

Thank you!!
 

Attachments

  • HF 7 x 12.jpg
    HF 7 x 12.jpg
    576.8 KB · Views: 426
Last edited:
Signed-In Members Don't See This Ad

randyrls

Member
Joined
Feb 2, 2006
Messages
4,829
Location
Harrisburg, PA 17112
You may want to rethink the collets. Fractional sized collets have small 'gaps' in the stock size they are able to hold. The gaps are all above 1/2".

A metric sized set doesn't have any gaps in the range of coverage if you get an 18 piece set. I keep the collets in a case in size order. I just put the stock into the smallest collet it will fit and go. Do not try to use a collet that is too small for the stock. There is a definite order of assembly for collets.
  1. Put the collet in the nut. It will 'snap' into a ring inside the nut
  2. Thread the collet and nut onto the collet chuck
  3. Finally, insert the stock into the collet chuck.

You may want to check the spanner wrench. There are two kinds. One is a "pin spanner" the hook on the end is round. The other is a hook spanner and the end is square.

Grinding your own tools from tool bit blanks is a skill well worth learning. There are several videos on YouTube that show how and charts showing the angles. The angles on the bits are not critical, the only difference is whether you are cutting steel or aluminum or brass.

Don't worry, the common wisdom is that you will spend at least as much on accessories as the lathe itself.
 
Last edited:

mredburn

IAP Activities Manager
Staff member
Joined
Jul 5, 2009
Messages
8,753
Location
Fort Myers FL
IF your not going to sharpen your own tools to start with I recommend the Sherline set 2257
Sherline 2257
also the cut off blade from sherline as its only .040 thick.
http://www.ebay.com/itm/Sherline-30...020?pt=LH_DefaultDomain_0&hash=item3cd2fc498c

You will need an outside and inside threading tool if your going to do your own threads on the lathe. I would also recommend a tap guide and a die holder for quick and easy threading. Cutting threads on the lathe is not hard but set up time to do one thread can be a pain. Sometimes just grabbing a tap and getting it done is faster and easier.

You will need a boring tool as well as the outside indexable threading tool and inside threading tool
Here is one example of an outside threading tool
3 8" Square Threading Grooving Tool GT Gang Tool Lathe CNC Indexible | eBay
and an inside threading tool that will fit in the boring tool holder of the qtcp
Micro 100 Carbide Threading Tool It 100600 | eBay

You dont have to buy from Ebay, Shars.com LMS, and others have good stuff too.

I ended up with about 17 qtcp tool holders for all the various tools I needed for production. (both for my 6 in lathe and 12-36 lathe) You will probably not need that many but you will need more than the ones that come with the set. Unless you like changing tools and resetting the heights every time you need a different tool.
Here is a link to Arthur Warner co. They are a US maker and they have some very good quality tools for your lathe. THe cuttoff tool has a blade as thin as .015 I have a set.
they also have boring and threading tools
Arthur R. Warner Co. | Specialists in High Speed Steel - Tool Kits

As always you will have to balance the cost of the tool against your time and budget constraints.
 

mredburn

IAP Activities Manager
Staff member
Joined
Jul 5, 2009
Messages
8,753
Location
Fort Myers FL
You will probably need a dial indicator and holder to dial in the Collet chuck when you mount it. You will want it as close to center as you can possibly get it and just bolting it on may not give you that. TonyL had a thread on that recently and it had some good info in it as well.
Eventually you are going to have to grind your own hss cutters to get into smaller spaces and for special jobs.
 

MartinPens

Member
Joined
Apr 3, 2010
Messages
1,813
Location
Medford, Oregon, USA
You will probably need a dial indicator and holder to dial in the Collet chuck when you mount it. You will want it as close to center as you can possibly get it and just bolting it on may not give you that. TonyL had a thread on that recently and it had some good info in it as well.
Eventually you are going to have to grind your own hss cutters to get into smaller spaces and for special jobs.

I found the thread for the dial indicator. http://www.penturners.org/forum/f30/tool-measuring-run-out-132538/I'll have to read up on how to use one (add that to my list) and ponder the purchase.

Thank you!
 

MartinPens

Member
Joined
Apr 3, 2010
Messages
1,813
Location
Medford, Oregon, USA
Sherline set 2257
also the cut off blade from sherline as its only .040 thick.
Thank you for the Sherline link. I will check it out.
I have an HSS 1/16 cut off (see photo) - so I'm hoping that will be adequate


You will need an outside and inside threading tool if your going to do your own threads on the lathe. I would also recommend a tap guide and a die holder for quick and easy threading. Cutting threads on the lathe is not hard but set up time to do one thread can be a pain. Sometimes just grabbing a tap and getting it done is faster and easier.
I have several tap and die sets and the delrin die holder made and sold by the IAP member (Doc?)(Wizard?)

You will need a boring tool as well as the outside indexable threading tool and inside threading tool---and an inside threading tool that will fit in the boring tool holder of the qtcp
I will have to research what these would be used for. They are foreign to me. Thanks.

As always you will have to balance the cost of the tool against your time and budget constraints.
I would like to take it in small stages and know why I'm buying a certain tool (and what it's used for), since I usually buy first and figure it out later (which is a costly way of doing things:eek:

I knew your response would challenge my learning curve! Thank you! I greatly appreciate it. It keeps the brain sharp to learn new things.
 

Attachments

  • 1-16 cut off.jpg
    1-16 cut off.jpg
    31.8 KB · Views: 249

MartinPens

Member
Joined
Apr 3, 2010
Messages
1,813
Location
Medford, Oregon, USA
A metric sized set doesn't have any gaps in the range of coverage if you get an 18 piece set.

Don't worry, the common wisdom is that you will spend at least as much on accessories as the lathe itself.

I found this set. The price is a bit daunting, but consistent with your statement above. I'm going to wait and start with the chuck that came with the lathe
http://www.amazon.com/Dorian-Tool-Alloy-Precision-Collet/dp/B00CB1C15S/ref=sr_1_2?ie=UTF8&qid=1433100942&sr=8-2&keywords=er32+collet+set

Thank you!
 

mredburn

IAP Activities Manager
Staff member
Joined
Jul 5, 2009
Messages
8,753
Location
Fort Myers FL
The 1/16 is .0625,it will work just wastes more material. That may or may not be a problem, depends on how much stock you have to work with. The delrin die holder was from George Butcher. The boring tool you will need to make accurate holes to thread. Not every tap has an exact match of a drill bit. Plus drill bits can wander and make larger holes than expected and be off center. I take it you have a center drill already as well.
The bolts that hold the collet chuck on can move around slightly. That means your chuck will be off center slightly, that makes keeping everything concentric difficult.

Er 32 metric set 19 pieces $51.00 with shipping
ER32 19 Pcs Spring Collets Set 2 20mm ER32 Collet for CNC Engraving Machine Inus | eBay
 

ChrisN

Member
Joined
Mar 23, 2013
Messages
730
Location
Denver, PA
I was very recently in the same position that you are in, so here are my thoughts on your list.

I have that collet chuck and QCTP. The one modification I made to the chuck was to drill a ~1/4" hole in the body to insert a tommy bar for tightening. Since the mini metal lathe does not have spindle lock, this is necessary to allow for more tightening and easier loosening.

+1 on the metric collet sets. Look for a full set of 2mm to 20mm. I procured mine for around $50-$60 off of ebay. You also may want a 13/16" collet for blanks that are a bit too large for the 20mm collet.

I am happily using the Harbor Freight 5 piece indexable carbide insert tool set. I have found identical sets on ebay for slightly cheaper, so you may want to look there. Replacement inserts can be found for ~$30/pack of 10 on ebay, also.

I made my own cam lock tailstock, based off of these plans. I definitely had more than $30 of time into it, but if you are like me and like making things, I recommend trying it yourself.

The next thing you will want is DROs (Digital Read-Out), if you are really wanting precision. Kits are available, or you can make a poor man's DRO out of the $10 Harbor Freight special digital calipers.

Have fun with your new lathe, I know I do!
 
Last edited:

Carl Fisher

Member
Joined
Jun 7, 2011
Messages
2,761
Location
Cape Coral, FL
I just purchased an 18 or 19 piece ER32 metric collet set off ebay for just over $50 shipped. Best deal I've run across to date and they all seem to fit well so far (thanks Michael!) But I only use them on my wood lathe still. I use the 3-jaw chuck on the metal lathe and have had no complaints so far.

As for threading, I don't recall if the HF machine comes with the full change gear set or not, but if not here is what you'll need to set the machine to the various thread sizes

Full change gear set:
Change Gears Set 1523 - LittleMachineShop.com

Also for more accurate metric thread pitches, you may want to look into the 21t gear as well:
Gear, 21 Teeth 3mm keyway 2459 - LittleMachineShop.com

You can also pick up a manual crank if you get to the point where you don't like trying to turn the chuck itself when threading:
Spindle Crank 3897 - LittleMachineShop.com

For external threads, you'll need something like this 60-degree bit and center gauge:
Threading Tool Bit and Center Gage 4115 - LittleMachineShop.com

For internal threads, the one posted by Michael up above from ebay will work but it's only a 1/4" shank I believe which means you'll have to make an adapter so it can be held in your boring bar holder. You want the small one for pens as the larger shank ones won't work in the smaller openings we typically deal with.

I still find tap and die much faster, but at least I don't have to buy any more for those one off threads.

You'll want a boring bar set as mentioned above. I picked up this set and QC holder as well:
Search - LittleMachineShop.com
QC 3/8" Boring Tool holder, A2Z CNC 2484 - LittleMachineShop.com


I'm sure there's a ton I'm missing. I chose to buy a new tailstock with the cam lock built in, but I'm sure the conversion kit will work just fine.
 
Last edited:

thewishman

Member
Joined
Mar 9, 2006
Messages
8,182
Location
Reynoldsburg, Ohio, USA.
I don't do production runs with kitless pens and I want to do as much as I can without removing and re-installing a piece. On the center area of a pen body, I want to do the internal threads for the grip section with a 8X.75mm, the external threads for mating to the cap at 12X1.5mm - two gear changes. You still have to do the female cap threading, the male and female cap finial and maybe both male and female for a body finial. Add the grip section male threads at the bottom, that is six to eight threadings for one pen. For my purposes, threading with taps and dies is quick and easy.

I'd get three or four sets of taps (I use plug taps) and dies for about $75, add matching bottoming taps for $6 to $9 each:

Metric Taps - Taper, Plug, Bottoming, and Spiral Point - millimeter sizes.
Metric High Speed Round Adjustable Dies - millimeter sizes.
 

MartinPens

Member
Joined
Apr 3, 2010
Messages
1,813
Location
Medford, Oregon, USA
Wow, I feel like I'm in over my head. Breathe in, breathe out.

I'm beginning to see some of the basics that I will need. I'm going to hold off on the collet faceplate and collet set for now.

Taps and Dies I currently have:

M12 x .8 set // M10 x .5, .75, 1 sets // M9 x .5, .75, 1 sets // M8 x .5, .75, 1 sets

M7 x 1 set (see photo) (why did I buy these??)

M6.4 x 0.6 // M7.9 x 0.6 (I don't even know what these are for anymore) Nib section?

Recently purchased M9.4 x .5 with 7.4 x .5 for #6 Meister Nib fitting

1/4 inch reamer, various sizes of center drill bits.

Double end die holder (can't find the bar that passes through yet)

One set of M10 x 1.0 aluminum mandrels. (see photo) I assume the largest mandrel on the right is to hold a cap, but I don't have a tap for that thread size. (??)

The post replies are extremely helpful. Thank you very much!
 

Attachments

  • 7.0-set.jpg
    7.0-set.jpg
    33.8 KB · Views: 187
  • 10-x-1-mandrels.jpg
    10-x-1-mandrels.jpg
    31.3 KB · Views: 218

thewishman

Member
Joined
Mar 9, 2006
Messages
8,182
Location
Reynoldsburg, Ohio, USA.
Your taps and dies look good. I think the 6.4 is for Sierra transmissions.

Making your own aluminum mandrels with your taps and dies is a great project to get comfortable with the process. (Mine have a male end and a female end.) Then you'll be certain that they will work perfectly with your tools.

I also got a tap guide to keep things going straight and steady. Not vital, but nice to have:

Tap Guide, 2MT Short 3104 - LittleMachineShop.com
 
Last edited:

Carl Fisher

Member
Joined
Jun 7, 2011
Messages
2,761
Location
Cape Coral, FL
Not to derail too much but what exactly is a tap guide used for or how is it used? I've always just chucked the tap in a jacobs chuck and that's all I need to keep it straight and true. Looking at tap guide, I have no idea how it would be used.

Martin, your tap/die sets look good for most common sizes. You may find you need a few specialty sizes for various nib housings or transmissions, etc... but for the most part what you have is about spot on for the accepted normal. 9 or 10 for the grip section to body, 12 for the cap and 7 or 8 for any finials.
 

randyrls

Member
Joined
Feb 2, 2006
Messages
4,829
Location
Harrisburg, PA 17112

thewishman

Member
Joined
Mar 9, 2006
Messages
8,182
Location
Reynoldsburg, Ohio, USA.
Not to derail too much but what exactly is a tap guide used for or how is it used? I've always just chucked the tap in a jacobs chuck and that's all I need to keep it straight and true. Looking at tap guide, I have no idea how it would be used.

Carl, the point is spring loaded and fits into the back of the tap. As you advance the tap, it keeps a steady pressure on the tap, keeping going in a straight line. It gives you about an inch of travel.

When I hold the tap in the jacobs chuck, as I advance the tap, it pulls the jacobs chuck out of the morse taper. That causes the tap to go off center. I can compensate by stopping the process and advancing the tail stock, but I already have my hands full holding onto the tap and turning the headstock.
 

randyrls

Member
Joined
Feb 2, 2006
Messages
4,829
Location
Harrisburg, PA 17112
I found this set. The price is a bit daunting, but consistent with your statement above. I'm going to wait and start with the chuck that came with the lathe

Martin; Collets come in TWO different 'quality' standards. The common collets will be sufficient for our purposes. Machinists collets are made to a MUCH higher standard with minimum runout, and greater accuracy. If you can stand .001" to .003" of runout the common collets are much cheaper ($100 - $120) The higher quality collets have .0002" to .0005" runout. but can be much more expensive ($20 each x 18 = OUCH!) You also have to get a collet chuck that has the same repeatability and you have to 'true' the chuck to the lathe.

A good compromise is get the cheap set. Make a dot on the case where the collet rests when you use it. After you see the most common collet sizes you use, buy single collets in the higher quality.
 
Last edited:

randyrls

Member
Joined
Feb 2, 2006
Messages
4,829
Location
Harrisburg, PA 17112
I'd get three or four sets of taps (I use plug taps) and dies for about $75, add matching bottoming taps for $6 to $9 each:


Chris; I have been able to find tap 'sets' with a taper tap, plug tap, and bottoming tap. As you reccomended the plug tap is usually sufficient for our uses in softer materials.

As a general FYI; the tap style(?) taper, plug, bottoming are how many threads are tapered on the tap.

  • A Taper tap will have about 12-15 threads that are tapered and these are good for starting an thread and doing thru holes in hard metals.
  • A Plug tap has about 6-8 threads that are tapesed and are good general purpose taps.
  • A Bottoming taper has only 2 or 3 tapered threads and is used for threading to the bottom of a blind hole where a threaded part will go in the hole.

We are getting quite a vocabulary lesson in this thread :)
 

randyrls

Member
Joined
Feb 2, 2006
Messages
4,829
Location
Harrisburg, PA 17112
Carl, the point is spring loaded and fits into the back of the tap. As you advance the tap, it keeps a steady pressure on the tap, keeping going in a straight line. It gives you about an inch of travel.

Because a picture is worth a thousand words:
Tap Guide, 2MT Short 3104 - LittleMachineShop.com

Be cautious if anyone gets one of these. When I put it on my metal lathe the *SHORT* taper would not self eject from the lathe. I had to disassemble the tail stock to get it out. I added a short 'stub' to the narrow end of the tap guide and all is good.
 

KBs Pensnmore

Member
Joined
Oct 16, 2010
Messages
834
Location
Murray Bridge 5253 Australia
The 7X12 lathe is not assembled all that well, basically it needs stripping down, cleaning, modifying, reassembling and checking. Little Machine Shop have a PDF that is pretty good. Some units are not fitted with a camlock to the tailstock, this can be bought from LMS, a good supplier of machine parts and accessories. You will find this a very useful accessory. A lot of the pieces have burrs on them, machining is a bit rough in places also. I got a copy of "The Mini Lathe" by David Fenner, Number 43 of the Workshop Practice Series, it describes the dismantling, rectifications required and assembly. As well as a lot of other information.
I have one that turns tapers, without any modification, it turns 5 thou larger at the chuck end over a 1.25" length. The headstock will require shimming up to bring it into line. A lot of small problems, that are frustrating with it.
Kryn
 

Carl Fisher

Member
Joined
Jun 7, 2011
Messages
2,761
Location
Cape Coral, FL
Be cautious if anyone gets one of these. When I put it on my metal lathe the *SHORT* taper would not self eject from the lathe. I had to disassemble the tail stock to get it out. I added a short 'stub' to the narrow end of the tap guide and all is good.


Been there, done that. I don't know why these machines don't have a bored hole like the wood lathes to so you can eject with a knock out bar. I had to tear mine down to get a short taper jacobs chuck out..

Planning to pull the threaded rod and tap the end for a bolt to make it a touch longer. I need to do that when I add my DRO anyway since I'll loose the ability to retract fully.
 

mredburn

IAP Activities Manager
Staff member
Joined
Jul 5, 2009
Messages
8,753
Location
Fort Myers FL
"M6.4 x 0.6 // M7.9 x 0.6 (I don't even know what these are for anymore) Nib section?"

Heritance feed assembly housings.
Sierras are usually 8.5 x1
 

darrin1200

Member
Joined
Mar 17, 2010
Messages
1,850
Location
Lyn, Ontario, Canada
This is a tap guide that a friend made for me. It fits into adrill chuck and has a 1" throw. The back of it unscrews so that I can put in a heavier spring when I'm threading harder materials.

It works fantastic for me.
 

Attachments

  • 20150601_091755-1.jpg
    20150601_091755-1.jpg
    166.4 KB · Views: 160

MartinPens

Member
Joined
Apr 3, 2010
Messages
1,813
Location
Medford, Oregon, USA
  • A Taper tap will have about 12-15 threads that are tapered and these are good for starting an thread and doing thru holes in hard metals.
  • A Plug tap has about 6-8 threads that are tapesed and are good general purpose taps.
  • A Bottoming taper has only 2 or 3 tapered threads and is used for threading to the bottom of a blind hole where a threaded part will go in the hole.

We are getting quite a vocabulary lesson in this thread :)

Thanks for this explanation. It helps me understand the set of taps that I have.:biggrin:
 

MartinPens

Member
Joined
Apr 3, 2010
Messages
1,813
Location
Medford, Oregon, USA
Making your own aluminum mandrels with your taps and dies is a great project to get comfortable with the process. (Mine have a male end and a female end.) Then you'll be certain that they will work perfectly with your tools.

I also got a tap guide to keep things going straight and steady. Not vital, but nice to have:

Where is the best place to get aluminum for making mandrels?

I honestly don't know what the function of the tap guide is. (to guide the tap dummy!:rolleyes: But I will look it up. I'm visual - so I can't see it in my brain yet. :confused:
 

mredburn

IAP Activities Manager
Staff member
Joined
Jul 5, 2009
Messages
8,753
Location
Fort Myers FL
The tap guide supports the back of the tap or tap handle, depending on how you use it. Sometaps have a dimple in the back that the tap guide fits in.
The front of the tap is supported by what ever it is your trying to tap and the tap guide the back, it also keeps it in alignment from left to right so it taps straight in. The spring keeps pressure forward on the tap so it doesnt hang loose as it threads into the material and to keep moving the tap forward so it doesnt strip out the threads its making.
The Aluminum stock bars from HD and Lowes is not a good quality source but you can use it if you have no other sources.
 

darrin1200

Member
Joined
Mar 17, 2010
Messages
1,850
Location
Lyn, Ontario, Canada
Here is a quick pic of my guide. The guide applies pressure through the spring, automaticly advancing the tap. I grasp the tap holder in one hand and manually turn the lathe with the other. I can cut with and back out the tap simply by turn the lathes handwheel.

The guide keeps the tap aligned nd a contant pressure. I love it.
 

Attachments

  • 20150602_093646.jpg
    20150602_093646.jpg
    144 KB · Views: 156

Penultimate

Member
Joined
Aug 22, 2010
Messages
1,099
Location
Bartlett, IL 60103
+1 for the LMS tap guide. Also, the spring loaded pin is reversible. There is a set screw on the back side holding the pin and spring in place. Back it out, remove the spring flip the pin over to expose a countersink and reassemble. Some small taps have a cone shaped end instead of the c'sink.

Get a die holder too, it's like the tap guide, it mounts into the tail stock and holds dies.
 

jj9ball

Member
Joined
Dec 23, 2008
Messages
140
Location
Norfolk, NE
Just my 2 cents here... but I use the the er-32 set in 1/32 increments and have had ZERO gaps. If I'm doing my math right a mm is around .390 or approximately 1/25 of an inch. If you get a 1/32 increment set it would actually be tighter and have less risk of gaps.
For taps and dies, that is a slipperly slope. I think I started with about 2 sets and now have about 10, and am looking for more all the time. :) I, and this is just my own opinion, prefer to make a little bit larger pens. I would suggest looking at 13mm and 14mm tap and die sets for the cap to body connection. I think ideally you will want 9,10,11,12,13,14mm sets all preferably with a .75 thread. This will give you lots of flexibility when choosing the connections for section to body and also the clip. Once you start looking at clips you will notice that they are widely varied in size. Typically they need a tenon that varies between 10, 11, and 12 mm. Bottom line you will be able to do a little bit with a couple taps and dies... but if you get a sequential pile of them as I mentioned above you'll always be able to handle everything.
Another important thing to consider, and it looks like you've already started, is work holding. I have found that (and here is where having the metal lathe is awesome) making several different aluminum mandrels to match both thread sizes and length for all your pieces is very helpful. You can then mount and re-mount the part in your lathe and maintain its concentricity to a pretty strong degree. This will allow you to finish and shape your parts in different steps. I like doing it this way because I can rough everything in on the metal lathe and finish it on the wood lathe using the collet chuck and mandrels.
Finally, and this was told to me by someone when I started down this road, go to harbor freight or victor machine and get your self a lettered and numbered set of drill bits. Harbor freight has a set that I bought. It was around $60 but I have rarely ever needed any other drill bits beyond these. Especially if you have a drill doctor you can keep resharpening the bits as they dull and one set will last you a LONG time. Drill bits are like clamps you can't buy too many!!!! Don't overlook the numbered bits. If you decide to start altering feeds (to put a breather tube in for instance), you will need wire bits... I believe I used #71 and #59 on my last bulb filler.

I hope this helps. I know its a lot of rambling, but kitless pen making is about the funnest most endlessly creative part of this hobby that I have run into. So I have one final piece of advice.

You will destroy parts and make mistakes... when you do walk away and come back later. The worst thing you can do is get frustrated and force yourself to keep going. This is what leads people to getting frustrated with the kitless stuff.

Please do post pens once you start making a few. We need more people on the forum doing kitless stuff. Good Luck!!!
 
Top Bottom