Texatdurango
Member
This is a tutorial showing how a fountain pen grip section can be made on any lathe, in this case a Jet mini lathe using ordinary wood turning tools. Making a roller ball section is very similar and once you finish this tutorial you should be able to figure out which steps to omit and which steps to add for making the roller ball section.
It should be noted that this is not the only way of making a fountain section, it's just a way that works for me. Take from this tutorial what you will, add or modify to suit your particular needs, I just hope it will help clarify some things that possibly you are unsure of or not familiar with now.
Exact measurements are not given as I believe it takes some of the mystery and fun out of making your own. Some measurements however do hinge on others so a few sizes will be discussed.
A pen body and cap is nothing but two pieces of material and a nib is useless without something to attach it to and the ink source has to attach to something so the section is the most important part of a pen that marries all these other parts together so it is truly at the heart of any custom pen. That said, there are a few design factors that we must consider since there are many variables to work through so let's do a little planning which will make our job a LOT easier.
1. First, determine the size pen you want to make, do you want a small pen or a large pen? There are two popular sizes of multi-start tap and die sets for making pens, which have 12mm or 14mm threads, the pitch isn't important for this discussion and you can use any threads you like.
2. Once you determine the cap to body mating thread size, you need to choose a nib size, generally a #5 (small) or a #6 (large). It's personal preference, there are no rules as which to use.
3. A nib needs a matching feed and the feed needs a matching housing and not all housings are the same so it's time to choose a brand. I like Heritance and Bock nibs and each require their own tap to cut their feed threads into the inside of the section.
4. The sections require different size holes for the different feed housings so knowing the brand you want to use up front is important. Buy the nib/feed/housing you want then measure the housing diameter to determine the hole size in the section.
Here is some helpful reference material on nib/feed/housing threads:
For the #5 (small) Heritance feed housing you will need a 6.4mm x .5mm tap to thread the inside of the section. Available at http://www.indy-pen-dance.com/Nibs/
For the #5 (small) Bock feed housing you will need a 6.4mm x .6mm tap to thread the inside of the section. Available at http://www.classicnib.com/feeds.html
Please do not look at the .5mm and .6mm thread pitches and think one tap will do both, I've tried and ruined a few feed housings in the process. The threads are just close enough to cause a nasty cross thread mess!
For the #6 (large) Heritance feed housing you will need a 8.4mm x .75mm tap to thread the inside of the section. Available at http://www.indy-pen-dance.com/Nibs/
For the #6 (large) Bock feed housing you will need a 7.9mm x .6mm tap to thread the inside of the section. Available at http://www.classicnib.com/feeds.html
Other nibs/feeds/housings are available but I choose to stick with the quality nibs above.
For the exterior section threads where the section actually screws into the pen body I use a 9mm x .75mm tap for all my pens. (available at http://www.victornet.com/subdepartme...Taps/1310.html) This size thread WILL NOT fit the kit sections which use a 10mm x 1mm thread but I feel that using the smaller threads allows me more material between the inner and outer threads of the pen body thus eliminating a weak link.
So, now you know your pen size, the cap to body thread size and the size and brand of nib you will use you can start drilling and tapping and having fun! So off we go………….
I start out with a ¾" blank made of Alumilite resin dyed black. It's ¾" because that's the diameter of the ice cube tube trays I buy at Walmart. I also find that Ebonite is a great material to use as it has a nice feel to it and it thurns and threads well. I only use acrylic if I am making a section to match the pen body.
I insert the blank into a collet chuck a little farther than the final length the section will be so I do all the turning without moving the blank. I face off the end to square up the blank then I drill a 60 degree hole using a center drill. Never drill a center hole without squaring up the blank or the blank will try to wobble when turning. If you don't have a center drill, consider getting a few, with these small parts a crooked hole is something you don't want.
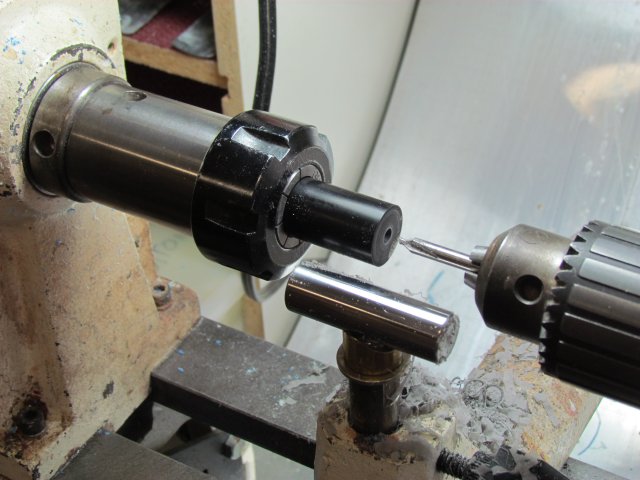
Here the blank has been turned down to the approximate finished size and a tenon for the rear threads has been turned. Look closely at the tool rest, I applied a bit of ski wax because I want my tools to slide freely on the rest while making delicate cuts. Any "non sticky" wax will work.
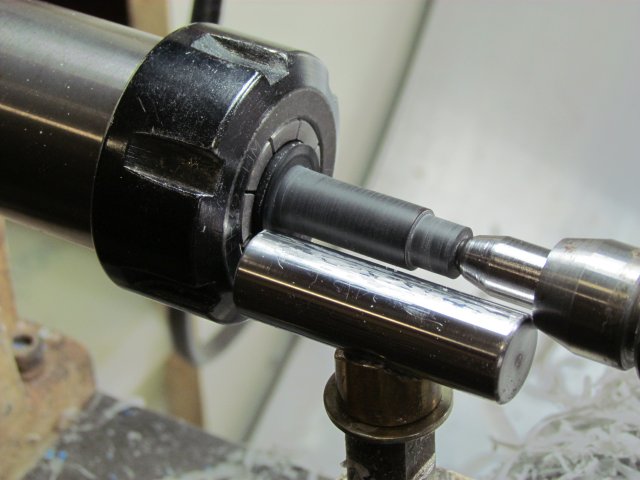
I spray a bit of cooking spray such as PAM to lubricate the blank and proceed to thread the section. Why cooking spray… why not! I like it because I can spray a tiny quick shot on the blank then a quick shot into the die then it cleans off easily after use.
Here I am actually cutting the threads using a die holder which spins freely on a rod that is chucked into the tailstock.
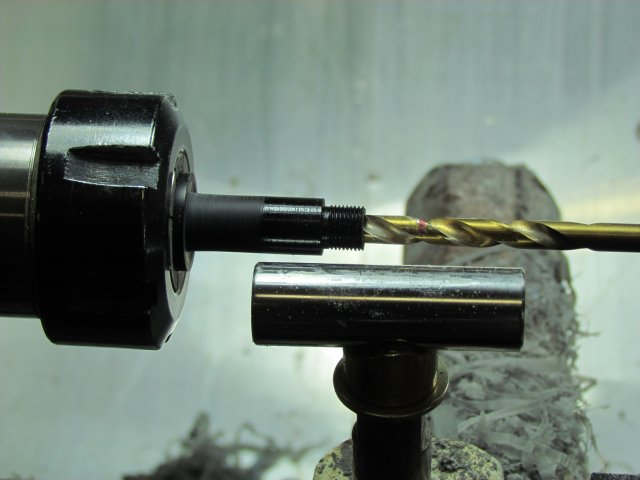
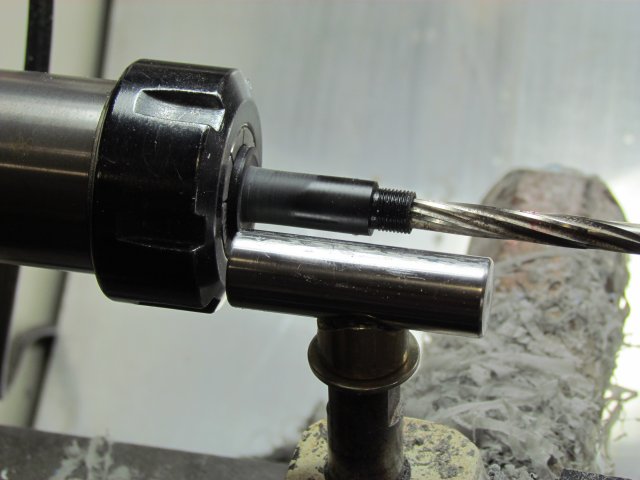
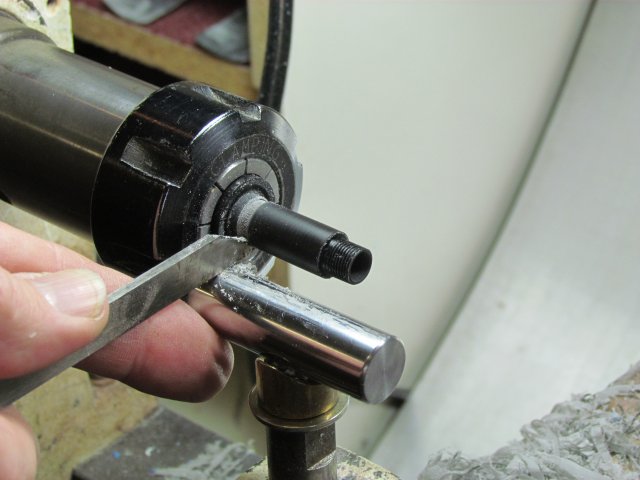
After threading, take a narrow parting tool and clean up the threads at the end closest to the section body so it will thread flush to the pen body (Look closely to the left of the threads to see the area cleaned up). Now I drill the first hole as deep as I want the section to be, in this case 1.1" long. This is the drill size used for whatever tap you select so choose it carefully. The second drill I use is to allow the fountain converter to fit inside the section as shown a few photos down.
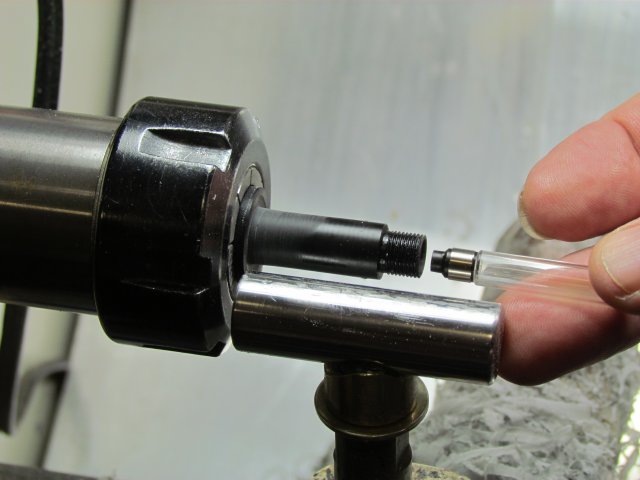
Since I have no drill bit the right size to provide a snug fit for the converter I follow the drilling with a .252" reamer which only goes in enough to allow the converter to seat itself.
Seating the converter snugly but NOT too tight is important. Too loose and the converter will fall off into the pen and would probably make a mess, too tight and you'll likely crack the section since this a fairly delicate part of the pen. Don't go any further unless this fits like a glove!
So far so good, now I part off the section to it's finished length
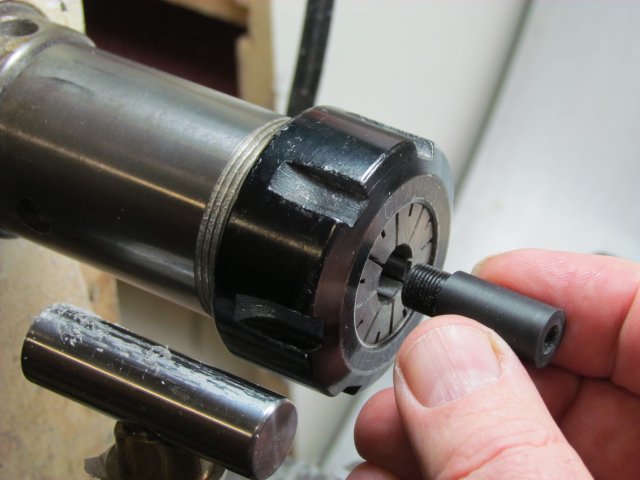
I change collets for the first time switching to one that fits the finished diameter of the section then insert the section in threads first.
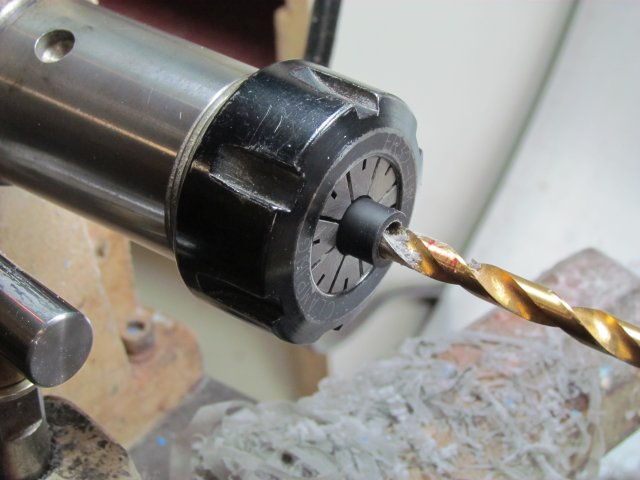
Now I drill a hole in only far enough to allow the smooth portion of the feed housing to easily slide in but not so far as to to destroy the section I am going to thread next.
Tip: Measure your feed housing to see how much smooth side you have and how much thread area you have, this will tell you how deep to drill a clearance hole for the smooth surface.
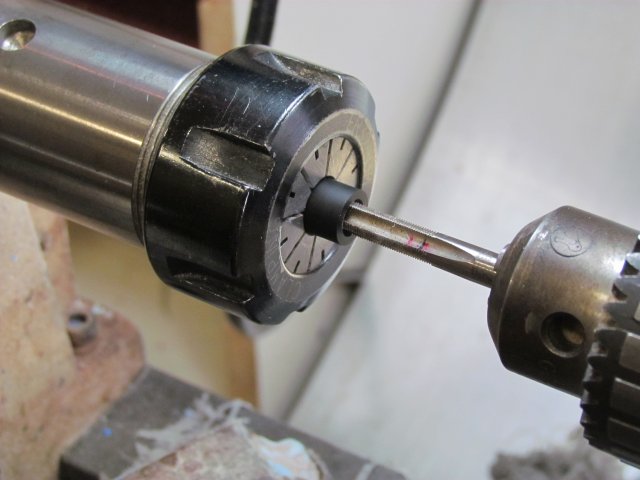
Now I use the appropriate tap size for the threads on the feed I am using. A bit of thought should be given before deciding on buying one of these specialized taps since they are specific to certain feed housings. For a few years I have been using Heritance feed housings so use the taps sized for those feeds BUT… am in the process of switching over to the Bock nibs and feed housings which use a different thread and of course a different tap.
Don't think typical "metal threading" here, because these taps cut through the Alumilite, acrylic and ebonite like butter so very little force is necessary. These are very fine threads so easy does it else you will ruin the threads
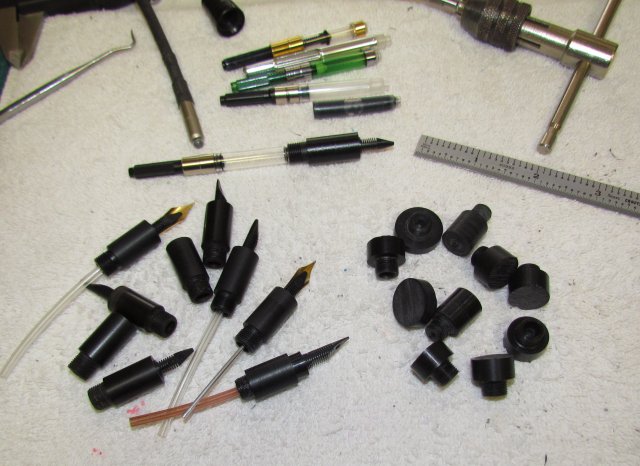
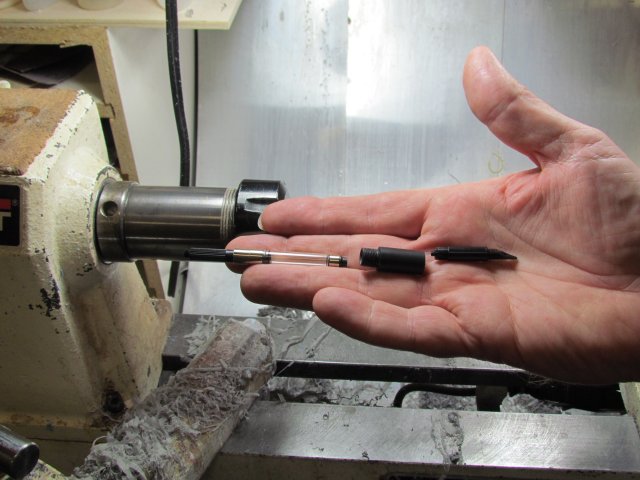
Up to this point steps 1 thru 11 have been done to make a section that will now hold a converter and allow a feed housing to screw in and for those not familiar with the terms, here is a photo of a converter, section and feed housing which has the feed inserted.
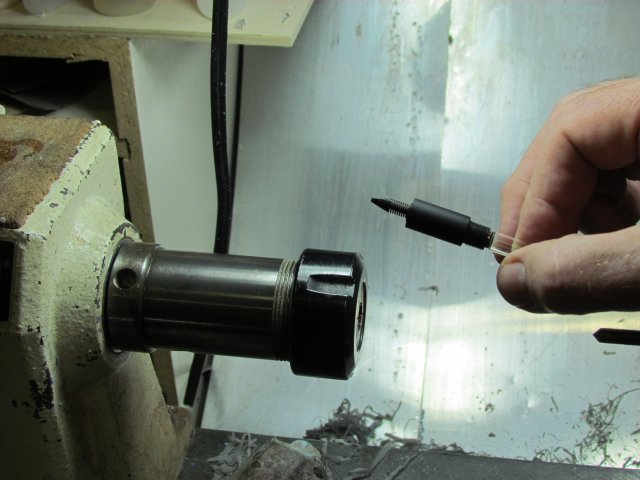
Here is the section with the converter inserted, the feed housing screwed in and the feed itself inserted into the housing. Well there's my pen, all you need now is a little ink in the converter, a nib on the feed and you're in business! But most folks want something a little nicer looking so let's doll it up a bit………
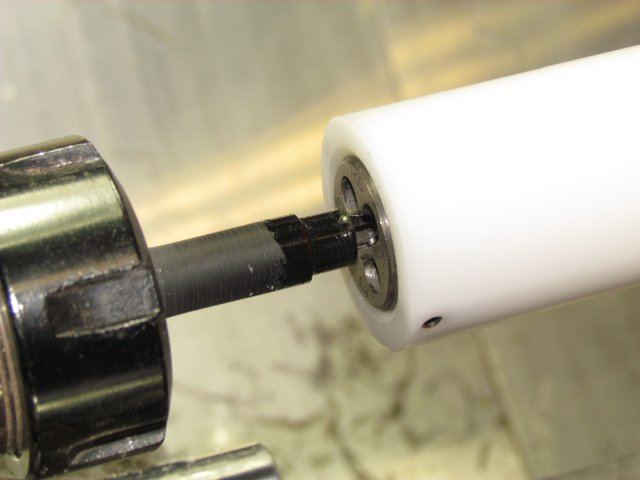
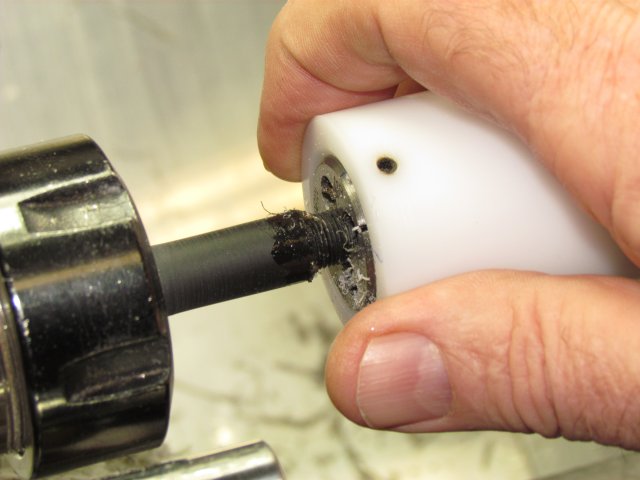
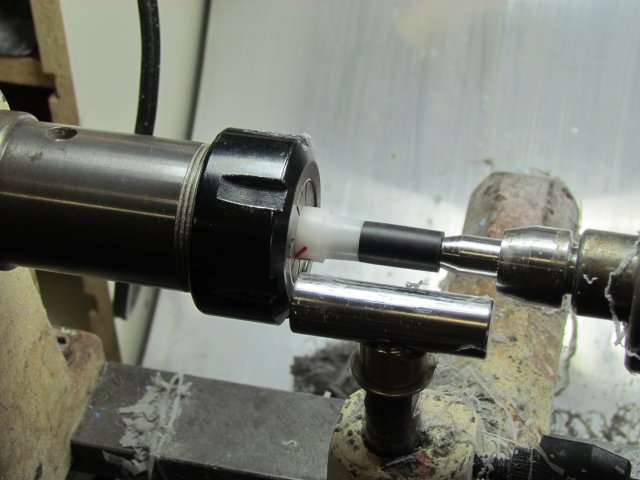
Here is the part that gets me the most PM's asking how I hold the section to work on it! I make a holder from Delrin which is threaded to match the lower section threads. The angle and diameter is also sized to the finished section size so I know when to stop cutting and shaping. Two things make working on these tiny sections possible, a very short tool rest and a modified "cut back" live center. The short tool rest allows me to get up very close to the section for fine turning and shaping without the tools chattering and ruining 30 minutes of work! You will see that I also cut back some of the live center while still leaving the 60 degree point. This allows me to maneuver the skew wherever I want without hitting the live center.
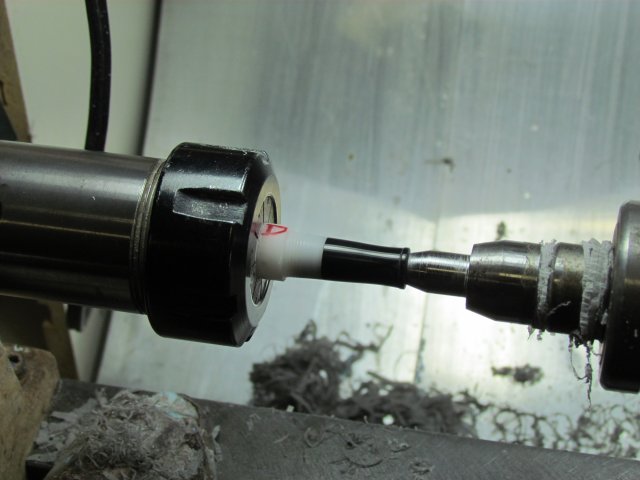
Here the section shaping is finished. While being held between the delrin holding tool and the live center I shaped it to one of the shapes I like. This is one of the few times I don't use Abranet, instead I wet sand starting with 600, then 800, 1000 and 2000 grit then polish using Novus #2 then #3, all while held in the delrin holder. Now I take it off, give it a shot of Novus #1 polish to clean it up and on the pen it goes. (I finally found some more Novus #1 polish and think http://www.indy-pen-dance.com/Novus-...and-Shine.html is about the only place that carries it anymore!)
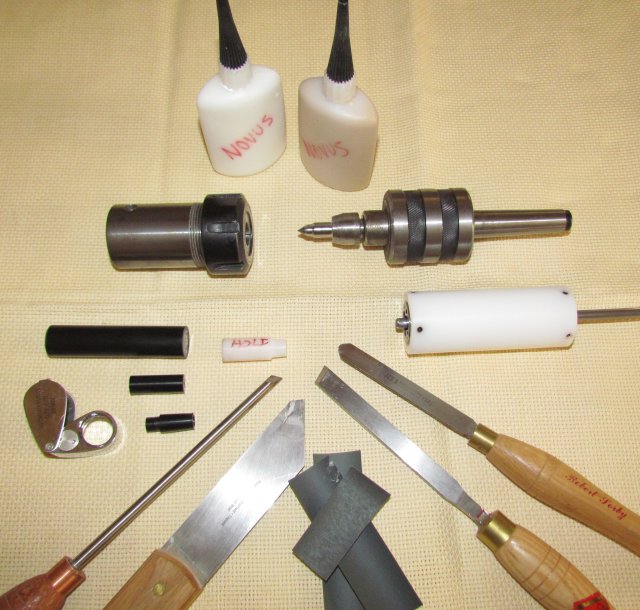
Making these small sections doesn't require a lot of special tools but a few modified tools and holders certainly make the job easier. In the photo below is everything I used in making the section in this tutorial.
1. Beall collet chuck, there are already 1000 reasons to have one, this is reason 1001! While not required, it certainly adds a magnitude of accuracy, remember this is tiny work and any slop will be magnified. Available at http://www.bealltool.com/products/turning/colletchuck.php
2. A good live center that will keep the wide part of the center away from your work. I forgot where I got this one but it has interchangeable tips and I modified it so I could get in close on these sections without hitting the live center.
3. A short tool rest so you can get up very close to the work, in-between the collet and the live center. For small very fine work I want to be right on top of the piece! My 2 3/4" rest was just TOO LONG so I called on a friend, Rick Herrell, (Rherrell on the IAP forum) who came through and made this one for me to my exact length which is 2" long. If interested, contact him and tell him you want a shortie rest like George has.
4. I made the white tool that holds the section while working and it is made from Delrin and has internal 9mm x .75mm threads and the exterior is the same diameter as the 12mm multi-start threads. Available as "Acetal" from http://www.use-enco.com/CGI/INSRAR?PMSECT=0000001935
5. The other white tool is a die holder I made which rotates on a shaft chucked in the tailstock, it is made from Delrin as well and the Delrin is available at Enco.
Lastly are the cutting tools I use making these sections, a ½" wide Sorby flat skew and what I believe is called a "spindle Master" also by Sorby which allows me to make nice curved shapes without digging in too aggressively thus requiring little sanding afterwards. The parting tool and mini skew also come in handy.
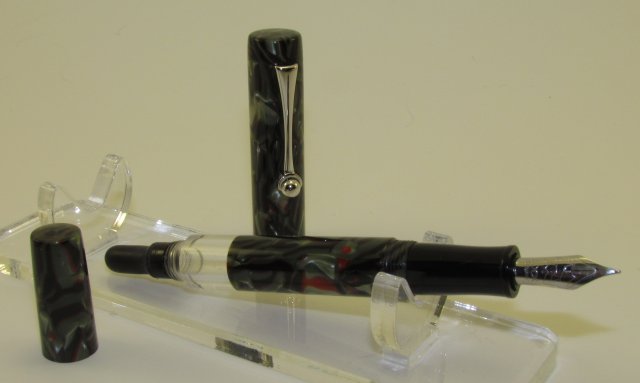
Well there you have it, I hope this explained a few things you didn't already know and gives you some ideas on how to make your own sections to fit into those "made from scratch" creations. And speaking of "made from scratch" (previously called kitless) pens, here is the nib from this tutorial in a little bulb filler I made which has an ink window and is sporting a Bock nib and rhodium plated rollerball clip I just acquired.
__________________
It should be noted that this is not the only way of making a fountain section, it's just a way that works for me. Take from this tutorial what you will, add or modify to suit your particular needs, I just hope it will help clarify some things that possibly you are unsure of or not familiar with now.
Exact measurements are not given as I believe it takes some of the mystery and fun out of making your own. Some measurements however do hinge on others so a few sizes will be discussed.
A pen body and cap is nothing but two pieces of material and a nib is useless without something to attach it to and the ink source has to attach to something so the section is the most important part of a pen that marries all these other parts together so it is truly at the heart of any custom pen. That said, there are a few design factors that we must consider since there are many variables to work through so let's do a little planning which will make our job a LOT easier.
1. First, determine the size pen you want to make, do you want a small pen or a large pen? There are two popular sizes of multi-start tap and die sets for making pens, which have 12mm or 14mm threads, the pitch isn't important for this discussion and you can use any threads you like.
2. Once you determine the cap to body mating thread size, you need to choose a nib size, generally a #5 (small) or a #6 (large). It's personal preference, there are no rules as which to use.
3. A nib needs a matching feed and the feed needs a matching housing and not all housings are the same so it's time to choose a brand. I like Heritance and Bock nibs and each require their own tap to cut their feed threads into the inside of the section.
4. The sections require different size holes for the different feed housings so knowing the brand you want to use up front is important. Buy the nib/feed/housing you want then measure the housing diameter to determine the hole size in the section.
Here is some helpful reference material on nib/feed/housing threads:
For the #5 (small) Heritance feed housing you will need a 6.4mm x .5mm tap to thread the inside of the section. Available at http://www.indy-pen-dance.com/Nibs/
For the #5 (small) Bock feed housing you will need a 6.4mm x .6mm tap to thread the inside of the section. Available at http://www.classicnib.com/feeds.html
Please do not look at the .5mm and .6mm thread pitches and think one tap will do both, I've tried and ruined a few feed housings in the process. The threads are just close enough to cause a nasty cross thread mess!
For the #6 (large) Heritance feed housing you will need a 8.4mm x .75mm tap to thread the inside of the section. Available at http://www.indy-pen-dance.com/Nibs/
For the #6 (large) Bock feed housing you will need a 7.9mm x .6mm tap to thread the inside of the section. Available at http://www.classicnib.com/feeds.html
Other nibs/feeds/housings are available but I choose to stick with the quality nibs above.
For the exterior section threads where the section actually screws into the pen body I use a 9mm x .75mm tap for all my pens. (available at http://www.victornet.com/subdepartme...Taps/1310.html) This size thread WILL NOT fit the kit sections which use a 10mm x 1mm thread but I feel that using the smaller threads allows me more material between the inner and outer threads of the pen body thus eliminating a weak link.
So, now you know your pen size, the cap to body thread size and the size and brand of nib you will use you can start drilling and tapping and having fun! So off we go………….
I start out with a ¾" blank made of Alumilite resin dyed black. It's ¾" because that's the diameter of the ice cube tube trays I buy at Walmart. I also find that Ebonite is a great material to use as it has a nice feel to it and it thurns and threads well. I only use acrylic if I am making a section to match the pen body.
I insert the blank into a collet chuck a little farther than the final length the section will be so I do all the turning without moving the blank. I face off the end to square up the blank then I drill a 60 degree hole using a center drill. Never drill a center hole without squaring up the blank or the blank will try to wobble when turning. If you don't have a center drill, consider getting a few, with these small parts a crooked hole is something you don't want.
Here the blank has been turned down to the approximate finished size and a tenon for the rear threads has been turned. Look closely at the tool rest, I applied a bit of ski wax because I want my tools to slide freely on the rest while making delicate cuts. Any "non sticky" wax will work.
I spray a bit of cooking spray such as PAM to lubricate the blank and proceed to thread the section. Why cooking spray… why not! I like it because I can spray a tiny quick shot on the blank then a quick shot into the die then it cleans off easily after use.
Here I am actually cutting the threads using a die holder which spins freely on a rod that is chucked into the tailstock.
After threading, take a narrow parting tool and clean up the threads at the end closest to the section body so it will thread flush to the pen body (Look closely to the left of the threads to see the area cleaned up). Now I drill the first hole as deep as I want the section to be, in this case 1.1" long. This is the drill size used for whatever tap you select so choose it carefully. The second drill I use is to allow the fountain converter to fit inside the section as shown a few photos down.
Since I have no drill bit the right size to provide a snug fit for the converter I follow the drilling with a .252" reamer which only goes in enough to allow the converter to seat itself.
Seating the converter snugly but NOT too tight is important. Too loose and the converter will fall off into the pen and would probably make a mess, too tight and you'll likely crack the section since this a fairly delicate part of the pen. Don't go any further unless this fits like a glove!
So far so good, now I part off the section to it's finished length
I change collets for the first time switching to one that fits the finished diameter of the section then insert the section in threads first.
Now I drill a hole in only far enough to allow the smooth portion of the feed housing to easily slide in but not so far as to to destroy the section I am going to thread next.
Tip: Measure your feed housing to see how much smooth side you have and how much thread area you have, this will tell you how deep to drill a clearance hole for the smooth surface.
Now I use the appropriate tap size for the threads on the feed I am using. A bit of thought should be given before deciding on buying one of these specialized taps since they are specific to certain feed housings. For a few years I have been using Heritance feed housings so use the taps sized for those feeds BUT… am in the process of switching over to the Bock nibs and feed housings which use a different thread and of course a different tap.
Don't think typical "metal threading" here, because these taps cut through the Alumilite, acrylic and ebonite like butter so very little force is necessary. These are very fine threads so easy does it else you will ruin the threads
Up to this point steps 1 thru 11 have been done to make a section that will now hold a converter and allow a feed housing to screw in and for those not familiar with the terms, here is a photo of a converter, section and feed housing which has the feed inserted.
Here is the section with the converter inserted, the feed housing screwed in and the feed itself inserted into the housing. Well there's my pen, all you need now is a little ink in the converter, a nib on the feed and you're in business! But most folks want something a little nicer looking so let's doll it up a bit………
Here is the part that gets me the most PM's asking how I hold the section to work on it! I make a holder from Delrin which is threaded to match the lower section threads. The angle and diameter is also sized to the finished section size so I know when to stop cutting and shaping. Two things make working on these tiny sections possible, a very short tool rest and a modified "cut back" live center. The short tool rest allows me to get up very close to the section for fine turning and shaping without the tools chattering and ruining 30 minutes of work! You will see that I also cut back some of the live center while still leaving the 60 degree point. This allows me to maneuver the skew wherever I want without hitting the live center.
Here the section shaping is finished. While being held between the delrin holding tool and the live center I shaped it to one of the shapes I like. This is one of the few times I don't use Abranet, instead I wet sand starting with 600, then 800, 1000 and 2000 grit then polish using Novus #2 then #3, all while held in the delrin holder. Now I take it off, give it a shot of Novus #1 polish to clean it up and on the pen it goes. (I finally found some more Novus #1 polish and think http://www.indy-pen-dance.com/Novus-...and-Shine.html is about the only place that carries it anymore!)
Making these small sections doesn't require a lot of special tools but a few modified tools and holders certainly make the job easier. In the photo below is everything I used in making the section in this tutorial.
1. Beall collet chuck, there are already 1000 reasons to have one, this is reason 1001! While not required, it certainly adds a magnitude of accuracy, remember this is tiny work and any slop will be magnified. Available at http://www.bealltool.com/products/turning/colletchuck.php
2. A good live center that will keep the wide part of the center away from your work. I forgot where I got this one but it has interchangeable tips and I modified it so I could get in close on these sections without hitting the live center.
3. A short tool rest so you can get up very close to the work, in-between the collet and the live center. For small very fine work I want to be right on top of the piece! My 2 3/4" rest was just TOO LONG so I called on a friend, Rick Herrell, (Rherrell on the IAP forum) who came through and made this one for me to my exact length which is 2" long. If interested, contact him and tell him you want a shortie rest like George has.
4. I made the white tool that holds the section while working and it is made from Delrin and has internal 9mm x .75mm threads and the exterior is the same diameter as the 12mm multi-start threads. Available as "Acetal" from http://www.use-enco.com/CGI/INSRAR?PMSECT=0000001935
5. The other white tool is a die holder I made which rotates on a shaft chucked in the tailstock, it is made from Delrin as well and the Delrin is available at Enco.
Lastly are the cutting tools I use making these sections, a ½" wide Sorby flat skew and what I believe is called a "spindle Master" also by Sorby which allows me to make nice curved shapes without digging in too aggressively thus requiring little sanding afterwards. The parting tool and mini skew also come in handy.
Well there you have it, I hope this explained a few things you didn't already know and gives you some ideas on how to make your own sections to fit into those "made from scratch" creations. And speaking of "made from scratch" (previously called kitless) pens, here is the nib from this tutorial in a little bulb filler I made which has an ink window and is sporting a Bock nib and rhodium plated rollerball clip I just acquired.
__________________
Last edited by a moderator:
 I frequently use the cooking oil on larger taps but have never used any lubricant when tapping the inside of the feed housings. I might give it a try one day.