
Timebandit
Member
Hopefully all can see this today.
Ok guys, here we go. Since all of this kitless(dare i call it that) stuff is going on, i thought i would share a couple of mandrels that i made to help with my new kitless pens. Now there are a lot of different ways to turn these kind of pens, Texdurango has shown the most basic form of this, but this method means that you for one have to leave at least one portion of your pen perfectly strait so you cant make a nice curvacious pen at the center with this method, two that you have to have the right size collet for the pen you are making unless you stick to a standard size that you buy with your collet chuck(like 5/8,3/4) and three that you have to make certain that you re-chuck your blank properly when you reverse the blank and if your blank isnt perfectly round then this could cause some problems.
You can also make pin chucks and other mandrels and things,which i did at first,but didnt work as well. I was making and expansion mandrel like you buy at Arizona Sillohette,but with a piece of rubber hose on the end that expands to grab the inside of the blank(got the idea from someone on IAP)but that didnt seem to run true either.
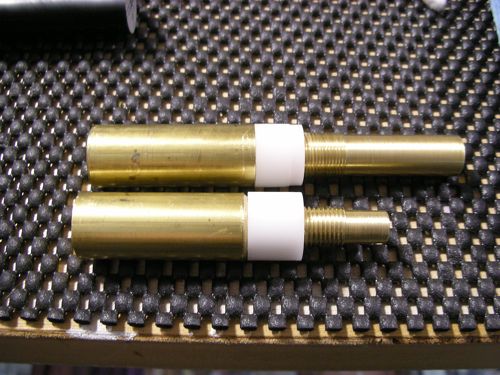
So i came up with these mandrels that i think are fairly accurate(will be more accurate latter when i get better at making them) and would like to share them with everyone since there has been a lot of talk about how to make a kitless pen. Now everyone can make these,but it will just take you a little longer without a metal late. But if you know a friend with a metal lathe or a machine shop close,you could have these made. They are made from 330 brass and are machined to fit the inside diameter of the body or cap and have matching threads that the blank threads onto to make sure that it runs true. I also made delrin bushings that are threaded to go on so when they get beat up i can just make a new bushing. Now my metal lathe is not accurate so i just used it to remove heavy material and they got these to size with a file. If all you have is a wood lathe this can be done with some heavy files or rasps. These are what i used to make the two kitless pens that i have shown lately.
I hope this helps a few of you.
Now go have some fun.
Justin
Ok guys, here we go. Since all of this kitless(dare i call it that) stuff is going on, i thought i would share a couple of mandrels that i made to help with my new kitless pens. Now there are a lot of different ways to turn these kind of pens, Texdurango has shown the most basic form of this, but this method means that you for one have to leave at least one portion of your pen perfectly strait so you cant make a nice curvacious pen at the center with this method, two that you have to have the right size collet for the pen you are making unless you stick to a standard size that you buy with your collet chuck(like 5/8,3/4) and three that you have to make certain that you re-chuck your blank properly when you reverse the blank and if your blank isnt perfectly round then this could cause some problems.
You can also make pin chucks and other mandrels and things,which i did at first,but didnt work as well. I was making and expansion mandrel like you buy at Arizona Sillohette,but with a piece of rubber hose on the end that expands to grab the inside of the blank(got the idea from someone on IAP)but that didnt seem to run true either.
So i came up with these mandrels that i think are fairly accurate(will be more accurate latter when i get better at making them) and would like to share them with everyone since there has been a lot of talk about how to make a kitless pen. Now everyone can make these,but it will just take you a little longer without a metal late. But if you know a friend with a metal lathe or a machine shop close,you could have these made. They are made from 330 brass and are machined to fit the inside diameter of the body or cap and have matching threads that the blank threads onto to make sure that it runs true. I also made delrin bushings that are threaded to go on so when they get beat up i can just make a new bushing. Now my metal lathe is not accurate so i just used it to remove heavy material and they got these to size with a file. If all you have is a wood lathe this can be done with some heavy files or rasps. These are what i used to make the two kitless pens that i have shown lately.
I hope this helps a few of you.
Now go have some fun.
Justin

