...That's all well and good but I think more times than not, the user is just swamped with information overload and honestly, some of the links aren't all that useful and just add to the confusion, but maybe that's better than nothing at all...
You know, the funny thing is I don't think there is enough information, and there definitely is not an organized source. I have been looking at it for a couple months now and have watched, I think, all the videos and read all the tutorials at least once and several times in many of the cases, but there is still some things that are in your step-by-step above that I have not been able to pick up on.
So, thank you very much.
Wayne,
I have a suspicion that some members are looking for or sitting back waiting for someone to post....
1. take a 6.4mm bit and drill a hole 3.1" deep in the lower body for the converter clearance.
2. take a 8mm drill and drill the lower body 2.35" for the converter body clearance
3. take a 9mm drill and drill a hole for the 10mm x 1mm threads which will......
And I just don't think that's going to happen. Even the tutorials are deliberately left vague to spur the imagination of the readers.
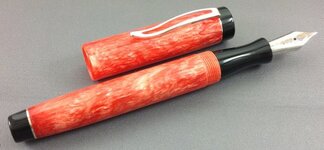
My post above is not intended to be a step by step set of instructions, it is simply a list of particular drill bits, taps and dies used to make the pen in the photo.
I'm thinking if one were to look at the photo then look at the list which has the tools used on each part of the pen they could probably figure out how to make that part where it will line up with the other parts.
As an example, the
[FONT=Tahoma, sans-serif]Upper Finial[/FONT] says....
[FONT=Tahoma, sans-serif]"Turn rod to .630" dia then turn a .395" tenon then cut 10mm x 1mm threads with a die[/FONT]"
With that information, one would chuck up a blank, turn it down to .630" Dia then turn a tenon to .395" dia then run the die up to the tenon and cut the male threads which will eventually thread into the top of the pen cap. I'm leaving little things like tenon length, finial length of the finial and parting off the finished finial to the imagination of the pen maker, after all, they have to have some fun with this just like I did when I started doing these.
I may be wrong but I think several members are willing to help out, just not hand out step by step worksheets to things they themselves spent months figuring out with a lot of trial and error.

") ............
............