A few kitless questions.

Signed-In Members Don't See This Ad

Ramparte

Member
Joined
Apr 4, 2017
Messages
7
Hi,

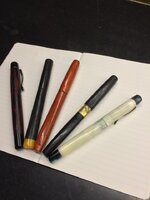
I'm new to pen turning. Did a few kits and then dove into kitless. It's working out ok - I have 5 workable pens so far, hope the pic comes through (yeah, I made a white ink pen. Not a great idea) I had a few questions for the folks who've been doing this a while:

- I worry about the strength of the wood pens I've made. Does anyone insert brass tubes into these as kitless pens for strength, or is it unevcesary. I think the wood walls are about 2mm.

- does anyone have a good solution for sealing a wood cap so the nib doesn't dry out?

- I'm using m12x1.0 and m10x1.0 for the cap and barrel threads. On the wood pens I use ebonite for the threads and it's fine. On acrylic pens, the acrylic seems really fragile and I get some threads cracking off in use. Does anyone have a favorite set of thread dimensions for this kind of pen?

- one of the pens is ebonite. Really cool (if stinky). But I can't get a high gloss finish on it. Does anyone have a good finish for this material? I guess I could just do standard CA finish?
 

Attachments

  • IMG_1031.jpg
    IMG_1031.jpg
    149.9 KB · Views: 434
Signed-In Members Don't See This Ad

More4dan

Member
Joined
Mar 17, 2016
Messages
2,102
Location
Katy, TX
Lovely pens!

If I stack up your tread dimensions correctly, there isn't much wall left between the cap thread and the section thread, assuming they sit atop each other. The thickness left over would be between 0.23mm and 0.5mm, 0.009" and 0.020". Probably not enough wall thickness for anything but metal. If you offset the threads for the cap and section where they don't sit on top of each other, you might be ok. I use 0.75mm pitch threads to give me an additional wall thickness when stacking the threads. I have use 9mm x 0.75 and 11mm x 0.75 threads for acrylic pens without issue stacked. With 1.0 pitched threads you will likely need to step up the cap to 13mm for acrylics.

The following site was very helpful for me in designing my kitless and picking threads.

UN imperial screw thread calculator

You will have to convert metric to inches for the diameter. Then change the output to metric. Input threads in tpi till you get a metric pitch match. The thread class selection, I use 2A for the male thread and 2B for the female thread. It will calculate the minor and major diameters and the their acceptable ranges. I also use it to calculate the tendon diameter and hole size required prior to threading.

Danny
 

frank123

Member
Joined
Feb 5, 2012
Messages
613
Location
Colorado
How are you polishing the Ebonite?

I've always just progressively wet sanded to around 2000 then polished with a buffing wheel using some white polish compound and gotten a mirror finish.

Micromesh and similar pads should work well too, but I haven't tried them on Ebonite since the way I do it is easiest and fastest for me with my technique.
 

Ramparte

Member
Joined
Apr 4, 2017
Messages
7
Thanks for the replies. I guess I'll have to invest in a 9mm tap for the nib section - I've been using premade ones that have 10mm but as you say, it's really not much material.

I polished using micromesh up to 12000. I'll try buffing, haven't done that - didn't know how the material would react to it.
 

duncsuss

Member
Joined
Jun 29, 2012
Messages
2,160
Location
Wilmington, MA
Looks like you are off to a really good start -- well done!

I polished using micromesh up to 12000. I'll try buffing, haven't done that - didn't know how the material would react to it.

Hmmm. By the time I get to the gray (12000) Micromesh pad, my ebonite is pretty glossy, and buffing is just to remove the scratches that I need a loupe to see.

Sanding is not complicated, but there are lots of variables ... some before you even start sanding:

- What lathe tools do you use?
- What speed do you turn at?
- Do you sand with sandpaper before going to Micromesh?
- Wet or dry?
- What speed do you sand at?
- Backing block or not?
- How long do you sand with each grit?
- Do you stop the lathe sand along the length of the pen to get rid of radial scratches before going on the the next grit?
- Do you wash off any residue before going on to the next grit?
- What sequence of grits do you use?
 

More4dan

Member
Joined
Mar 17, 2016
Messages
2,102
Location
Katy, TX
Thanks for the replies. I guess I'll have to invest in a 9mm tap for the nib section - I've been using premade ones that have 10mm but as you say, it's really not much material.

I polished using micromesh up to 12000. I'll try buffing, haven't done that - didn't know how the material would react to it.

You may just need to move up to a larger cap thread. Are you using #5 or #6 nibs, that will also determine if you can use a 9mm body thread. 9mm works for a #5 nib but I'm not sure about a #6.

Danny
 

Ramparte

Member
Joined
Apr 4, 2017
Messages
7
On tools,etc, just working with regular hss, gouge to touch and scraper, etc to finish. Sanding, I do 120, 220, 350 and then micro mesh. I suppose I could have over heated it but I was going slowly and didn't get the burnt smell or smoke. Maybe I'm just impatient with the micromesh and needs to spend more time on it.

On threads, I ordered the m9 x .75 and and m11 x .75, I'll mess with those and see How they work.

Thanks for the help. New to this but having a lot of fun. I took the ebonite pen to work today and got a lot of compliments.
 

Rounder

Member
Joined
Jan 16, 2011
Messages
753
Location
Marlin, TX
On tools,etc, just working with regular hss, gouge to touch and scraper, etc to finish. Sanding, I do 120, 220, 350 and then micro mesh. I suppose I could have over heated it but I was going slowly and didn't get the burnt smell or smoke. Maybe I'm just impatient with the micromesh and needs to spend more time on it.

On threads, I ordered the m9 x .75 and and m11 x .75, I'll mess with those and see How they work.

Thanks for the help. New to this but having a lot of fun. I took the ebonite pen to work today and got a lot of compliments.

You generally shouldn't need to start your sanding with such a course grit. That makes it much more difficult as the course grits put such large grooves in the wood or acrylic. If your turning is fairly smooth after using the tools, start with 400 grit and work up from there. It will save time and headaches on the finish. And most people don't go much past 600 - 1500 grit on wood sanding. Make sure you are cross sanding also to remove the radial scratches.
 

Ramparte

Member
Joined
Apr 4, 2017
Messages
7
I went back in and started at 400 and ran through micromesh today, wet. It's still not as shiny as polished AR but it's better, so I was being impatient, I think.
 

More4dan

Member
Joined
Mar 17, 2016
Messages
2,102
Location
Katy, TX
I went back in and started at 400 and ran through micromesh today, wet. It's still not as shiny as polished AR but it's better, so I was being impatient, I think.

I've not been able to get a mirror shine in ebonite. I don't remember seeing other ebonite pens with a mirror finish either. Smooth yes but not quite glass like. Keep posting pictures of your work. You're off to an amazing start.

Danny
 

jalbert

Member
Joined
May 17, 2015
Messages
993
Location
Louisville, KY
I went back in and started at 400 and ran through micromesh today, wet. It's still not as shiny as polished AR but it's better, so I was being impatient, I think.

I've not been able to get a mirror shine in ebonite. I don't remember seeing other ebonite pens with a mirror finish either. Smooth yes but not quite glass like. Keep posting pictures of your work. You're off to an amazing start.

Danny

I've found that I needed to buff ebonite in order to get a mirror shine. This is Japanese ebonite, and was buffed with tripoli and white diamond compounds on cloth wheels.
 

Attachments

  • soucy4.jpg
    soucy4.jpg
    241.6 KB · Views: 191

Ramparte

Member
Joined
Apr 4, 2017
Messages
7
Yeah, that's what I was looking for. OK, maybe I'll get out the buffing wheel tonight.

Thanks for the kind words, Danny.
 

More4dan

Member
Joined
Mar 17, 2016
Messages
2,102
Location
Katy, TX
I went back in and started at 400 and ran through micromesh today, wet. It's still not as shiny as polished AR but it's better, so I was being impatient, I think.


I've not been able to get a mirror shine in ebonite. I don't remember seeing other ebonite pens with a mirror finish either. Smooth yes but not quite glass like. Keep posting pictures of your work. You're off to an amazing start.


Danny


I've found that I needed to buff ebonite in order to get a mirror shine. This is Japanese ebonite, and was buffed with tripoli and white diamond compounds on cloth wheels.


I stand corrected, what an amazing finish! Have you found a difference between the ebonite sources in finishing and quality? How would you rank them in comparison?

Danny


Sent from my iPhone using Penturners.org mobile app
 

Ramparte

Member
Joined
Apr 4, 2017
Messages
7
I went back in and started at 400 and ran through micromesh today, wet. It's still not as shiny as polished AR but it's better, so I was being impatient, I think.

I've not been able to get a mirror shine in ebonite. I don't remember seeing other ebonite pens with a mirror finish either. Smooth yes but not quite glass like. Keep posting pictures of your work. You're off to an amazing start.

Danny

I've found that I needed to buff ebonite in order to get a mirror shine. This is Japanese ebonite, and was buffed with tripoli and white diamond compounds on cloth wheels.


Turns out buffing did the trick!
 
Top Bottom