The Dragon Sceptre; Gent tube conversion.

Signed-In Members Don't See This Ad

edstreet

Member
Joined
Aug 12, 2007
Messages
3,684
Location
No longer confused....
First off this is intended to be more of a how-to.

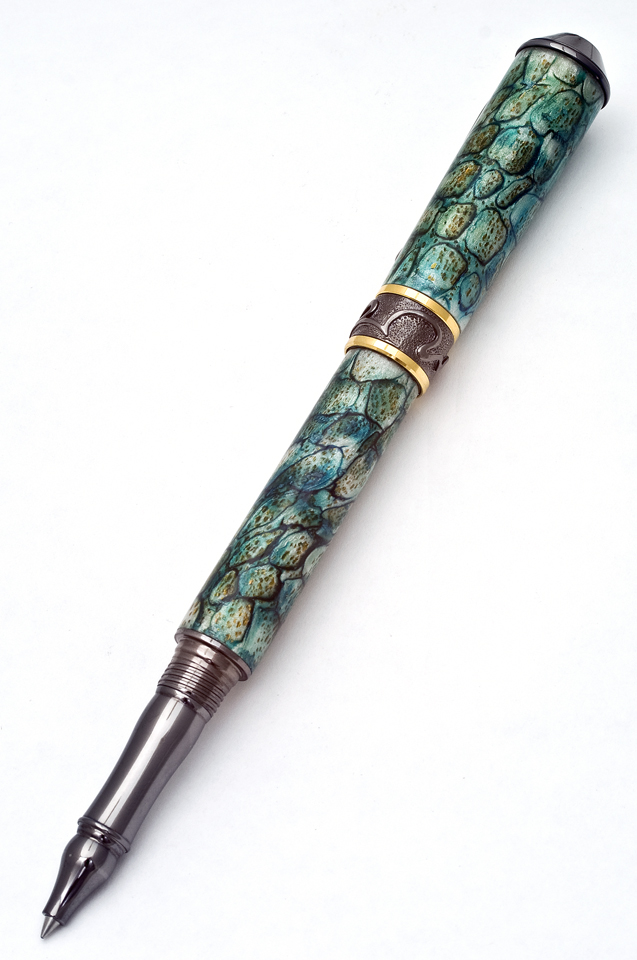
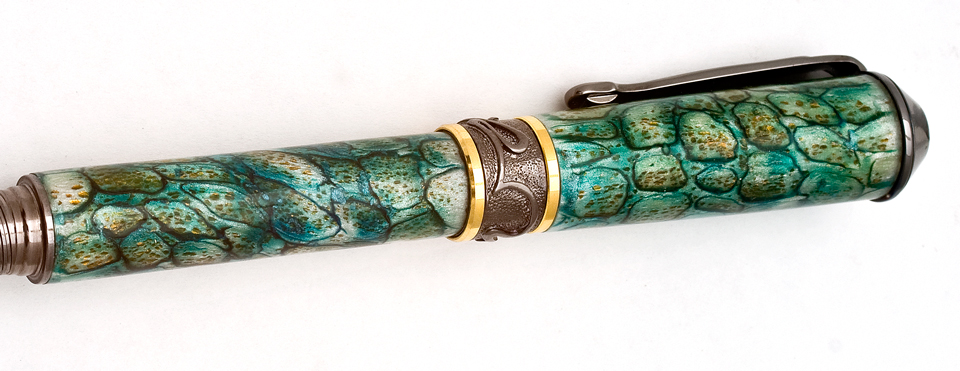
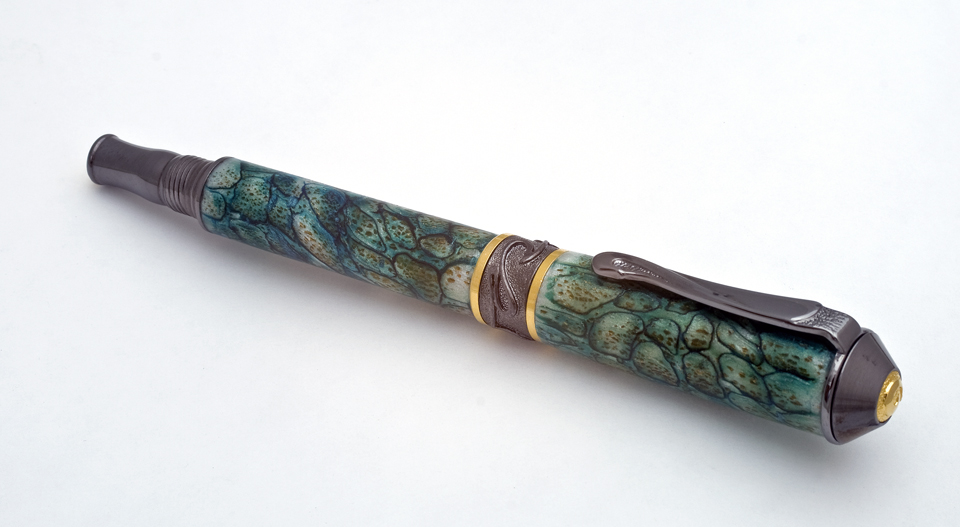
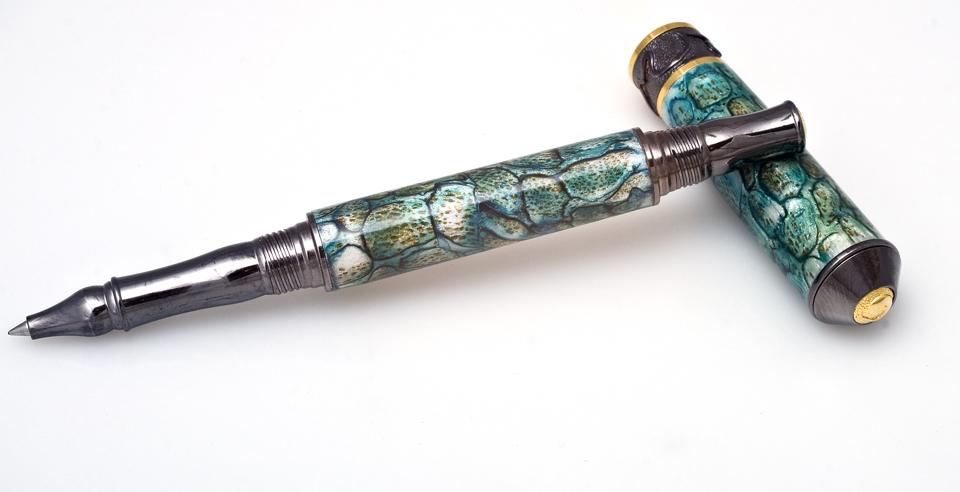
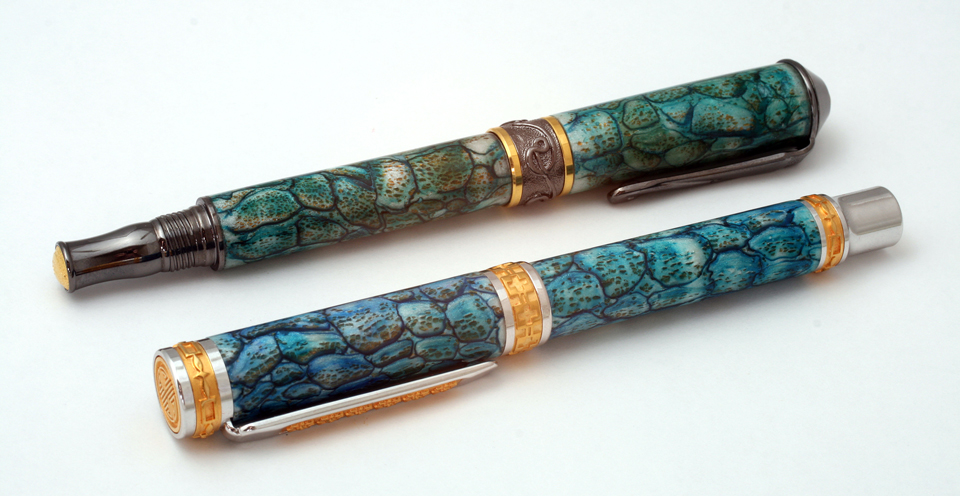
Here we have a set of gent Dragon scale tubes by Toni. This set is the result of several days of labor intensive work as these are *NOT* canes, I can not go into any detail but I can say the high skill level that I thought she has was an epic undervalued estimate.

After starting work on finishing the tubes with her it occurred to me this set was very masculine and was missing something. The more I looked at it and slept on it for several days the more it begged me to kick it up. I began to evaluate plating, emblems, inserts and shape. Nothing seemed to fit.

I then expanded the pool and removed the normal boundaries, beyond the series that the tubes were intended for (Gent Jr, Statesman Jr, Venus, Atrax, Emperor Jr) Every think I looked at one kit kept coming back to haunt me, the Nouveau Sceptre, in Black Titanium and 22kt Gold.

This is the end result.
attachment.php


attachment.php


attachment.php


attachment.php


attachment.php
 

Attachments

  • 960-IMG_6457.jpg
    960-IMG_6457.jpg
    218.2 KB · Views: 3,005
  • 960-IMG_6595.jpg
    960-IMG_6595.jpg
    247.1 KB · Views: 3,007
  • 960-IMG_6601.jpg
    960-IMG_6601.jpg
    249.4 KB · Views: 3,167
  • 960-IMG_6473.jpg
    960-IMG_6473.jpg
    213.9 KB · Views: 3,029
  • 960-IMG_6496.jpg
    960-IMG_6496.jpg
    300.1 KB · Views: 2,956
Signed-In Members Don't See This Ad

edstreet

Member
Joined
Aug 12, 2007
Messages
3,684
Location
No longer confused....
part 2: Test subjects.

Next up I wanted to show how I went from a gent jr to a nouveau sceptre.

Instead of doing experiments, test etc on the dragon scale I went digging in my box of disasters and I found a willing candidate for testing. I had a snake skin blank that I butchered greatly but now has a second life in this project.

I measured and found that the lower tube is even on both sides, this would entail some buildup on one side ever so slightly. from 0.512" to 0.480", or a difference of 0.032" or 1/32". The emperor and nouveau sceptre does not have this taper.

The upper tube on the Nouveau Sceptre flares out at the cap. Most of the images that I have seen the cap itself has a slight lip on it.

Also the upper tube is slightly LONGER on the Gent Jr series by about this much.

attachment.php


This minor difference would give some extra spacing between the end of the clip and the center band, which allows us to show more of the dragon scale so all is good with that.

Next concern was this.
attachment.php


How would we get the tube thicker with out damaging the tube. Some more insight into the tube itself, sanding, in any grit, will damage the tube, kill the effect, change everything about it so there is strategic sanding only. Some said cast it and cut it down, which was tempting but cutting down into something so delicate that will get destroyed by just one mishap of sandpaper does not trill me. The only viable option was to build up the gap with CA and hope it does the job.

*) The target bushings, Nouveau Sceptre, was waxed in it's entirety. I used Renaissance Wax because that is what I had available.

*) The test subject, cracks, flaw, damage and all was filled in with one pass of thin CA and allowed to dry (no spray on this one) I also got it on both thumbs and index fingers intentionally.

*) Thick CA was then applied, well quite thick ;) It went on as thick as the RPM and tube would allow, when it started to sling glue from the tube it is saturated.

*) I allowed the glue to sit and then started moving it over the blank from end to end. One side, the non-build up side, received very little and never on or close to the bushing.

*) Once the glue started to dry I switched to using my fingers to work the CA into the areas I needed.

*) After it was dry I sanded off the beads that formed in some areas with 80 grit. then repeated until it was over the bushing and half covered on the top.

*) 80 grit abranet was used and sculpted to shape.
attachment.php


*) I skipped several steps and cut corners. I went to 240 grit. then 400 grit.
attachment.php


*) Then hit it with novus #3 to see how bad things were.
attachment.php


Lastly before/after shot. This is not going to win any beauty contest, nor is it for production. It is a proof of concept.
attachment.php


It seemed that yes, building up 1/16" with CA is indeed viable. This means tube repair for other kits could be used, over cut, over sanded tubes could use this method to salvage.
 

Attachments

  • 960-IMG_6268.jpg
    960-IMG_6268.jpg
    246.2 KB · Views: 2,960
  • 960-IMG_6335.jpg
    960-IMG_6335.jpg
    576.4 KB · Views: 3,005
  • IMG_6281.jpg
    IMG_6281.jpg
    493.5 KB · Views: 2,944
  • IMG_6294.jpg
    IMG_6294.jpg
    308.4 KB · Views: 3,013
  • IMG_6299.jpg
    IMG_6299.jpg
    313.1 KB · Views: 2,849
  • before-after.jpg
    before-after.jpg
    300.8 KB · Views: 2,893

edstreet

Member
Joined
Aug 12, 2007
Messages
3,684
Location
No longer confused....
Part 3: taming the dragon

Today was the big day, I was going to convert the upper tube. Sorry but the photo's was lacking during work as my 1,000% focus was on doing the deed and making NO mistakes.

Here is what our goal is.
attachment.php


I did not pull stops, cut corners or the like. I used Abranet in the following grits, 80, 240, 400, 800. I also used this 1,500 grit that I have of regular sheet paper. I also used Novus, #3, #2 and #1 (#1 is a cleaner and mostly rubbing alcohol for cleanup) The CA that I used was UFO Odorless Thin and Odorless super-gold+ THICK CA. Stuff is not cheap but quite a beautiful thing when doing projects like this. I also used a 16x loup to inspect the finish.
attachment.php


attachment.php
 

Attachments

  • 960-before-after.jpg
    960-before-after.jpg
    506.5 KB · Views: 2,872
  • 960-Untitled-1.jpg
    960-Untitled-1.jpg
    536.4 KB · Views: 2,837
  • 960-IMG_6418.jpg
    960-IMG_6418.jpg
    434.1 KB · Views: 2,904

edstreet

Member
Joined
Aug 12, 2007
Messages
3,684
Location
No longer confused....
The lower tube was build up with CA in the same method the day before the upper tube was done. Reason for that it was minute and took no time at all to finish.

It also helped with encouragement for the upper tube.
attachment.php


Lessons learned:

*) Toni is an exceptional artist with epic loads of talent and skill.

*) CA can be used to sculpt.

*) never be afraid to experiment, think outside the box, be constructive, creative and original.

*) I think I broke the 'IAP how many coats of CA you apply' rating :) Also the http://www.penturners.org/forum/f28/how-thick-your-ca-finish-111630/ rating. Guess my CA is over 9,000.

*) Novus is epic! Can almost clean up 400 grit marks from CA, almost. 600grit is normally where I start using it at and 800-1500 is optimal range to switch over.
 

Attachments

  • 960--IMG_6327.jpg
    960--IMG_6327.jpg
    460.8 KB · Views: 2,808
Last edited:

Buzzzz4

Member
Joined
Dec 7, 2008
Messages
2,761
Location
Grand Rapids, Mi
Nicely done. You've found the way to "cast" with CA. I have also found this works with stamp pens or any other tube on specimens when you don't have the right resin around. You made a beauty out of what is IMHO an odd component set and did a great tutorial in the process.
 

edstreet

Member
Joined
Aug 12, 2007
Messages
3,684
Location
No longer confused....
Small mirror I found. :(


attachment.php


attachment.php


attachment.php


attachment.php
 

Attachments

  • IMG_0368.jpg
    IMG_0368.jpg
    102 KB · Views: 647
  • IMG_0380.jpg
    IMG_0380.jpg
    160.1 KB · Views: 628
  • IMG_0363.jpg
    IMG_0363.jpg
    112.8 KB · Views: 689
  • IMG_0379.jpg
    IMG_0379.jpg
    144.2 KB · Views: 611

Fish30114

Member
Joined
Oct 18, 2014
Messages
484
Location
Burbs of Atlanta,Georgia
Ed, that is cool and also very beautiful work. I like the way you reasoned things out and even took the time to find the appropriate parts to do a test run and proof of concept.

I guess the 'ol veterans around here know who 'Toni' is, but I don't--could you provide some further info about who this person is? Also, what is it that that blank is made out of--the new dragon one?

Thanks--Don
 

edstreet

Member
Joined
Aug 12, 2007
Messages
3,684
Location
No longer confused....
Ed, that is cool and also very beautiful work. I like the way you reasoned things out and even took the time to find the appropriate parts to do a test run and proof of concept.

I guess the 'ol veterans around here know who 'Toni' is, but I don't--could you provide some further info about who this person is? Also, what is it that that blank is made out of--the new dragon one?

Thanks--Don


This pen blank is made with polymer clay and by Toni Ransfield. You can do a site search here for "Toni Ransfield" and see all the wonderful work we have posted over the years. She is a world renowned polymer clay artist. She's in the pen makers guild.

https://www.facebook.com/toni.ransfield/

I also have loads of photo's in my facebook galleries.
https://www.facebook.com/ed.street.92/photos

http://www.penturners.org/forum/f24/tonis-dragon-emperor-113965/

I have included some photo's of her work for you to see.
 

Attachments

  • IMG_6287.jpg
    IMG_6287.jpg
    124.6 KB · Views: 232
  • IMG_6262.jpg
    IMG_6262.jpg
    136.9 KB · Views: 257
  • IMG_6105.jpg
    IMG_6105.jpg
    127.7 KB · Views: 295
Last edited by a moderator:
Top Bottom