Brief explanation to make a PC Tube

Signed-In Members Don't See This Ad

Toni

Member
Joined
Feb 23, 2010
Messages
2,042
Location
Phenix City, Alabama
I hope this is posted in the right place:biggrin:

I would like to explain alittle about how my pens are made, since I dont have the tutorial yet to post. BEWARE I have an interesting way of writing tutorials

1. I dont turn.
2. I dont use blanks.
3. I dont use CA

Now that you know that I will explain briefly how I make my "TUBES".

Equipement: Polymer clay for a base layer, pasta machine or roller, pre-made canes or canes you made(this post is not going to teach you how to make a cane!!) a sharp blade, oven, sandpaper and muselin buffing wheel and your choice of gloss/finish

***Baking Polymer Clay does give off plasticizer residue/fumes they are not toxic(thats what all the literature says), but it is recommended that you either cover your piece that you are baking in the oven with a tinfoil tent or a large baking dish(you know for making loafs(ask your wives)) OR you can purchase a toaster or convection oven and use that just for polymer clay. sorry i forgot to mention that..i have to use a toaster oven as the ovens in New Zealand are sooo small, no thanksgiving turkeys in there, lucky if a chicken will fit. For those of you that have baked in your home oven it has not been enough for you to worry about..again my apologizes

I use a sheet of pc (polymer clay) to cover the tube, pc needs to be conditioned before you use it. To condition the clay you can roll it on a tile to get it soft and pliable or you can run it through the pasta machine till you dont see any cracks. (if this step is not done your clay will crack or worse all the work you have done will crumble off the tube)

Once conditioned run the clay through the pasta machine, a thin sheet. Wrap this sheet around the tube, cuting it where they join, smooth out the seam.

I take a cane, you can see photos of them in my etsy shop (http://www.toninz.etsy.com) and cut slices off using a sharpe blade, Thomas Scientific Blade(they can be purchased online,they are as sharp as(kiwi lingo)) I do this with all the canes I am going to use for my design. hint: slice them as thin as possible!!

Apply these slices onto the tube(which has a pc sheet wrapped around it, this acts like glue!!) if you place a slice on the tube and want to move it good luck it will rip!! so think first before you start putting on the slices.

After you have put a few on, roll on a large tile,ie..the ones you use to tile your kitchen floor, plain white is perfect you dont want one that has indentations!! APPLY LIGHT PRESSURE when rolling; be gentle guys. Then apply more slices, roll again, continue to add slices and roll till you have covered the tube.

While rolling the tube clay will begin to move to the ends, use your blade to slice off the clay that is not adhered to the tube.

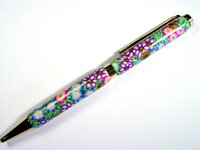
When you are done rolling and its smooth. Place the tube on a flat tile standing upright. Bake it in the oven acccording to the manufacturers directions(all pc artist that write tutorials are supposed to say that) for 30-40minutes. The tube will look like the first picture.

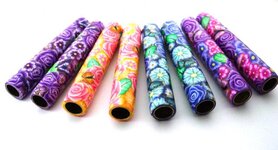
The second picture shows you the inner view of the tube, hopefully this photo explains ALOT!! Clay on the outside, metal tube on the inside.

Once cooled,start sanding that baby with 600 or 800 grit, be careful you dont want to sand off the millefiori, so sand till you have it nice and smooth, move onto the next grit, same thing as above be careful, keep sanding till you are at 2,000 grit. You are now done sanding. do you still have your fingerprints??

Buff it on a muselin wheel or your jeans( I dont, but you can) and coat it with CA or whatever gloss you have, I use floor polish to seal in the shine. Should shine like glass before you even apply this coating.

Assemble your pen and viola you are done!! Now you have some insight on how to make a polymer clay tube ala Toni.

I promise I will get a better tutorial with step by step photos ASAP.
 

Attachments

  • DSC09350.jpg
    DSC09350.jpg
    99.4 KB · Views: 3,184
  • DSC09341.jpg
    DSC09341.jpg
    34.1 KB · Views: 2,494
Last edited:
Signed-In Members Don't See This Ad

witz1976

Member
Joined
Jun 28, 2009
Messages
2,144
Location
Bucksport, Maine, USA
I too am amazed & your quick tutorial is nice, but to be honest where I never used clay before and found it is a little confusing. I can't figure out how the heck you are putting flowers in it for instance. I am anxiously waiting for a nice full scale tutorial with pics =)
 

AceMrFixIt

Member
Joined
Oct 1, 2008
Messages
625
Location
Jacksonville, FL
I have a friend that is very interested in how you do this. I sent her a copy of your post. She said she has done the canes but not to the extent you do. Great looking pens. Now I have a bit of a clue how its done. Keep it coming.
 

AceMrFixIt

Member
Joined
Oct 1, 2008
Messages
625
Location
Jacksonville, FL
Oh sorry the flowers are canes you can see them on my etsy shop http://www.toninz.etsy.com they are all clay with a design in the center filled in with a translucent clay.

How long has she been working with pc?

She has done it in the past. I sent pics of your pens and she got all excited and wants to get back into it. She is very artistic with painting so I think she can do it.
 

fiferb

Member
Joined
Mar 20, 2006
Messages
2,440
Location
Ninety Six, SC, USA.
Very nice tutorial. It took me a few seconds to understand that the canes on your website were pictures of the end of the canes and that the design is going all the way through it. Hence, the thin slices. Having never worked with PC the lightbulb finally came on. Thanks.
 

Lenny

Member
Joined
Jan 6, 2009
Messages
3,475
Location
Searsport, Maine
That explains a lot .... although I'm still trying to wrap my head around it. :biggrin:
 

Attachments

  • pcnme.jpg
    pcnme.jpg
    16.1 KB · Views: 458

OKLAHOMAN

Member
Joined
May 17, 2006
Messages
10,228
Location
Costa Rica
Just wondering how it would look on a larger pen...say a Jr. Gent or Retro fountain pen. Would be a nice seller to some.
 

lwalden

Member
Joined
Nov 3, 2005
Messages
1,238
Location
Trophy Club, Texas, USA.
Nice work on the Mini-Tutorial, Toni- thanks for helping educate us PC neophytes. I have a couple of questions if you don't mind- 1st, how long are the canes themselves? How are they stored? Do you have to worry about things like humidity and room temperature much (I'm picturing a collection of tupperware containers in the fridge!)? I've got a daughter who's 10 that loves working on craft projects, and I'm wondering if this would be a good medium for her to try a few things with. Given her age, I'm hesitant to think of her trying to use very sharp knifes to cut very thin slices of anything. How difficult are the canes to slice? Are they very firm with a lot of resistance? And if so, is there a downside to cutting thicker slices other than possibly needing to bake for a longer period? I'm wondering if thicker pieces are more prone to cracking while baking. I know this is a lot of questions, if you can recommend a site that may have more generic information on PC, I would appreciate it. Thanks, and again- Love your work!!
 

its_virgil

Member
Joined
Jan 1, 2004
Messages
8,101
Location
Wichita Falls, TX, USA.
I too am amazed at how you PCers can make those canes...especially the floral ones. Awesome work both making the canes and the pens. Yours are the first PC pens I've really liked. You have coupled your creativity and talent with an interesting medium. I love pens also.
Thanks for the quick tutorial and I look forward to more info from you.
Do a good turn daily!
Don
 

rjwolfe3

Member
Joined
Feb 12, 2008
Messages
8,352
Location
Mansfield, Ohio, USA.
How hard is the finished pen? In other words, does it hold up to abuse in a pocket or should it be babied?

Very good tutorial. I understand the basics now. Your canes and pens are awesome.
 

LEAP

Member
Joined
Dec 22, 2006
Messages
1,938
Location
Old Orchard Beach, Maine
Nicely done and in a way even I can understand! You have certainly gained a lot of admirers with the beauty of your work. My wife loves her pen and has been busy showing it off at work. You must be getting a lot of hits on your ESTY page.
 

workinforwood

Member
Joined
Mar 1, 2007
Messages
8,173
Location
Eaton Rapids, Michigan, USA.
I can make a simple flower cane, I just can't make a flower cane that looks so cool as those. Making a cane is just like making a segmented twist pen, or making an end grain cutting board. After you condition the clay, you roll it into long thin worms. So lets just say you have 2 long thin worms, one yellow, one green. Cut the 2 worms in half then you place the 4 worms beside each other so it's like an alternating color square, but long of course. Now make 4 more long thin rolls of a different color and use those to put in the spaces of your "square". Then roll out a sheet and wrap what you just did...hey, you are making a sushi roll! Once it is wrapped, roll it out into a long round roll again. The pieces inside will get thinner as the clay roll gets smaller but longer. Now you can cut this into 4 sections and once again place them beside one another like a square. You can now make 5 long thin rolls. Put one roll in the center of the square, the other 4 around the square to truly square it out. The wrap that and roll it out again. By now you should have a can with 8 flowers in it. Simple flowers with round petals, but still flowers. Then you do as Toni said, slice it thin and apply it to your pen that has clay wrapped around it. It maybe takes a bit of thought, but it all begins just the same as a segmented twist pen. Only difference is that the pieces are round, so each time you make a "square", you have to fill in between the rolls or you would have a gap. Just picture holding 4 dowels together as a square. inbetween each dowel is a v shaped gap that needs to be filled to complete the square. Wrap, roll, cut. Now I have to figure, if you want a more designed cane, like a tear drop shaped petal, then you could probably get a tear drop shaped or make a tear drop shaped cutter for the pasta machine. Then you'd have a round roll in the center. You would have several tear drop shapes the length of it and have to have a filler peice in between each petal. Then you would wrap an outer shell around all that. and evenly roll it all out to remove any air and thin out the design.
 

thewishman

Member
Joined
Mar 9, 2006
Messages
8,181
Location
Reynoldsburg, Ohio, USA.
I'm off to Michaels - they are selling PC at 4 for $5. Wish you could get a commission on all of the PC and tool sales that you are inspiring!

Your mini "tut" was cute! Enough information to get me ready to make a huge mess. Your finished pens also give me the desire to push through the learning process to make something special.

Thanks, Toni. Just how many canes would you need to sell to get back to Jersey?:biggrin:
 

jttheclockman

Member
Joined
Feb 22, 2005
Messages
19,083
Location
NJ, USA.
Your work is just simply amazing and everytime you make a post here from now on you are going to get many people following it and replying so be prepared.

You make it sound so simple and to you it is after all your time you spent working with it. I see this is the basic steps and the secret lies in the canes themselves. I do have a couple questions. When picking the base color is there a rhym or reason to pick certain colors. When doing acrylics for us, the color paint we chose to paint the tubes makes a difference in the outcome of the shade of the blank. Is that the case with your system. Does the bottom layer show through the added canes??? Also when curing in the oven, is it possible to overcook them and what are the danger zones, both over and under cooked???? Thanks for sharing. I do see an increase in pc sales. Maybe we should warn Michaels and AC Moore stores ahead of time.
 

ssajn

Local Chapter Leader
Joined
Feb 3, 2008
Messages
1,034
Location
Milwaukee, Wi, USA.
Toni
I think you stuff is assume. I showed it to my wife and now she want to try it. I just ordered the magazine with your article. I think your tutorial was well done and am looking forward to the next one.
Thanks
 

ESwindell

Member
Joined
Mar 4, 2008
Messages
195
Location
Northwood, NH, USA.
I have been talking with Toni and have asked some of the questions that others have, so in an effort to save her the time and energy involved in repeating herself I will post them here.

Toni if this is bad form let me know and I will remove my post.

"How hard is the finished pen? In other words, does it hold up to abuse in a pocket or should it be babied?".... how fragile?? humm... I drop them and nothing happens, you must make sure you bake it at the correct temperature!!

"how long are the canes themselves?" ...(my answer) from what I have seen, most on her site are ~2" long x 1/2" thick. http://www.toninz.etsy.com

"How are they stored?" ... fishing tackle box or tupperwere container and make sure its covered

"I've got a daughter who's 10 that loves working on craft projects, and I'm wondering if this would be a good medium for her to try a few things with." ... (MY ANSWER) The blade needed to cut the canes, from my research, are SUPER SCARY SHARP, think scalpel, so unsupervised no. Supervised or some one cutting the pieces for her then sure.

is there a downside to cutting thicker slices other than possibly needing to bake for a longer period? ... (my answer) it depends on what she is making, buttons and beads should be thick. the pattern stuff like Toni makes needs to be thin as you are building the design up and the thicker the pieces the father out from the base clay it will be.

"can recommend a site that may have more generic information on PC, I would appreciate it." ... (my answer) google/ youtube polymer clay lots of reading/ videos.

Hope this helps.

God Bless,
Eric
 

Toni

Member
Joined
Feb 23, 2010
Messages
2,042
Location
Phenix City, Alabama
Thanks Eric you were spot on!!

My daughter who is 10 as well has been playing with pc for years, she doesnt use the "SHARP" blades I use there are other ones that will slice canes. some supervision would be needed as well as basic instruction on using the blades carefully. My daughter loves to make beads, containers, stuff for her doll house it will spark serious creativity(I let her use my cheep clay,SculpeyIII)

As for how fragile, I have dropped my pens on the ground and nothing has happened ever!!

Canes are typically sold for the lengths Eric said, BUT you can request longer and see if its doable.

As for storing, they can be stored ontop of each other as long as they are wrapped in Saran wrap. I ship my canes all over the world!!! they are wrapped in saran wrap and placed on top of each other with no problems.

Awww... the base color!! Good question!! I choose a color that is in the canes that I am using, so for the Pink rose/orange and yellow flowers the base color is yellow, nice and light so it doesnt "darken" the flowers. If you look at the photo of tubes where you see the inside you can see the base colors.

Does the base color show through? sometimes it will thats why I am carefull with the color I use, there are a few pens that I Let the base color show..i will attach a picture of that pen(that design won me second place in a bead contest, the base color is a jade green pearl)

Which magazine did you get? most of my tuts are for making jewelry. There 'was' a magazine in OZ that I did a few unfortunatly the magazine went under and I am trying to find out if those tuts published I can now sell.

Overcooking.........hell yes you can burn them!! I have:mad: Make sure you have a timer set if you are like me and do other things and forget when you put them in the oven.

As for placing them in the oven~I didnt know how to exactly explain that in the mini tut, you have a few choices.

1. stand them up make sure they arent close to the top of the oven
3. use a metal skewer through the tubes and place that skewer on a glass dish
4. Use a bead rack(yes I know you probably dont have one) thats what I use now.

I REALLY REALLY MISS MICHAELS, I miss craft stores PERIOD!!

Oh the thicker the slice the more distortion you will have and when you layer canes on top of them it gets even thicker, SOOO thinner is better. To show you how I slice would need to be video taped or done in person. I am not keen on putting it on youtube, sorry. so you will have to send me a plane ticket to show everyone:biggrin:

I have not seen or used a Jr. Gent pen..sigh..I have done Fountains as you can see in my photos, not sure if they are the size you are asking about.

I will re-read the posts to make sure I got everyone covered.

THANK YOU EVERYONE for your feedback and positive response, I really wanted to help the members as well as get it across I dont use blanks.

When I am able to make some tubes, hopefully you will understand what you are buying because you wont need to turn them, but you can apply CA!!
 

Attachments

  • DSC07496.JPG
    DSC07496.JPG
    63.3 KB · Views: 643

Toni

Member
Joined
Feb 23, 2010
Messages
2,042
Location
Phenix City, Alabama
JEFF I wanted to make a comment about your description, it works for me!! Those 4 rods you are holding and the gaps inbetween each one, I use translucent clay to "caulk" between them almost like a flattened triangle, wish I could draw it, maybe Lenny can do it seems he is very computer savy:)

How many canes to get me back to the US? for a visit a few thousand dollars for a plane ticket. To move back home for good a full time job that will support a family of 5.
 

workinforwood

Member
Joined
Mar 1, 2007
Messages
8,173
Location
Eaton Rapids, Michigan, USA.
Thanks Toni. I think a person could make millefiori with exotic wood dowels and casting resin. You take two maple dowels and two walnut dowels and set them in a tube <alternating the colors> that is the right size that the 4 piece just fit then fill it in with resin and cast. Then remove that and cut it into 4 equal pieces and set into an even bigger tube where they just fit and cast again. Slice it super thin and set the thin slices in hot water for 30 minutes and they can be bent around a tube, hold them on the tube with elastics till they dry then glue the formed pieces to the tube and cast in clear acrlic. Milledowelfiori!:biggrin:
 

KDM

Member
Joined
Nov 12, 2009
Messages
618
Location
Redditch, England
I thought I'd be smart and got a couple of pieces of polymer clay different colours and marbled them, squished them into a block, baked it just to see what it would look like after I turned it on the lathe.

1_MarbledPolymerClay00.jpg


It turns up really well, actually, but the resultant tube was just too crumbly to make a pen from. Is this typical, or do you have any tips as to how I can make it stronger?

Your pens are stunning, by the way. The patience you must have!!
 
Last edited:

Toni

Member
Joined
Feb 23, 2010
Messages
2,042
Location
Phenix City, Alabama
Hi Ken~First off what brand did you use? That may be the problem.

REmember I DO NOT OWN A LATHE and have never turned anything except a hotdog:) But I can help you with other issues, like this.

Thank you for the complements in regards to my pens. Not so sure about patience, I just love what I do so I dont mind how long it takes, some aspects of polymer clay that should take long to do, I can do it in minutes only because I have been working with it for so long. Probably the same for a woodturner.

Feel free to ask for anyhelp!!
 

KDM

Member
Joined
Nov 12, 2009
Messages
618
Location
Redditch, England
I used Fimo. I think it's supposed to be one of the stronger brands. At this point the lathe is pretty well irrelevant. That was the part of the process that WORKED!! See in the photo how the right-hand end cracked off? I could do that just with my fingers.
Thanks for getting back to me.
 

Toni

Member
Joined
Feb 23, 2010
Messages
2,042
Location
Phenix City, Alabama
Ken~I wish I could enlarge the photo, I could probably tell you definatly what happened. Your choice of clay is fine, so that leaves me to believe it was either not conditioned enough, how did you condition the clay? or you didnt bake it long enough at the right temperature..
 

keithkarl2007

Member
Joined
Apr 22, 2008
Messages
1,727
Location
Ireland
Do the white outside pieces of the cane have to be cut away after slicing? Your pens are awesome and the detail in your canes is amazing. Can't believe you actually make the canes yourself
 

bobleibo

Member
Joined
Mar 15, 2007
Messages
2,130
Location
Utah
Hi Toni...
Your work is amazing to say the least. I'm not sure I am going to start making flowered pens just yet, but your work and craftsmanship absolutely intrigues me. A curious question.....do you actually slice a single cane flower into many pieces that then get molded into the PC on the tube or is it one flower for each piece that is embedded?
I would love to sit and watch you actually create one but I don't think a quick stop in NZ is in the cards just yet. You should do a video! There used to be a guy not far from me who created the blown glass vases and animals that I would sit and watch for hours. Always fun to watch artistic people in action.

Cheers
Bob
 

KDM

Member
Joined
Nov 12, 2009
Messages
618
Location
Redditch, England
I wish I could enlarge the photo

Ooops. That was silly. try clicking it now.

... that leaves me to believe it was either not conditioned enough

So I didn't look a berk, I looked up "conditioning clay". You may be right. I may well need to massage it more. Also, I hadn't realised, but my clay was relatively hard compared to a freshly opened pack.

... or you didnt bake it long enough at the right temperature..

30 minutes at 150C. My oven might not be terribly accurate, though, and I don't have a food thermometer yet. How critical is it?

Damn - should have started a "PC HowTo" thread!!!
 
Signed-In Members Don't See This Ad

Toni

Member
Joined
Feb 23, 2010
Messages
2,042
Location
Phenix City, Alabama
keithkarl2007~the white outside is translucent clay, if the slices are thin you wont need to cut it off as it will be see through. Yes I make all my cane flower canes(there are a few that I have bought)

Bob~:rolleyes::rolleyes:Trying to figure out what you are asking. So I will tell you what I do, I take slices off the cane and apply them onto the tube, dont understand the molded part they are like putting sticky stickers on a piece of paper a bitch to take off without them ripping:frown: Back in new york state we had a swedish glass blowing studio, You could watch them work and I loved it!! Was great fun when i took the boyscouts there we got right up close man is it hot. I have always wanted to learn how to blow glass, but ummm..hubby wont let me....its not safe to have me around fire:eek::eek: you dont want to know.LOL

Ken~the clay has to be rolled out with a rolling pin or a pasta machine numerous times to "conditiion" the clay. I have never massaeged clay:biggrin: you know when its ready to use when you can fold it over and it doesnt crack at the seams....you know there isnt a nice way to explain all this to a guy without laughing!!! As for temperature I have a thermometer in my oven to keep a close eye on the temperature as it fluctuates.. Try again!!!!!!!!!!
 
Top Bottom