Best method for holding kitless blank?

Signed-In Members Don't See This Ad

studioso

Member
Joined
Feb 14, 2010
Messages
358
Location
Montreal, qc, Canada
Hello fellow turners, I was wondering what is everyone's favorite method to hold the blanks (both body and cap, plus any section) when making a kitless pen.
I've outlined the methods I know here below, although I have not found a method that works for me (ie a method that will help me not screw up)
1- as per texatdurango AWSOME article on kitless pens, one way is to hold the pen in a chuck, then finish half a pen at a time.
Simple, in theory, however: I only have scroll chuck and I find it really hard to properly reallign the pen, and there is a step by the transition that can be felt when you run your finger over it. Also, this method only seem to work if the body is pretty straight, as a curve will not hold well in a chuck. Also, it will not work on wood, as you can't really do a ca finish half a pen at a time.

2-pin chuck. This method seems smart, although my poor sherline skills have prevented me to do a decent enough pin to fit my blanks. Also, it seems to me in theory, that by design a pin chuck will hold the blank off center. But I might be wrong.
3- those special expanding Mandrels, although they really just fit in 1-2 sizes brass tubes, and not in a true kitless.

3- Soligen's great tutorial on bulb pens shows some shop made brass Mandrels, and you thread the blanks onto them. Personally however, I would be very scared to hold the barrel by its threads, I am positive they will crack (on my blanks, with my skills).

So, what's your best method?
 
Last edited:
Signed-In Members Don't See This Ad

soligen

Member
Joined
May 11, 2010
Messages
1,085
Location
Sterling Heights, Michigan
Personally however, I would be very scared to hold the barrel by its threads, I am positive they will crack (on my blanks, with my skills).

The only part I have broken is section _after_ it has been drilled out - it gets delicate becasue the walls get thin. An then, it is not the threads that gave, it breaks at the shoulder. The threads stay perfectly in-tact inside the mandrel. Make sure you stop every so often and loosen the part and re-snug so it doesn't over tighted in. Turning is no big deal - its drilling too large a hole all at once and tapping that stresses it the most

For body and cap, never had an issue. I think the threads are stronger than you think. I've had parts on so tight I needed pliers to get it off - not a good thing if you dont have an un-finished part to use them on - stop occasionally and make sure it doesnt over tighten.
 
Last edited:

IPD_Mr

Member
Joined
Jun 27, 2007
Messages
3,707
Location
Zionsville, In
Dennis is spot on. The threads kind of work to reinforce the blank. I was always afraid they would break as well but like Dennis, the problem is them getting tighter as you turn. The blank is spinning counter clock wise and the pressure that you put on the blank when turning forces it clock wise. A little Pam on the threads seems to help for me.
 

rherrell

Member
Joined
Aug 22, 2006
Messages
6,334
Location
Pilot Mountain, NC
Hello fellow turners, I was wondering what is everyone's favorite method to hold the blanks (both body and cap, plus any section) when making a kitless pen.
I've outlined the methods I know here below, although I have not found a method that works for me (ie a method that will help me not screw up)
1- as per texatdurango AWSOME article on kitless pens, one way is to hold the pen in a chuck, then finish half a pen at a time.
Simple, in theory, however: I only have scroll chuck and I find it really hard to properly reallign the pen, and there is a step by the transition that can be felt when you run your finger over it. Also, this method only seem to work if the body is pretty straight, as a curve will not hold well in a chuck. Also, it will not work on wood, as you can't really do a ca finish half a pen at a time.

2-pin chuck. This method seems smart, although my poor sherline skills have prevented me to do a decent enough pin to fit my blanks. Also, it seems to me in theory, that by design a pin chuck will hold the blank off center. But I might be wrong.
3- those special expanding Mandrels, although they really just fit in 1-2 sizes brass tubes, and not in a true kitless.

3- Soligen's great tutorial on bulb pens shows some shop made brass Mandrels, and you thread the blanks onto them. Personally however, I would be very scared to hold the barrel by its threads, I am positive they will crack (on my blanks, with my skills).

So, what's your best method?


If the pin chuck is made correctly it won't turn off center. The trick is to get a tight fit, if it's tight then the pin will just keep it from rotating, if it's a loose fit the pin will push the blank to one side and it will be OOR.

My pin chucks fit tight:biggrin::wink:
 
Last edited:

mredburn

IAP Activities Manager
Staff member
Joined
Jul 5, 2009
Messages
8,753
Location
Fort Myers FL
I just realized you said Sherline in your Post. I turn all my pens and parts on Sherline Lathes. The Sherline chucks will not let you hold a blank far enough in to get a good fit or a good hold. I use two methods on my Sherline. I make brass mandrels that fit just tight enough I have to twist the blank as I push to get it to go on. I also make up two bushings one for the head stock and one for the 60 degree tail stock to fit the tube when I'm not doing a closed end. If your going to use more than one size of tube you will just have to have more than one mandrel. If your not going to use tubes you will have to design your mandrels to fit what your making. I think basically it needs to be said that you need to practice on your Sherline until you can turn a mandrel that will fit your tubes properly. I have several threads under "simple wooden pen" that shows the kitless pens I make and some of the Mandrels on my Sherline.
 

SDB777

Member
Joined
Feb 6, 2010
Messages
6,620
Location
Cabot, Arkansas USA
Hello fellow turners, I was wondering what is everyone's favorite method to hold the blanks (both body and cap, plus any section) when making a kitless pen.
I've outlined the methods I know here below, although I have not found a method that works for me (ie a method that will help me not screw up)
1- as per texatdurango AWSOME article on kitless pens, one way is to hold the pen in a chuck, then finish half a pen at a time.
Simple, in theory, however: I only have scroll chuck and I find it really hard to properly reallign the pen, and there is a step by the transition that can be felt when you run your finger over it. Also, this method only seem to work if the body is pretty straight, as a curve will not hold well in a chuck. Also, it will not work on wood, as you can't really do a ca finish half a pen at a time.

2-pin chuck. This method seems smart, although my poor sherline skills have prevented me to do a decent enough pin to fit my blanks. Also, it seems to me in theory, that by design a pin chuck will hold the blank off center. But I might be wrong.
3- those special expanding Mandrels, although they really just fit in 1-2 sizes brass tubes, and not in a true kitless.

3- Soligen's great tutorial on bulb pens shows some shop made brass Mandrels, and you thread the blanks onto them. Personally however, I would be very scared to hold the barrel by its threads, I am positive they will crack (on my blanks, with my skills).

So, what's your best method?


If the pin chuck is made correctly it won't turn off center. The trick is to get a tight fit, if it's tight then the pin will just keep it from rotating, if it's a loose fit the pin will push the blank to one side and it will be OOR.

My pin chucks fit tight:biggrin::wink:


And mine just came in yesterday from Rick, as soon as I get a day off from work....I'm gonna be spinning stuff!


Scott (pin chuck is the way to go) B
 

studioso

Member
Joined
Feb 14, 2010
Messages
358
Location
Montreal, qc, Canada
Thank you all for the good advice,

Dennis and ipd-mr, when chucking the body of the kitless on a brass Mandrels, would you chuck on the inside or outside? In other words, would the brass go where the cap threads or where the nib section goes?

Mredburn, I don't do all my turnings on the sherline: I only meant to do the pin chuck On it, to then put it my delta wood lathe.
I'm quite impressed however that you manage to do all your beautiful Pens on the sherline!
 

cnirenberg

Member
Joined
Jan 26, 2004
Messages
2,700
Location
Fort Myers, Fl
Alex,
I do a combo of the above with a twist (of course, I had to be different). I like the Mike's idea of using mandrels. I use the tap as one too. For the barrel, the nib section has to thread in so I end up using that tap to hold it on the HS while a male bushing fits to the TS. If it is not a through hole, but a blind one, I make a compression tip for the TS to fit the end. Same goes for the cap.
 

BRobbins629

Passed Away Dec 28, 2021
In Memoriam
Joined
Mar 8, 2006
Messages
4,037
Location
Richmond, VA, USA.
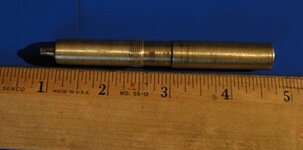
I make mandrels in brass that incorporate the same threads used the barrels. Since the diameter over the threads is larger than the interior diameter of the barrel, these need to be made in 2 pieces. I start with piece A and cut a male thread. This is either the equivalent of the cap thread for the top or the section thread for the bottom barrel. I then drill and tap the threaded end of A so that I can screw a threaded piece of B into the end. An important step is to make sure A and B are parallel. This can be done by chucking A in the lathe and taking a few passes on B. Now B can be chucked in the lathe and A is turned to the inner diameter of the barrel just up to the threads. Once a barrel is drilled and threaded, it can be screwed onto part A the mandel and is supported by its length.
attachment.php
 

Attachments

  • Mandrel.jpg
    Mandrel.jpg
    15 KB · Views: 959

studioso

Member
Joined
Feb 14, 2010
Messages
358
Location
Montreal, qc, Canada
I make mandrels in brass that incorporate the same threads used the barrels. Since the diameter over the threads is larger than the interior diameter of the barrel, these need to be made in 2 pieces. I start with piece A and cut a male thread. This is either the equivalent of the cap thread for the top or the section thread for the bottom barrel. I then drill and tap the threaded end of A so that I can screw a threaded piece of B into the end. An important step is to make sure A and B are parallel. This can be done by chucking A in the lathe and taking a few passes on B. Now B can be chucked in the lathe and A is turned to the inner diameter of the barrel just up to the threads. Once a barrel is drilled and threaded, it can be screwed onto part A the mandel and is supported by its length.
attachment.php

so, if I understand correctly, part A goes into the pen body, and it threads on it too, and you chuck part B into your collet chuck when you turn.
is that right?
 

BRobbins629

Passed Away Dec 28, 2021
In Memoriam
Joined
Mar 8, 2006
Messages
4,037
Location
Richmond, VA, USA.
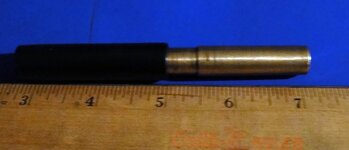
Alex - you understand correctly. Here are a couple of photos of one cap blank. This one has the triple start 12mm threads. First photo is the mandrel, part A on the left. Second one is with a drilled and tapped blank. Piece on the right goes into chuck.
attachment.php


attachment.php
 

Attachments

  • mandrel 1.JPG
    mandrel 1.JPG
    127.1 KB · Views: 573
  • mandrel 2.JPG
    mandrel 2.JPG
    97.9 KB · Views: 587

soligen

Member
Joined
May 11, 2010
Messages
1,085
Location
Sterling Heights, Michigan
It also helps to have a shoulder just to the right of the threads in the pic so that the cap squares itself against the shoulder. That way if your hole size is a little big , it still squares itself
 
Last edited:

Timebandit

Member
Joined
Sep 25, 2010
Messages
1,446
Location
Austin,TX
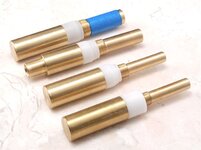
Why do you need to make them in two pieces Bruce? I made mine in one piece and they work fine. I also dont have to worry about the two pieces lining up perfectly. The mandrels are long enough to support the blank from the inside, not the threads, and there is a delrin bushing to butt up against.

attachment.php


Alex - you understand correctly. Here are a couple of photos of one cap blank. This one has the triple start 12mm threads. First photo is the mandrel, part A on the left. Second one is with a drilled and tapped blank. Piece on the right goes into chuck.
attachment.php


attachment.php
 

Attachments

  • DSC_0690.jpg
    DSC_0690.jpg
    43.7 KB · Views: 685

BRobbins629

Passed Away Dec 28, 2021
In Memoriam
Joined
Mar 8, 2006
Messages
4,037
Location
Richmond, VA, USA.
Why do you need to make them in two pieces Bruce? I made mine in one piece and they work fine. I also dont have to worry about the two pieces lining up perfectly. The mandrels are long enough to support the blank from the inside, not the threads, and there is a delrin bushing to butt up against.
Yours look fine, and I like the Delrin stop - will have to include that.
My die holder is solid on the back so when I start threading if I want to hold it in the tail stock I can't start the threads several inches in. If I had a die holder with a through hole I would do it in one piece.
 

hewunch

Member
Joined
Aug 5, 2008
Messages
4,661
Location
Albany, GA
Justin,
On how you mounted your delrin bushings.
Did you just continue the threads down and then tap the delrin to fit? Or did you mount it some other way?
Thanks!
 

Timebandit

Member
Joined
Sep 25, 2010
Messages
1,446
Location
Austin,TX
Justin,
On how you mounted your delrin bushings.
Did you just continue the threads down and then tap the delrin to fit? Or did you mount it some other way?
Thanks!

Yep...its just threaded. The threads on the mandrel are 1" long and the delrin bushing is 1/2".
 

philkessling

Member
Joined
Jun 6, 2007
Messages
121
Location
Virginia Beach, VA, USA.
I was going to make mandrels out of Delrin vice brass. I have the delrin rods and I was not sure of being able to turn brass ones. What are the disadvantages of the Delrin vice the brass? I assume durability and rigidity.
 

philb

Member
Joined
Sep 1, 2007
Messages
1,561
Location
Midlands, United Kingdom.
Nice looking mandrels Justin!

Does the section get supported by the mandrel? I'm assuming the blue piece on one is a padded ring, to support the section being worked on and is swapped between mandrels for different sections? Could be wrong though!!

Phil
 

Timebandit

Member
Joined
Sep 25, 2010
Messages
1,446
Location
Austin,TX
I was going to make mandrels out of Delrin vice brass. I have the delrin rods and I was not sure of being able to turn brass ones. What are the disadvantages of the Delrin vice the brass? I assume durability and rigidity.

What you said is true. You are going to loose rigidity and be prone to the piece flexing and causing chatter and getting out of round. I wouldnt use delrin unless it was a last choice.

Nice looking mandrels Justin!

Does the section get supported by the mandrel? I'm assuming the blue piece on one is a padded ring, to support the section being worked on and is swapped between mandrels for different sections? Could be wrong though!!

Phil

The blue is just blue painters tape. Its only there because i had a design change and the mandrel is now to small, so i had to put that on there to make up the missing diameter. The pieces are supported from the inside by the brass. For turning front sections, the second mandrel from the top, on the back side, i have it taped to accept my front section threads.
 

soligen

Member
Joined
May 11, 2010
Messages
1,085
Location
Sterling Heights, Michigan
Can the brass rods be turned on a wood lathe?

Yes it can, but what I think will work better for you is to buy a size of rod you can chuck, then just turn the the tennon to thread. That way you chuck the un-turned part which will come to you more accurately round and straight than you can likely turn it on a wood lathe.
 
Top Bottom