Another Try at Kit-less

Signed-In Members Don't See This Ad

1dweeb

Member
Joined
Feb 9, 2010
Messages
639
Location
Saginaw, Texas
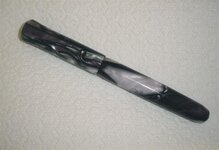
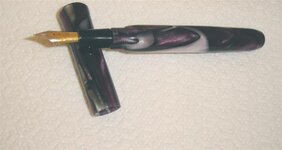
I took another stab at making a kit-less pen and I must say everything went much smoother this time. :) I am not very good with pictures but you can probably get an idea of where I am at with these shots. In all this is my 4th attempt and I do enjoy the challenge.
 

Attachments

  • kitless 1a.jpg
    kitless 1a.jpg
    26.3 KB · Views: 318
  • kitless 2a.jpg
    kitless 2a.jpg
    20 KB · Views: 317
Signed-In Members Don't See This Ad

RAdams

Banned
Joined
Apr 5, 2009
Messages
2,983
I have alot of catching up to do to even get close! Nice work! Keep it up my friend! Like the pros have been telling us, focus on function for now, the style will come later!
 

Texatdurango

Member
Joined
Apr 23, 2007
Messages
4,649
Location
Show Low, Arizona
Wayne, From what I can see, it looks like the pen would flow together better if you didn't round over the lower body so much where it meets the cap and watch the gap where the section meets the threads.

If you ever want to grab your stuff and come over and play awhile on some ideas, just hollar. :)
 

fernhills

Member
Joined
Jan 22, 2007
Messages
2,142
Location
Hellertown, PA, USA.
Looks like you are coming along fine, a lot faster and further then i am. I got some pieces i am working on sitting on my work table. As i am working on something else i ponder and think, whats next. Carl
 

1dweeb

Member
Joined
Feb 9, 2010
Messages
639
Location
Saginaw, Texas
Thanks for all the comments...

George,
I may take you up on the offer one of these days and come see you. The gap where the Nib meets the threaded body is there because the threads stop on the Nib housing. I am trying to get a die that will allow me to cut the threads up higher on the sleeve. I tried to get the cap to seat down over the rounded body area by countersinking the inside of the cap. It does seal okay it just doesn't quite flow yet as you noticed. All in all the challenge is rewarding. I am having to think more than just shaping the stock to a set of bushings and assembling a kit pen.

Wayne
 

Texatdurango

Member
Joined
Apr 23, 2007
Messages
4,649
Location
Show Low, Arizona
Thanks for all the comments...

George,
I may take you up on the offer one of these days and come see you. The gap where the Nib meets the threaded body is there because the threads stop on the Nib housing. I am trying to get a die that will allow me to cut the threads up higher on the sleeve. I tried to get the cap to seat down over the rounded body area by countersinking the inside of the cap. It does seal okay it just doesn't quite flow yet as you noticed. All in all the challenge is rewarding. I am having to think more than just shaping the stock to a set of bushings and assembling a kit pen.

Wayne
Hold up on that idea, there's a lot better solution that works great and makes the pen look a lot better. I'll send a PM
 

workinforwood

Member
Joined
Mar 1, 2007
Messages
8,173
Location
Eaton Rapids, Michigan, USA.
It looks pretty good to me. You need a clip and a centerband on the cap would look good..I like a bit of metal, or a lot. If you chuck that nib section, you can use a parting tool and reduce the collar above the threads. This will allow the nib to screw in all the way. From what I gather what you are saying, the threads don't go all the way to the shoulder of the nib section, so you have to either extend the threads or reduce the material size in the unthreaded portion. Removing material is the fastest way. You can also remove the first couple threads inside the pen, it will do the same thing.
 

RAdams

Banned
Joined
Apr 5, 2009
Messages
2,983
It looks pretty good to me. You need a clip and a centerband on the cap would look good..I like a bit of metal, or a lot. If you chuck that nib section, you can use a parting tool and reduce the collar above the threads. This will allow the nib to screw in all the way. From what I gather what you are saying, the threads don't go all the way to the shoulder of the nib section, so you have to either extend the threads or reduce the material size in the unthreaded portion. Removing material is the fastest way. You can also remove the first couple threads inside the pen, it will do the same thing.


Thanks for the tips Jeff! I encountered this problem the other day and now i have a solution! :biggrin: I am still trying.. slowly but surely!
 

1dweeb

Member
Joined
Feb 9, 2010
Messages
639
Location
Saginaw, Texas
Thanks Jeff for the great ideas. I may try to work on another one this coming weekend.

Thanks to all who have posted for support and helpful suggestions. I have read a lot of posts here in the archives and don't mind sharing some of my trials so that others can gain from my mistakes or triumphs. As there are many different experience levels of turners on this site it seems there is always some very helpful information coming out of these discussions. Thanks again to all.
 
Top Bottom