Almost ready to try a kitless

Signed-In Members Don't See This Ad

Gilrock

Member
Joined
Oct 18, 2011
Messages
560
Location
Tucson, AZ
I've been gathering my taps, dies, and drill bits and doing some practicing making threads. I've read through several threads on the forum and the library and there's a lot of great info. My main reference has been George's tutorial for making a fountain pen section. I've decided to use #5 Bock nibs and feed housings. I've ordered some converters. I have the tap for the #5 housing, a 9mm x 0.75 tap and die, a 12mm x 0.8 triple tap and die. But as a complete newbie I haven't found a few key pieces of info I think I need. I'm sure I can figure this all out with experimentation and destroying a bunch of material but I'm sure it would help a lot of us wanting to make our first kitless if we had a good starting point so here's few things I haven't found if anyone can help:

Assuming you are making a section that will thread into the body with cap threads on the body:

How do you know how long to make the section piece?

Whats a good length for the tenon on the section for the part that threads into the body?

What's a good length for the threads on the body that holds the cap?

If I have 12mm internal threads whats a good cap diameter so it's not too thin and prone to cracking?

Thanks,
Gil
 
Signed-In Members Don't See This Ad

Gilrock

Member
Joined
Oct 18, 2011
Messages
560
Location
Tucson, AZ
Thinking about this some more and looking at the fountain pen section tutorial again. It's my lack of understanding how the fountain pen works that's causing me problems. Is the placement of the converter with respect to it's distance to the feed housing critical? Or is there a gap between the two such that you are creating an "ink chamber" when you craft the section?

Thanks,
Gil
 

soligen

Member
Joined
May 11, 2010
Messages
1,085
Location
Sterling Heights, Michigan
There is no rule here - it is a matter of making it whatever you like. Examining and trying spme of the kits is a good way to get started. For example, I tried a churchhill and decided that the section was a little short for my tastes, but others probably find it perfect.

What I would recommend is making the first one a little on the long side, becase then you can always make another one shorter if desired and the cap will still fit. In fact, just make 3 of different sizes for your first pen and use each one for a couple days to see what you like. It will also get you some good practice on making sections.

Here is where I landed for a #5 nib or rollerball. Cap threads plus section at 1 1/6".
 

mredburn

IAP Activities Manager
Staff member
Joined
Jul 5, 2009
Messages
8,753
Location
Fort Myers FL
I like about .150 for the length of the 12mm cap threads on the body. I use .570 for the cap as a comfortable diameter but can go thinner. My wooden pen use these dimensions. MY front sections for fountain pens run about 1 inch (MM). I have had requests for MM, as well. My rollerball pens I start with 1.35 and I am working on 1.5 and 1.75 lengths to see how I like them visually as well as how well they feel holding them.
 

043Turning

Member
Joined
Jan 26, 2011
Messages
55
Location
Werribee ~ Victoria ~ Australia
the length of the pen is up to you this one finishes at 145mm and uses a M14x.8 triple start thread for the Cap, the tail tappers down to about 12mm (1/2") as a result the cap post on the body

the cap has a 14.2mm hole drilled into the timber and an acrylic sleeve inserted inside the sleave has a 13mm hole drilled halfway down then 12.5mm

And as for the Cap as again it's up to you this starts at 14.7mm and finishes at 16mm
 

Attachments

  • SDC11048.JPG
    SDC11048.JPG
    134.3 KB · Views: 170
  • SDC11043.JPG
    SDC11043.JPG
    175.4 KB · Views: 217
  • SDC11044.JPG
    SDC11044.JPG
    156.7 KB · Views: 199

Gilrock

Member
Joined
Oct 18, 2011
Messages
560
Location
Tucson, AZ
Thanks for all the input. I've got a pen body I'm fairly happy with for my first try. Now back to making the section and cap. I think the only thing I'm not sure about is how the converter is supposed to engage the feed housing. I don't know if you just have to get them close or they have to fit together inside the section.

Gil
 

Gilrock

Member
Joined
Oct 18, 2011
Messages
560
Location
Tucson, AZ
I see what the 12mm tap and die and the 5mm tap will be used for. But what is the 9mm x 0.75 tap and die used for?

The 9mm x 0.75 tap and die is used to make the threads for the section piece to screw into the body.

The tutorial I started with said that some like to use 10mm threads for this so I think this becomes a personal choice. What I'm seeing is that although you end up with a little more material between the 9mm inner and 12mm outer threads on the body....you are reducing the material on the section so it becomes the more fragile part.

Gil
 

Gilrock

Member
Joined
Oct 18, 2011
Messages
560
Location
Tucson, AZ
Thinking about this some more and looking at the fountain pen section tutorial again. It's my lack of understanding how the fountain pen works that's causing me problems. Is the placement of the converter with respect to it's distance to the feed housing critical? Or is there a gap between the two such that you are creating an "ink chamber" when you craft the section?

Thanks,
Gil

Well I never really thought I got a good answer to the placement of the converter except I thought everyone was saying it was up to my personal taste. So yesterday I was trying to make a section and I think I found out the hard way that the length of the section is critical. Looking at how the Schmidt converter connects to the feed housing it sure appears like you need those two pieces to "engage". The part of the converter that will slide into the section is close to 1/4" diameter while the main body of the converter measured near 0.28" which doesn't leave enough material if you have 9mm outer threads on you're section. So that means you're section length is limited because if it's too long you won't be able to drill out the inside for the 0.28" body to fit. So I concluded you need to insert the converter into the feed housing and measure the distance from just inside the front lip of the housing to the back of where the 1/4" part of the converter stops. From memory I think it will come close to 1.25". If you make the section shorter then the converter will be fully engaged in the housing before it fully engages in the section and if you make the section longer than this measurement you are affecting how deep the section will be able to engage the feed housing. So you could be off by a small amount and it should still work but I would probably error on the slightly longer side of this measurement.

Now if you are using 10mm threads to connect you're section to the body then I'm not sure the section length is as critical because you may be able to drill out the back for the 0.28" converter body to slide down deeper if you need.

Anyways just trying to help others that may be starting out. If I'm wrong about anything I hope the experts can chime in.

Gil
 

Gilrock

Member
Joined
Oct 18, 2011
Messages
560
Location
Tucson, AZ
Oh and reading over my last post wanted to add one more thing. That 1.25" section length I'm saying is critical includes the threads that will screw into the body. So the size of the section you actually see can be tuned by adjusting the length of the tenon for the threads.

Gil
 

soligen

Member
Joined
May 11, 2010
Messages
1,085
Location
Sterling Heights, Michigan
Now if you are using 10mm threads to connect you're section to the body then I'm not sure the section length is as critical because you may be able to drill out the back for the 0.28" converter body to slide down deeper if you need.

Yep, thats why I use 10mm, although I am considereing experimenting with 9mm adn see how it all works out.
 

Gilrock

Member
Joined
Oct 18, 2011
Messages
560
Location
Tucson, AZ
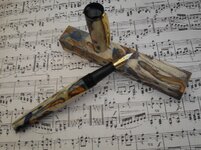
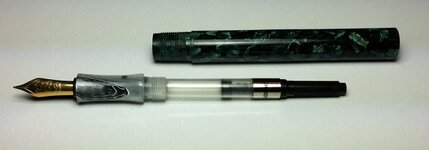
Here's my progress so far...the body is a material called Invisavue Acrylic from Woodcraft. It feels quite brittle. I didn't go for the shape I really wanted because I was worried about the material breaking and I just wanted to have something to show for the hours invested.

For the section I grabbed a piece of scrap acrylic I had lying around. I'll go back and try again with the ebonite now that I got the measurements down. Plus I need to make the cap.

Thanks,
Gil
 

Attachments

  • FirstKitless.jpg
    FirstKitless.jpg
    31.7 KB · Views: 150
  • FirstKitlessApart.jpg
    FirstKitlessApart.jpg
    36.1 KB · Views: 132

Gilrock

Member
Joined
Oct 18, 2011
Messages
560
Location
Tucson, AZ
From gadgets to pens. Looks like you are well on your way to making fountain pens from nothing.

The next step is to make my own lathe with wooden pulleys and rope where you press a pedal to keep it spinning. And have the wife in the backyard stomping berries for ink... :)

Gil
 

Gilrock

Member
Joined
Oct 18, 2011
Messages
560
Location
Tucson, AZ
"... for the hours invested."

Tediously addictive, eh? :)

-- joe

Well there's a little more to the story. After I had cut the tenon threads, drilled the interior hole and tapped those threads I turned the piece around and was holding it with a tapped piece of Delrin inside a Beall collet chuck on one end with a live center applying light pressure on the other end. So a little too much pressure trying to shape it and the body snapped in half. I was frustrated after spending a couple hours on it. So I'm showing the pieces to my wife and she says can't you just super glue it? At first I said no but then 30 minutes later I went back to the garage and gave it a try. It seemed to be holding so I chucked it back up and started shaping again but I didn't take the shape anywhere close to what I wanted. After sanding and polishing I can't even find the spot where it broke in half. I think with this stuff a glue joint is actually stronger than the original material.

Gil
 

TerryDowning

Member
Joined
Apr 27, 2011
Messages
520
Location
Newhall, CA
Most properly done glue joints (in the same material) are stronger than original material especially plastics.

If the materials are dissimilar, all bets are off. But if done properly can be strong enough.

Wood gluing to end grain is never strong either. This is why the use of accent strips when scalloping is crucial. Angled end grain to long grain or solid material.

Terry
 

Gilrock

Member
Joined
Oct 18, 2011
Messages
560
Location
Tucson, AZ
I'm curious to know from other kitless makers whether you make a mandrel to fit inside the profile of you're cap and body to support it while turning the outside shape. I saw another post yesterday where they were following chapter 32 of the penturners bible for creating a pen. I looked up that chapter and they were making a metal mandrel that fit inside the pen after the holes are drill and tapped and this supports it when turning the outside shape. I've been more inclined to get my outside shape really close to what I want before I drill my holes.

Thanks,
Gil
 
Top Bottom