Esterbrook feeds

Signed-In Members Don't See This Ad

lorbay

Member
Joined
Jul 2, 2009
Messages
3,384
Location
BC. Canada
For those of you that have used them, what are you using for a reservoir and delivery System for the ink?? Also did you have to do anything different for the section.?? I just purchased some and never even thought about the ink delivery system as I have a bunch of the piston converter. Didn't realize they would not work. Thanks

Lin.
 
Signed-In Members Don't See This Ad

Carl Fisher

Member
Joined
Jun 7, 2011
Messages
2,761
Location
Cape Coral, FL
From what I've been told by others who have used them, you can either drill all the way through your front section with the same size bit you will use to tap the front and just let it fill with ink, or you can do a step drill to run a smaller hole from the back of the feed out the back of the section.

Unless you are going to somehow seal the back of the feed to the step, I can't see the benefit in this as it would just fill the interior of the section with ink anyway so why not save the step and just drill the same size hole all the way through and make it easier to clean when changing ink color.

Letter D, 17/64 or 1/4" bit should all be close enough to do the trick on the 9/32 tap.

Silicone grease on all the threads should seal up nicely.
 

Carl Fisher

Member
Joined
Jun 7, 2011
Messages
2,761
Location
Cape Coral, FL
I would think you'd want to sleeve it with something nonporous. You don't want ink saturating the wood and you also want the seal on the pump piston to give a good vacuum to draw through the nib when filling.
 

duncsuss

Member
Joined
Jun 29, 2012
Messages
2,160
Location
Wilmington, MA
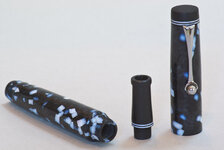
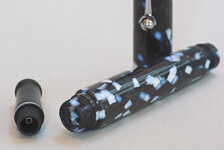
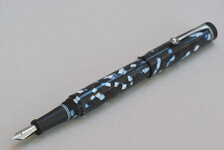
I made an experimental section that allows use of a cartridge or converter with an Esterbrook Renew-point unit, using a length of stainless steel tubing the same outer diameter as the spigot on the back of "normal" (Bock, Meisternib, etc.) feeds.

It works pretty well, but is extra effort in making the section.

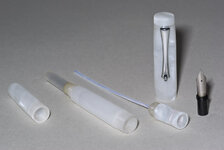
I also made a bulb-filler that takes Renew-points -- I use it daily, it works fine. (An eyedropper would be even simpler but I haven't made one.)
 

lorbay

Member
Joined
Jul 2, 2009
Messages
3,384
Location
BC. Canada
I made an experimental section that allows use of a cartridge or converter with an Esterbrook Renew-point unit, using a length of stainless steel tubing the same outer diameter as the spigot on the back of "normal" (Bock, Meisternib, etc.) feeds.

It works pretty well, but is extra effort in making the section.

I also made a bulb-filler that takes Renew-points -- I use it daily, it works fine. (An eyedropper would be even simpler but I haven't made one.)
Duncan do you have any pictures??
Lin
 

duncsuss

Member
Joined
Jun 29, 2012
Messages
2,160
Location
Wilmington, MA
Duncan do you have any pictures??
Lin
The cartridge/converter section -- you can see the end of the stainless steel tube that pushes into the cartridge:
IMGP5707.jpg

IMGP5709.jpg

IMGP5713.jpg

And the bulb-filler:

IMGP5680.jpg
 

lorbay

Member
Joined
Jul 2, 2009
Messages
3,384
Location
BC. Canada
Duncan that is sweet. I can see it would be quite a bit of extra effort in the section. I think the eye dropper is the easy way out. I think I am a little slow on some things as I can't wrap my brain around the way that bulb filler works, do you fill it through the nib when squeezing the bulb, and what is the little thin tube from the section for?? To give it some pressure.?
Lin
 

duncsuss

Member
Joined
Jun 29, 2012
Messages
2,160
Location
Wilmington, MA
Duncan that is sweet. I can see it would be quite a bit of extra effort in the section. I think the eye dropper is the easy way out. I think I am a little slow on some things as I can't wrap my brain around the way that bulb filler works, do you fill it through the nib when squeezing the bulb, and what is the little thin tube from the section for?? To give it some pressure.?
Lin

Thanks :)

To load the bulb filler, first remove the blind cap from the tail end of the barrel, and then dip the nib into a bottle of ink.

Without that thin tube, you would only be able to pull in as much ink as the air expelled when you squeeze the bulb -- subsequent squeezes would push ink out and suck it back in.

With the tube, the air in the bulb is expelled down the tube, then ink is drawn in up the tube and it spills over into the body of the pen. The next squeeze pushes out air again, and pulls in more ink, etc, etc until there is only a little air left in the bulb and the body is full.

Then you realize that there's no way for the ink to feed into the nib ... which is where a pin-prick through the side of the plastic tube helps. It allows just enough ink to leak through to feed the nib, without totally undermining the function of the tube for the filling process.
 

lorbay

Member
Joined
Jul 2, 2009
Messages
3,384
Location
BC. Canada
Holy crap Duncan that is really cool, man I wonder if anyone did that without making the small hole in the smaller tube. That would have kept the inventor busy for a while. I was ready to build one and if you would have not put that last paragraph in I would have been in the puzzled stage. Lol
Lin
 

duncsuss

Member
Joined
Jun 29, 2012
Messages
2,160
Location
Wilmington, MA
Holy crap Duncan that is really cool, man I wonder if anyone did that without making the small hole in the smaller tube. That would have kept the inventor busy for a while. I was ready to build one and if you would have not put that last paragraph in I would have been in the puzzled stage. Lol
Lin

:rotfl:

I saw references to a small hole in the feed tubes a couple of places, but no explanation of what it did or why it was necessary.

It wasn't till I was actually building one that I realized I'd got the pump action worked out but there was no feed -- and that a small hole (relative to the inner diameter of the tube) would be a solution.
 
Top Bottom