faas
Member
Made this as a Christmas present for my sister. I certainly see more in my future!


Made this as a Christmas present for my sister. I certainly see more in my future!
View attachment 157890
Pretty cool, I make lots of wine glasses with the wooden stems, but I usually also put a wood base on mine... haven't tried using the original base with just a wood stem... I like that and may have to copy your technique.
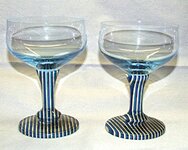
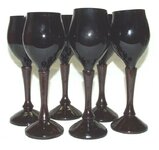
Here a couple of my glasses....
The first has cocobolo stem, the coupe glasses have Spectraply stem and the black ones have Wenge stems.
Pretty cool, I make lots of wine glasses with the wooden stems, but I usually also put a wood base on mine... haven't tried using the original base with just a wood stem... I like that and may have to copy your technique.
Here a couple of my glasses....
The first has cocobolo stem, the coupe glasses have Spectraply stem and the black ones have Wenge stems.
Copy away! I'm working on ways to get quicker at them so i can use better glass but still keep them inexpensive. Right now I'm turning round between centers, grabbing in a 4 jaw and turning the inside bevels then shaping/finishing between 60 degree centers. I've made a couple with the wooden bottom like yours, but really like the way this turned out.
Made this as a Christmas present for my sister. I certainly see more in my future!
View attachment 157890
This is very nice and very unique, I have a wine drinker that would LOVE something like this.
Would you care to explain HOW this is done ?? I am assuming you separate the stem from the glass and from the bottom, and glue/epoxy your finished piece in place. But, how do you separate the stem from the glass and the base ?? IF that's even how it done...
I'd be happy to share. I've done these 2 ways. I'll share the way I do this style though.
First score the stem with a file, i use triangular, all the way around and give a little tap with something rubber to break off. I do this as close to the glass and base as possible. Determine the length needed for the stem and cut blank to fit. Turn round between centers then grab in a 4 jaw, or collet chuck, or something similar. Turn the inside bevel to fit the bevel on the glass so that it seats well for adhesion. Turn around and do the same for the base (the glasses I've used are different on the top and bottom of the stem; i want to experiment with using a 60 degree reamer to see if this will work). Remove chuck and install 60 degree live and dead centers in their respective spots. Shape and finish between centers. Epoxy stem to base with a magic balancing act ensuring things are straight. Once dry, epoxy glass bowl to the base. Be careful that epoxy does not ooze out when you adhere these together.
A side note, leaving the stem and drilling a hole partially through the blank makes things easier to line up. However, It limits you on how thin you can make the stem. I prefer this way to make a thinner stem.
Awesome, great explanation, makes perfect sense. Thank you very much.
I am thinking of cutting the stem, but leaving about 1/8" - 1/4" left on the glass and on the bottom and use as a tenon to line up your blank and just drill or bore a small hole for the glass tenon, that way it will still allow you to make the stem thin, or thinner, in the middle, but yet line up perfectly. Gonna try this out. Thanks again.
The dremel was gonna be my first approach.Clint,
I use a dremel with a cut off disk to cut my stems... with a high speed dremel, you only have to touch the stem and hold it about 1-3 seconds and it will pop off... some times, depending on the glass, it may be a little jagged, but a quick trip to my 1 inch table top belt sander will smooth it some... since it's buried in the stem, it really not a major problem.
I also leave about 1/2 inch of stem to fit down into my stems... I also taper the hole in the end of the stem to fit the bottom of the glass.