Pistol Grips

Signed-In Members Don't See This Ad
See more from CabinetMaker

CabinetMaker

Member
Joined
Mar 16, 2009
Messages
256
Location
Arvada, CO
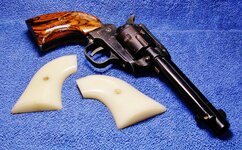
I decided that I wanted to do some silver inlay in my pistol grips. Since I am new to this, I figured I shouldn't jump right in on the grips that came with the guns so I decided to make my own. I had a piece of fairly uninteresting walnut laying around and decided to use that as my stock. It will also provide good contrast for the silver and brass inlay to come. If this makes a decent set of handles, I have a small chunk of Claro Walnut that will make a spectacular set of grips.

10314624_1576331809309184_3175077278819369927_n.jpg

I took the grips off and looked closely at the one-piece construction. I decided that a two piece grip would be easier given the required tolerances.

11150267_1576331819309183_1101120860632628867_n.jpg


So I traced out some patterns, cut them out on the band saw and spent a while smoothing out the patterns so I could use it as a router guide. The larger pattern is the grip and the smaller pattern is the spacer. My idea is to actually glue the pieces together to make a one piece grip. I don't want the grip screw in my inlay field.

11164775_1576331832642515_1883070201225478271_n.jpg


I built a couple of jigs to cut the butt to the proper length and a second to safely hold the grip during routing. U used a but of double sided tape to hold things firmly and it worked well. The extra length of the pattern allowed me to engage the guide bearing before the bit met the wood. This kept the router bit from grabbing the wood.

11146211_1576337105975321_7541911945380909058_n.jpg


The next step was to taper the grips and that was a bit of a challenge. I thought about planer sleds, sander sleds and finally decided that the band saw would be easiest and safest, provided I could get my fingers away from the blade. So, more double sided tape and a little gig to properly support the blank while cutting.

11169941_1576337189308646_5550807967775120242_n.jpg


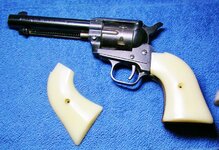
It worked! And, I still have all 10 fingers.

No I have to start the hand shaping to make the grips fit both the gun and my hand. Once that is done, I will start working on the inlay.

The inlay will be a challenge as I must first make a set of push chisels from an old hack saw blade. Any advice from those that may hove done this or something similar?

Thanks for looking and have a great day.
 
Signed-In Members Don't See This Ad

plantman

Member
Joined
Jan 2, 2012
Messages
3,437
Location
Green Bay, Wi
Pistol grips are fun to do and can make a great change in the looks of your gun. Not to mention that they will be a one of a kind that no one else has. Keep the progress and photos comming. Here are a couple photos of a 22 that I made grips for out of Bocote, along with the original plastic grips. No show piece, but a hugh change in looks. Jim S
 

Attachments

  • DSCN0793 (800x497).jpg
    DSCN0793 (800x497).jpg
    432.7 KB · Views: 244
  • DSCN0794 (800x550).jpg
    DSCN0794 (800x550).jpg
    384.9 KB · Views: 221
Last edited:

CabinetMaker

Member
Joined
Mar 16, 2009
Messages
256
Location
Arvada, CO
We had a cold, rainy weekend so it was a good time to get into the shop for a little more work on the pistol grips.

I decided to do most of the shaping with a rasp. Someday I would like to get a nice set of hand cut rasps.
20390_1579276225681409_6377962283971008349_n.jpg


I tried gluing a block to the back with a piece of newspaper between the grip and the block so I could clamp it in a vice. Two passes with the rasp, light passes at that, and the glue joint failed. So much for that idea. That is why it is clamped to a workbench. And it worked pretty well.
11162522_1579278202347878_4639920238649000424_n.jpg


I did all the rough shaping with the rasp and then took some old sanding belts and cut myself some sanding strips. Started with 50, 60, and 80 to complete the shaping. Lots of worrying the grip until it matched the gun frame. I switched to sand paper and sanded through about 120 which gives me a nice surface to start the inlay process. I took about 2 hours per set to get a set ready for one pistol.

11182358_1579276242348074_6634101695849030604_n.jpg


I have learned a lot from doing this. The biggest thing I learned is that 1, the guns are not identical despite being the same model from the same manufacturer and 2, the square corner where the grip meets the pistol is not a 90° corner. Why the hell is that not 90°!? I am glad I didn't start with my Claro walnut.

I still like what I have so far. I will attempt to inlay 4 different patterns on the grips to get practice with the inlay process.

More pics as things progress!
 

CabinetMaker

Member
Joined
Mar 16, 2009
Messages
256
Location
Arvada, CO
I had planned to work on my grips this weekend but the weather forecast called for a sunny dry weekend with rain for the rest of the week so I had to get some chores done outside. I built a planter.
11212621_1582596915349340_411448586353570647_o.jpg


But all work and no play make for a long weekend. I have been looking for info on turning hack saw blades into tools and have not found a wealth of information. I found one site that talked about judging the grade of steel in the blade based on the color of sparks that come off the grinding wheel but my iPad got scammed and I had to clear the cookies and history so I lost it. Best thing to do in a case like that is grab and old hacksaw blade and jump in.

First I ground the blade to the width I wanted.
11143107_1582594075349624_2999784437976694103_n.jpg


Then I snapped the end of the blade off to create a small push chisel. I made it in three different widths to make small curves and straight lines easy to cut.
11139445_1582595662016132_3136636655462732678_n.jpg


That small blade is really tough to keep cool when grinding. Touch the wheel, quench, touch the wheel, quench. I didn't take long. Maybe tonight I will be able to make a practice piece to see how things work.
 

CabinetMaker

Member
Joined
Mar 16, 2009
Messages
256
Location
Arvada, CO
I used the hacksaw chisels to do a little practice and I wasn't sure I like them. They were a little hard to control and I had a tendency to go way to deep while cutting. Both issues have more to do with technique and practice than tools but a little research on the web led to a set of tools used by a master blade smith and it seemed to offer more control. Besides, I have a lathe and I needed a little project for a snowy May day.

I made my first one, shown on the lathe bed, and it was a bit to small but acceptable for detailed scroll cutting. I decided to make the next two bigger.

11243456_1585686215040410_5455889354098582764_n.jpg


They are easy to make. I started with an X-acto knife and cut it off about 2" above the bottom of the Knurled band. I roughed the end of the knife and super glued it in.

11238229_1585691021706596_7400239198364505885_n.jpg


I broke the blade off and then ground it down to 1/8" and sharpened it. Very tricky to get a nice sharp ended on such a narrow blade. But it is critical. The sample piece next to the push chisel clearly shows that when the blade is not sharp enough to cut the fibers you get ugly gaps between the wire and the wood. That is part of the reason I switched to x-acto blades, the temper seems to hold the edge better.

I made a 1/16", 1/8" and 3/16" chisel and a little stand to hold them. I did not finish my practice pieces fully but I wanted to see how the wire would look. I will do another practice piece and then I will feel ready to tackle the actual pistol grips.

11231754_1585754801700218_3139481957360795761_n.jpg


Its a fun project but it is much harder than it looks. I think you can see from the practice piece that keeping lines straight and following curves takes lots of practice. My first try will fall under the category of folk art - a bit rough around the edges.
 

CabinetMaker

Member
Joined
Mar 16, 2009
Messages
256
Location
Arvada, CO
I finished my pistol grips this weekend. They are far from master pieces, I need a LOT more practice, but I am pleased with how they turn out. I need to learn how to bend the wire in two directions at once. That is kind of tricky. I am thinking that maybe round wire might be better when working on pistol grips. They are small and the curves are rather tight.

In case you are wondering, one has a D on one side and a very stylized dragon on the other. The other gun has an M on one side and a horse on the other.

1517405_1592966070979091_6247709317514759993_n.jpg


11265401_1592966080979090_7174712737005735781_n.jpg
 
Top Bottom