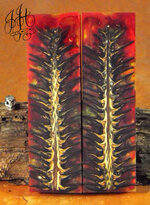
Three sets of these just went out the door this weekend. I think I have a happy knife maker, just waiting to see the completed knives...

You are using an out of date browser. It may not display this or other websites correctly.
You should upgrade or use an alternative browser.
You should upgrade or use an alternative browser.
Pine Cone Knife Scales
- Thread starter Tim K
- Start date
Signed-In Members Don't See This Ad
See more from Tim K

George: One more question for you. Would it be possible to stabilize the cone in some manner to hold it together and then bandsaw it in half and cast it. I have made a few knives and done some simple casting, and have not been pleased with the results when everything was cut and shaped to the final design, be it wood or plastic. Thanks for the above explanation !! I guess one realy has to think and plan ahead for this type of work, that's why I ordered the pen blanks from you !!! Jim S
A lot of knife makers will use the outside of the cones so the knife scales will look like fish scales, So a need for a book matched set is not there, the spine of the cone wood be attached to the tang. But it is sweet when you can get a nice book matched set.
I do stabilized & harden the cones before casting but as far as cutting them before casting that's something I will have to try!
Thanks Tim; That is the look I wanted. Jim S
Hi Tim,
That is indeed a nice set in that pic...!:wink:
I apologise if you saw my post as "butting in" in your work, was never my intention at all, I though in providing my own answers to the questions asked, based on my own experience even though, they were not asked to me.
However, the observations I made a true and correct and apply to anyone that makes these sort of castings. Sometimes, what we want to embed is quite forgiven and allow less meticulous preparations before the resin is poured, this is no so the case with some stuff we want to embed in resin.
Most of the best results I've seen, were the result of careful preparation with some of the most daring objects/materials/products one can think, that preparation is in many cases an attempt to keep it as natural as possible and maintain is beauty, that and as I said, rewards you big...!:wink::biggrin:
One of the most rewarding aspects of casting, to me, apart from being able to create stuff, is what I see as an unlimited end to possibilities, despite the fact that I mainly do castings to sell (not always), I have been a strong advocate to try to inspire other to try, regardless if they endup making a commercial use of it, that doesn't bother me, otherwise I wouldn't be sharing all the "secrets", tricks and shortcuts...!:wink:
I was given the "reputation" that, is nothing I can't cast, why...??? because I like to try, experiment, create and think beyond of what I can see, that is called "imagination". In fact we all have it, we were born with it however, sometimes life takes to a road where imagination is not relevant, we are paid to follow someone else's thoughts/steps, and that is something that many out there, have no other option, as sad as it make sound...!:frown:
I keep saying to everyone talking of casting, never say that you don't have anything to cast with, that is just so ridiculously incorrect, you don't even have to leave the house, each room big or small, will have something that can be used to cast, my preferred room is the kitchen, goodness me, it contains more suitable stuff than I'm prepared to list, believe me...!:biggrin:
OK so, not all get the "gold medal" but, so what...? :wink::biggrin:
Cheers
George
Jim,
Yes, there are a few "items" I stabilized before casting, to make sure they maintain the intended shape or prevent opening such as many cones when are put in a liquid or cast, particularly in Polyester where heat is what sets the hardening process, making also the cones to force open, sometimes far too much.
I suppose, one of the first difficulties in casting most comes is, removing the moisture they contain, any heat with make them open and become useless so, straight oven or microwave are out of question, while some other cones, completely disintegrate when subject to heat, these are the comes that have no core/spine, tight grouped petals that simple fall off when the cone opens (I have a thread about these cones, here)
Anyway so, there are a few different possibilities but, one that I like to use mainly because have never failed to me is the plaster mesh tape that they use to put over the plasterboard sheet joints, before they plaster over. They don't stretch, are sticky and the Cactus Juice doesn't affect it so, wrapping your cones with it (just 2 layers over, all around is sufficient) and then putting a thin string over it to make sure it doesn't come undone while stabilizing, is a good idea.
Your next problem is going to be, cure the juice in the oven at 90° celsius for 90 minutes or so and not burn the mesh before the resin is set, otherwise, the cone will look like and open rose...! :wink::biggrin: and completely stuffed...!
So, what do you need to use...???
The very same thing that you will need to use, if you want to dry the cone in the oven, before you stabilized and that is, the heat resistant tape, also known as the muffler repair tape.
The one I'm talking about is about 2" or so wide and looks like the foil paper, some has some strengthening mesh, others are simple a this heat resistant tape that is not expensive, a roll should cost about $20 or less.
So, if you have green or not totally dry cones that are still closed and you want to keep them that way, all the way through to the cured/set/harden casting resin, you use the combination of these 2 tape types, wrap the cone with the mesh and then the heat tape, (at this time you don't have to worry about tying the mesh as the heat tape has adhesive on it) put it in the oven to dry.
After is dry, remove the heat tape, tie the mesh tape with a thin string and stabilize. When drained properly and ready for the oven/curing, wrap it with the heat tape again, a simple layer of this tape covering the mesh tape, is all its needed.
Some heat resistant tapes tend to shrivel up when the temperatures reaches the threshold/limits of the manufacture heat resistance levels, by that time the resin is set and the heat tape done its job, even if the mesh gets a little burnt at that point, the cone is solid as a rock and it won't open, ever again...!
Just as a side note, some pods/cones are closed and you want them to open just so slightly however, when you put them in the oven, they open completely and beyond your control so, you can control how much those pods or cones should open by limiting its expected reaction to heat, for this, the mesh tape is not your best option, it can be done, if you find a way to wrap it and create a intended space for it to open that far so, a better option is most fish nets (fine mesh), they stretch a little, the force exerted from the pod/cone trying to open is enough to stretch the net sufficiently.
The heat resistant tape can not be used at this point, as these type tapes don't stretch, in this case, I would maintain the oven temperature at no more than 60*° celsius, this will not burn the fishing net, it may take a little longer but is safer that way...!
Like I said, there are other possible materials to use to achieve these results, the principals are what is important...!
I hope this has satisfied your curiosity...!:wink:
PS: Like you said, you have me, to worry about all that, huh...???
Cheers
George
Signed-In Members Don't See This Ad
plantman
Member
Tim; Those are fantastic !! I have never seen something so unique and beautiful in a knife scale before. You should have no trouble selling whatever you make. I have two questions. Are these four sets all from two single casts with each one cut in half, thus giving you both inside and outside of the cones. And, could you make matching scales that would show either two inside or two outside cones, making both sides of the knife bookmatch ?? Jim S
Last edited:
CrimsonKeel
Member
they better be bookmatched.
Very cool idea also. Ive been tossing around in my head whether you could rig up a knife in a cup and pour resin around it to basically bond with it so you could have hidden pins
Very cool idea also. Ive been tossing around in my head whether you could rig up a knife in a cup and pour resin around it to basically bond with it so you could have hidden pins
robutacion
Member
Great work Tim...!
Plantman's observation and question are fair for someone that has never done any sort of this work and if may me also fair to explain a few things...!
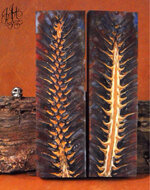
While the best booked matched images come from splitting the block blank in 2 halves, that doesn't always mean that you are going to get an exact mirror image. This can depend from the material cast original construction but mainly due to the difficulty cut a straight line exactly through the centre of the block when, the object embedded is not straight.
This is the case with these Pine pods and the problem with most of pods/seeds and many other materials. Cutting straight through the centre of something that has a curve, can never produce an mirror image as the case with these knife scales.
Sometimes, is possible to prepare the object to embed and straighten it up and position it in the mold so that is precisely centered for that split image look after cut however, it may be OK with some castings, if the natural and true shape of what you want to embed is significantly modified, it can spoil the look you are after, it won't look natural...!
Another problem with casting knife blanks/blocks/scales is that, you can get the same problem as you do with pen blanks, there is, the way the blank/scales look before worked on and what you like about it/makes it special, can sometimes be lost through the shaping process, this is a reality and a very annoying one, in fact, I have had many bad surprises in that regard and one of the reasons why, as a pen blank maker, that I take and advise others that cast these type blanks, to put some thinking/testing/experimenting before actually casting or, if a big batch is required, sacrifice the time and materials necessary to make a test sample, and make sure it turns out the way you wanted or, you missed something that becomes obvious when the cast is made and cut/shaped to its intended use...!
And CrimsonKeel, that is not only very possible/doable but a great way to fix the resin blank to the blade handle. You can simply drill a couple of decent size holes on the blank handle, drill small holes and put a pin through it or, weld a couple of small "spikes" in the handle if the steal is far too hard to drill, they don't need to protrude that much to stop the metal handle to slip out of the cast handle, just remember that, in most cases is not a lot of material left after is all shaped off so, you don't want to make the spikes/pins too long and and you have to make sure the resin mix is not to transparent, for obvious reasons...!:wink::biggrin:
I've done a few knife handles this way and never had any problems however, you have to be very careful of not damaging the blade and any other parts of the knife's metal when grinding things to shape, it will require some careful wrapping and some extra care when working/shaping the handle...!:wink::biggrin:
Hope this helps/make sense...!
Cheers
George
Plantman's observation and question are fair for someone that has never done any sort of this work and if may me also fair to explain a few things...!
While the best booked matched images come from splitting the block blank in 2 halves, that doesn't always mean that you are going to get an exact mirror image. This can depend from the material cast original construction but mainly due to the difficulty cut a straight line exactly through the centre of the block when, the object embedded is not straight.
This is the case with these Pine pods and the problem with most of pods/seeds and many other materials. Cutting straight through the centre of something that has a curve, can never produce an mirror image as the case with these knife scales.
Sometimes, is possible to prepare the object to embed and straighten it up and position it in the mold so that is precisely centered for that split image look after cut however, it may be OK with some castings, if the natural and true shape of what you want to embed is significantly modified, it can spoil the look you are after, it won't look natural...!
Another problem with casting knife blanks/blocks/scales is that, you can get the same problem as you do with pen blanks, there is, the way the blank/scales look before worked on and what you like about it/makes it special, can sometimes be lost through the shaping process, this is a reality and a very annoying one, in fact, I have had many bad surprises in that regard and one of the reasons why, as a pen blank maker, that I take and advise others that cast these type blanks, to put some thinking/testing/experimenting before actually casting or, if a big batch is required, sacrifice the time and materials necessary to make a test sample, and make sure it turns out the way you wanted or, you missed something that becomes obvious when the cast is made and cut/shaped to its intended use...!
And CrimsonKeel, that is not only very possible/doable but a great way to fix the resin blank to the blade handle. You can simply drill a couple of decent size holes on the blank handle, drill small holes and put a pin through it or, weld a couple of small "spikes" in the handle if the steal is far too hard to drill, they don't need to protrude that much to stop the metal handle to slip out of the cast handle, just remember that, in most cases is not a lot of material left after is all shaped off so, you don't want to make the spikes/pins too long and and you have to make sure the resin mix is not to transparent, for obvious reasons...!:wink::biggrin:
I've done a few knife handles this way and never had any problems however, you have to be very careful of not damaging the blade and any other parts of the knife's metal when grinding things to shape, it will require some careful wrapping and some extra care when working/shaping the handle...!:wink::biggrin:
Hope this helps/make sense...!
Cheers
George
plantman
Member
Great work Tim...!
Plantman's observation and question are fair for someone that has never done any sort of this work and if may me also fair to explain a few things...!
While the best booked matched images come from splitting the block blank in 2 halves, that doesn't always mean that you are going to get an exact mirror image. This can depend from the material cast original construction but mainly due to the difficulty cut a straight line exactly through the centre of the block when, the object embedded is not straight.
This is the case with these Pine pods and the problem with most of pods/seeds and many other materials. Cutting straight through the centre of something that has a curve, can never produce an mirror image as the case with these knife scales.
Sometimes, is possible to prepare the object to embed and straighten it up and position it in the mold so that is precisely centered for that split image look after cut however, it may be OK with some castings, if the natural and true shape of what you want to embed is significantly modified, it can spoil the look you are after, it won't look natural...!
Another problem with casting knife blanks/blocks/scales is that, you can get the same problem as you do with pen blanks, there is, the way the blank/scales look before worked on and what you like about it/makes it special, can sometimes be lost through the shaping process, this is a reality and a very annoying one, in fact, I have had many bad surprises in that regard and one of the reasons why, as a pen blank maker, that I take and advise others that cast these type blanks, to put some thinking/testing/experimenting before actually casting or, if a big batch is required, sacrifice the time and materials necessary to make a test sample, and make sure it turns out the way you wanted or, you missed something that becomes obvious when the cast is made and cut/shaped to its intended use...!
And CrimsonKeel, that is not only very possible/doable but a great way to fix the resin blank to the blade handle. You can simply drill a couple of decent size holes on the blank handle, drill small holes and put a pin through it or, weld a couple of small "spikes" in the handle if the steal is far too hard to drill, they don't need to protrude that much to stop the metal handle to slip out of the cast handle, just remember that, in most cases is not a lot of material left after is all shaped off so, you don't want to make the spikes/pins too long and and you have to make sure the resin mix is not to transparent, for obvious reasons...!:wink::biggrin:
I've done a few knife handles this way and never had any problems however, you have to be very careful of not damaging the blade and any other parts of the knife's metal when grinding things to shape, it will require some careful wrapping and some extra care when working/shaping the handle...!:wink::biggrin:
Hope this helps/make sense...!
Cheers
George
George: One more question for you. Would it be possible to stabilize the cone in some manner to hold it together and then bandsaw it in half and cast it. I have made a few knives and done some simple casting, and have not been pleased with the results when everything was cut and shaped to the final design, be it wood or plastic. Thanks for the above explanation !! I guess one realy has to think and plan ahead for this type of work, that's why I ordered the pen blanks from you !!! Jim S
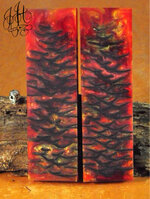
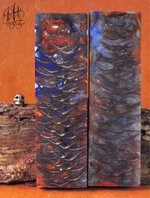
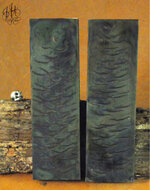
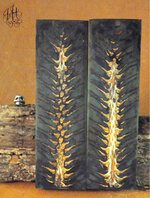
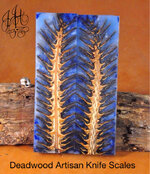
A nice book matched set can be achieved, while sometime not, bit to me that's the beauty of nature! If were all perfect we won't have burls, spalting and ambrosias all beautiful irregularities.Three sets of these just went out the door this weekend. I think I have a happy knife maker, just waiting to see the completed knives...
A lot of knife makers will use the outside of the cones so the knife scales will look like fish scales, So a need for a book matched set is not there, the spine of the cone wood be attached to the tang. But it is sweet when you can get a nice book matched set.
I do stabilized & harden the cones before casting but as far as cutting them before casting that's something I will have to try!
Attachments
plantman
Member
A nice book matched set can be achieved, while sometime not, bit to me that's the beauty of nature! If were all perfect we won't have burls, spalting and ambrosias all beautiful irregularities.Three sets of these just went out the door this weekend. I think I have a happy knife maker, just waiting to see the completed knives...
A lot of knife makers will use the outside of the cones so the knife scales will look like fish scales, So a need for a book matched set is not there, the spine of the cone wood be attached to the tang. But it is sweet when you can get a nice book matched set.
I do stabilized & harden the cones before casting but as far as cutting them before casting that's something I will have to try!
Thanks Tim; That is the look I wanted. Jim S
robutacion
Member
A nice book matched set can be achieved, while sometime not, bit to me that's the beauty of nature! If were all perfect we won't have burls, spalting and ambrosias all beautiful irregularities.Three sets of these just went out the door this weekend. I think I have a happy knife maker, just waiting to see the completed knives...
A lot of knife makers will use the outside of the cones so the knife scales will look like fish scales, So a need for a book matched set is not there, the spine of the cone wood be attached to the tang. But it is sweet when you can get a nice book matched set.
I do stabilized & harden the cones before casting but as far as cutting them before casting that's something I will have to try!
Hi Tim,
That is indeed a nice set in that pic...!:wink:
I apologise if you saw my post as "butting in" in your work, was never my intention at all, I though in providing my own answers to the questions asked, based on my own experience even though, they were not asked to me.
However, the observations I made a true and correct and apply to anyone that makes these sort of castings. Sometimes, what we want to embed is quite forgiven and allow less meticulous preparations before the resin is poured, this is no so the case with some stuff we want to embed in resin.
Most of the best results I've seen, were the result of careful preparation with some of the most daring objects/materials/products one can think, that preparation is in many cases an attempt to keep it as natural as possible and maintain is beauty, that and as I said, rewards you big...!:wink::biggrin:
One of the most rewarding aspects of casting, to me, apart from being able to create stuff, is what I see as an unlimited end to possibilities, despite the fact that I mainly do castings to sell (not always), I have been a strong advocate to try to inspire other to try, regardless if they endup making a commercial use of it, that doesn't bother me, otherwise I wouldn't be sharing all the "secrets", tricks and shortcuts...!:wink:
I was given the "reputation" that, is nothing I can't cast, why...??? because I like to try, experiment, create and think beyond of what I can see, that is called "imagination". In fact we all have it, we were born with it however, sometimes life takes to a road where imagination is not relevant, we are paid to follow someone else's thoughts/steps, and that is something that many out there, have no other option, as sad as it make sound...!:frown:
I keep saying to everyone talking of casting, never say that you don't have anything to cast with, that is just so ridiculously incorrect, you don't even have to leave the house, each room big or small, will have something that can be used to cast, my preferred room is the kitchen, goodness me, it contains more suitable stuff than I'm prepared to list, believe me...!:biggrin:
OK so, not all get the "gold medal" but, so what...? :wink::biggrin:
Cheers
George
robutacion
Member
George: One more question for you. Would it be possible to stabilize the cone in some manner to hold it together and then bandsaw it in half and cast it. I have made a few knives and done some simple casting, and have not been pleased with the results when everything was cut and shaped to the final design, be it wood or plastic. Thanks for the above explanation !! I guess one realy has to think and plan ahead for this type of work, that's why I ordered the pen blanks from you !!! Jim S
Jim,
Yes, there are a few "items" I stabilized before casting, to make sure they maintain the intended shape or prevent opening such as many cones when are put in a liquid or cast, particularly in Polyester where heat is what sets the hardening process, making also the cones to force open, sometimes far too much.
I suppose, one of the first difficulties in casting most comes is, removing the moisture they contain, any heat with make them open and become useless so, straight oven or microwave are out of question, while some other cones, completely disintegrate when subject to heat, these are the comes that have no core/spine, tight grouped petals that simple fall off when the cone opens (I have a thread about these cones, here)
Anyway so, there are a few different possibilities but, one that I like to use mainly because have never failed to me is the plaster mesh tape that they use to put over the plasterboard sheet joints, before they plaster over. They don't stretch, are sticky and the Cactus Juice doesn't affect it so, wrapping your cones with it (just 2 layers over, all around is sufficient) and then putting a thin string over it to make sure it doesn't come undone while stabilizing, is a good idea.
Your next problem is going to be, cure the juice in the oven at 90° celsius for 90 minutes or so and not burn the mesh before the resin is set, otherwise, the cone will look like and open rose...!
:wink::biggrin: and completely stuffed...!So, what do you need to use...???
The very same thing that you will need to use, if you want to dry the cone in the oven, before you stabilized and that is, the heat resistant tape, also known as the muffler repair tape.
The one I'm talking about is about 2" or so wide and looks like the foil paper, some has some strengthening mesh, others are simple a this heat resistant tape that is not expensive, a roll should cost about $20 or less.
So, if you have green or not totally dry cones that are still closed and you want to keep them that way, all the way through to the cured/set/harden casting resin, you use the combination of these 2 tape types, wrap the cone with the mesh and then the heat tape, (at this time you don't have to worry about tying the mesh as the heat tape has adhesive on it) put it in the oven to dry.
After is dry, remove the heat tape, tie the mesh tape with a thin string and stabilize. When drained properly and ready for the oven/curing, wrap it with the heat tape again, a simple layer of this tape covering the mesh tape, is all its needed.
Some heat resistant tapes tend to shrivel up when the temperatures reaches the threshold/limits of the manufacture heat resistance levels, by that time the resin is set and the heat tape done its job, even if the mesh gets a little burnt at that point, the cone is solid as a rock and it won't open, ever again...!
Just as a side note, some pods/cones are closed and you want them to open just so slightly however, when you put them in the oven, they open completely and beyond your control so, you can control how much those pods or cones should open by limiting its expected reaction to heat, for this, the mesh tape is not your best option, it can be done, if you find a way to wrap it and create a intended space for it to open that far so, a better option is most fish nets (fine mesh), they stretch a little, the force exerted from the pod/cone trying to open is enough to stretch the net sufficiently.
The heat resistant tape can not be used at this point, as these type tapes don't stretch, in this case, I would maintain the oven temperature at no more than 60*° celsius, this will not burn the fishing net, it may take a little longer but is safer that way...!
Like I said, there are other possible materials to use to achieve these results, the principals are what is important...!
I hope this has satisfied your curiosity...!:wink:
PS: Like you said, you have me, to worry about all that, huh...???
Cheers
George
George, I didn't see you comments that way at all, I sorry if I came across that way. I love your feedback and I obviously learn something new everyday, at least that's my goal. I guess what I was trying to say is that sometimes in our pursuit for perfection we can over look the real beauty of the object we are working with. Heck I have pine cone scales that won't see the light of day except on my own knives, for myself.....I like them though..... And you are correct in saying "careful preparation with some of the most daring objects/materials/products one can think, that preparation is in many cases an attempt to keep it as natural as possible and maintain is beauty, that and as I said, rewards you big...!:wink::biggrin: " I totally agree, I guess in my case I try not to over work a project( not that you do) and I have at times and I think to myself , why did I do that? But that's what it's all about, right? So I do appreciate your comments and feedback! Keep it coming..... TimHi Tim, That is indeed a nice set in that pic...!:wink: I apologise if you saw my post as "butting in" in your work, was never my intention at all, I though in providing my own answers to the questions asked, based on my own experience even though, they were not asked to me. However, the observations I made a true and correct and apply to anyone that makes these sort of castings. Sometimes, what we want to embed is quite forgiven and allow less meticulous preparations before the resin is poured, this is no so the case with some stuff we want to embed in resin. Most of the best results I've seen, were the result of careful preparation with some of the most daring objects/materials/products one can think, that preparation is in many cases an attempt to keep it as natural as possible and maintain is beauty, that and as I said, rewards you big...!:wink::biggrin: One of the most rewarding aspects of casting, to me, apart from being able to create stuff, is what I see as an unlimited end to possibilities, despite the fact that I mainly do castings to sell (not always), I have been a strong advocate to try to inspire other to try, regardless if they endup making a commercial use of it, that doesn't bother me, otherwise I wouldn't be sharing all the "secrets", tricks and shortcuts...!:wink: I was given the "reputation" that, is nothing I can't cast, why...??? because I like to try, experiment, create and think beyond of what I can see, that is called "imagination". In fact we all have it, we were born with it however, sometimes life takes to a road where imagination is not relevant, we are paid to follow someone else's thoughts/steps, and that is something that many out there, have no other option, as sad as it make sound...!:frown: I keep saying to everyone talking of casting, never say that you don't have anything to cast with, that is just so ridiculously incorrect, you don't even have to leave the house, each room big or small, will have something that can be used to cast, my preferred room is the kitchen, goodness me, it contains more suitable stuff than I'm prepared to list, believe me...!:biggrin: OK so, not all get the "gold medal" but, so what...? :wink::biggrin: Cheers George
Last edited:
Russknan
Member
"So, what do you need to use...??? The very same thing that you will need to use, if you want to dry the cone in the oven, before you stabilized and that is, the heat resistant tape, also known as the muffler repair tape."
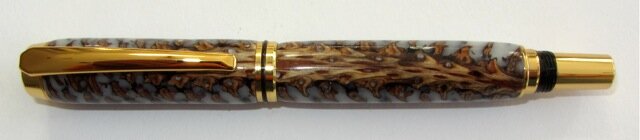
Please pardon my jumping into someone else's thread but, George, thanks for sharing your *brilliant* solution to a problem I was trying to solve. Cast a pine cone in dyed white Alumilite awhile back. Had dried it in the toaster oven, and it opened WAY up. Gave it a haircut on the bandsaw, then into the mold, pour, pressure, etc. I was looking for the "scales" effect, and worried that I might cut down into the core and ruin it. Indeed, during turning, I DID cut down into the core which revealed the most beautiful shape. To me, it looks like a dragon. That is the most enchanting part about this new casting/stabilization obsession. You never know what your "waste wood", inclusion, etc. pours are going to look like until you turn them. Just like opening a Christmas present! Of course, not all meet my approval, but there is always a surprise to be had. Now I have to go off and try the "tape trick." Russ
Please pardon my jumping into someone else's thread but, George, thanks for sharing your *brilliant* solution to a problem I was trying to solve. Cast a pine cone in dyed white Alumilite awhile back. Had dried it in the toaster oven, and it opened WAY up. Gave it a haircut on the bandsaw, then into the mold, pour, pressure, etc. I was looking for the "scales" effect, and worried that I might cut down into the core and ruin it. Indeed, during turning, I DID cut down into the core which revealed the most beautiful shape. To me, it looks like a dragon. That is the most enchanting part about this new casting/stabilization obsession. You never know what your "waste wood", inclusion, etc. pours are going to look like until you turn them. Just like opening a Christmas present! Of course, not all meet my approval, but there is always a surprise to be had. Now I have to go off and try the "tape trick." Russ
Attachments
sbell111
Member
Thanks for sharing your method. It will help many people out.Yes, there are a few "items" I stabilized before casting, to make sure they maintain the intended shape or prevent opening such as many cones when are put in a liquid or cast, particularly in Polyester where heat is what sets the hardening process, making also the cones to force open, sometimes far too much.
I suppose, one of the first difficulties in casting most comes is, removing the moisture they contain, any heat with make them open and become useless so, straight oven or microwave are out of question, while some other cones, completely disintegrate when subject to heat, these are the comes that have no core/spine, tight grouped petals that simple fall off when the cone opens (I have a thread about these cones, here)
Anyway so, there are a few different possibilities but, one that I like to use mainly because have never failed to me is the plaster mesh tape that they use to put over the plasterboard sheet joints, before they plaster over. They don't stretch, are sticky and the Cactus Juice doesn't affect it so, wrapping your cones with it (just 2 layers over, all around is sufficient) and then putting a thin string over it to make sure it doesn't come undone while stabilizing, is a good idea.
Your next problem is going to be, cure the juice in the oven at 90° celsius for 90 minutes or so and not burn the mesh before the resin is set, otherwise, the cone will look like and open rose...!
So, what do you need to use...???
The very same thing that you will need to use, if you want to dry the cone in the oven, before you stabilized and that is, the heat resistant tape, also known as the muffler repair tape.
The one I'm talking about is about 2" or so wide and looks like the foil paper, some has some strengthening mesh, others are simple a this heat resistant tape that is not expensive, a roll should cost about $20 or less.
So, if you have green or not totally dry cones that are still closed and you want to keep them that way, all the way through to the cured/set/harden casting resin, you use the combination of these 2 tape types, wrap the cone with the mesh and then the heat tape, (at this time you don't have to worry about tying the mesh as the heat tape has adhesive on it) put it in the oven to dry.
After is dry, remove the heat tape, tie the mesh tape with a thin string and stabilize. When drained properly and ready for the oven/curing, wrap it with the heat tape again, a simple layer of this tape covering the mesh tape, is all its needed.
Some heat resistant tapes tend to shrivel up when the temperatures reaches the threshold/limits of the manufacture heat resistance levels, by that time the resin is set and the heat tape done its job, even if the mesh gets a little burnt at that point, the cone is solid as a rock and it won't open, ever again...!
Just as a side note, some pods/cones are closed and you want them to open just so slightly however, when you put them in the oven, they open completely and beyond your control so, you can control how much those pods or cones should open by limiting its expected reaction to heat, for this, the mesh tape is not your best option, it can be done, if you find a way to wrap it and create a intended space for it to open that far so, a better option is most fish nets (fine mesh), they stretch a little, the force exerted from the pod/cone trying to open is enough to stretch the net sufficiently.
The heat resistant tape can not be used at this point, as these type tapes don't stretch, in this case, I would maintain the oven temperature at no more than 60*° celsius, this will not burn the fishing net, it may take a little longer but is safer that way...!
Like I said, there are other possible materials to use to achieve these results, the principals are what is important...!
I hope this has satisfied your curiosity...!:wink:
PS: Like you said, you have me, to worry about all that, huh...???
Cheers
George
robutacion
Member
You're welcome guys and gals...!:wink::biggrin:
Glad that I can be of help, to some.
Cheers
George
Glad that I can be of help, to some.
Cheers
George
robutacion
Member
I just thought that would help some folks, if I show a pic of those 3 types of tapes, I mentioned yesterday on my posts so, here they are...!

Cheers
George
Cheers
George