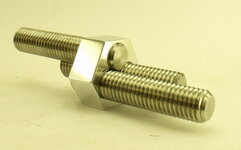
'That' nutty pen prop

Signed-In Members Don't See This Ad
See more from skiprat

skiprat

Passed Away Mar 22, 2022
In Memoriam
Joined
Oct 19, 2006
Messages
7,812
Location
In a Skip in Wales
I recently posted a threaded pen and one pic had a little prop as a stand.
Well........some of my miserable mates preferred the prop over the pen !!! Humph !!:mad:

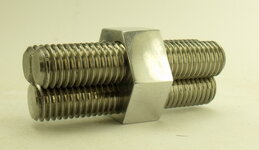
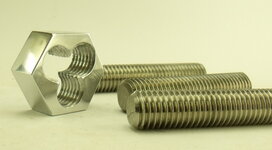
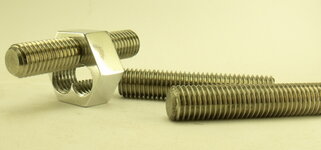
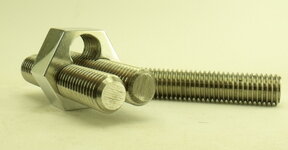
:biggrin: It is just a little novelty puzzle piece I made a few years ago. It has three 10mm stainless steel studs in a special nut. The nut was hand made from aluminium and the only trick was getting the distance between the drill holes ( to be tapped ) the correct distance apart.

The 'method' or better yet, the 'sequence' of tapping is actually the trick that lets it work.
Each stud can screw into the nut independently and the threads from each stud overlap.

I will tell the sequence later, so please have a guess if you want. It is a lot simpler than you may think....:wink:
 

Attachments

  • DSCF2803.JPG
    DSCF2803.JPG
    240.1 KB · Views: 332
  • DSCF2810.JPG
    DSCF2810.JPG
    237.5 KB · Views: 373
  • DSCF2811.JPG
    DSCF2811.JPG
    200.2 KB · Views: 303
  • DSCF2812.JPG
    DSCF2812.JPG
    205.8 KB · Views: 322
  • DSCF2814.JPG
    DSCF2814.JPG
    250.7 KB · Views: 358
Signed-In Members Don't See This Ad

jttheclockman

Member
Joined
Feb 22, 2005
Messages
19,132
Location
NJ, USA.
"miserable mates" Hey I resemble that:biggrin:

Yes I like this prop more-so It is more complex and I am all ears if your willing to reveal the solution. You thought you were just going to sneak that prop in there did you??? Your moves are analyzed and scrutinized here more than any others. There are teams of viewers watching your every move. :eek:
 

skiprat

Passed Away Mar 22, 2022
In Memoriam
Joined
Oct 19, 2006
Messages
7,812
Location
In a Skip in Wales
You figured out the sequence yet JT? :biggrin:

Remember that the three threads need to be 'synchronised' so that the overlapping allows each piece still to be easily screwed in and out.

I'll reveal in a few minutes. You will kick yourself for the simplicity:tongue:
 

AndyUK

Member
Joined
Sep 13, 2014
Messages
16
Location
UK
Clever stuff Skip. Got me thinking there. Do you use one screw from the opposite side to pull the other two through on their own threads?
 

Skie_M

Member
Joined
Aug 7, 2015
Messages
2,737
Location
Lawton, Ok
I would think that one bolt needs to be screwed in and secured in place while the second hole is drilled and tapped, forcing the tap to ride along the threads ... then the second bolt is screwed in and secured in place in position to allow the tap to pass both bolts, and then the third hole is drilled and tapped from there.
 

skiprat

Passed Away Mar 22, 2022
In Memoriam
Joined
Oct 19, 2006
Messages
7,812
Location
In a Skip in Wales
Hi Andy, no, they each can screw in independently.:wink:

I mistyped and the size is actually M12.

First I marked out the holes so that they would overlap once tapped.
Drill all three holes
Then tap the first hole.
Insert the first stud.
Using the threads of the first stud to align the tap for the second hole. In other words get the teeth of the tap in the threads of the first stud.
Now tap the second hole.
Screw in the second stud and now use both studs to align the tap for the final hole.
Tap the last hole.

See? I told you it was simple !!:biggrin:
 

jttheclockman

Member
Joined
Feb 22, 2005
Messages
19,132
Location
NJ, USA.
That is not as easy as you make it out to be. Drilling the holes has to be dead on. It is on my bucket list for sure. Thanks.
 

SteveJ

Member
Joined
Jul 11, 2012
Messages
3,374
Location
Grand Junction, Colorado
Both the pen and the prop are great! You've produced some great work - I still have your "Rat Nuts" on my to do list before I can aspire to either the pen or the prop ~ thanks for sharing your work with us.
 

skiprat

Passed Away Mar 22, 2022
In Memoriam
Joined
Oct 19, 2006
Messages
7,812
Location
In a Skip in Wales
Ha ha....:biggrin: Just keep laughing. He really doesn't have to do anything with my nuts........I promise..:biggrin:

Both the pen and the prop are great! You've produced some great work - I still have your "Rat Nuts" on my to do list before I can aspire to either the pen or the prop ~ thanks for sharing your work with us.


Steve,
Should we be concerned about this or just keep laughing?
 

JD Combs Sr

Member
Joined
Jan 30, 2010
Messages
767
Location
Owingsville, KY
Hi Andy, no, they each can screw in independently.:wink:

I mistyped and the size is actually M12.

First I marked out the holes so that they would overlap once tapped.
Drill all three holes
Then tap the first hole.
Insert the first stud.
Using the threads of the first stud to align the tap for the second hole. In other words get the teeth of the tap in the threads of the first stud.
Now tap the second hole.
Screw in the second stud and now use both studs to align the tap for the final hole.
Tap the last hole.

See? I told you it was simple !!:biggrin:
Skip, that's a great looking prop. I am awed by the pen as well. Would you have any objections if I used you as inspiration and tried something similar to both, with due credit of course? Just love doing things that are different but don't have quite the creativity of some of you folks on here to come up with "different". Wouldn't be right away but someday.
 

SteveJ

Member
Joined
Jul 11, 2012
Messages
3,374
Location
Grand Junction, Colorado
Both the pen and the prop are great! You've produced some great work - I still have your "Rat Nuts" on my to do list before I can aspire to either the pen or the prop ~ thanks for sharing your work with us.


Steve,
Should we be concerned about this or just keep laughing?

Sorry I didn't see this earlier - I'm sure Skiprat knew what I was referring to, but for those of you who didn't get the reference, check out this link from his website:

Rat-nuts

Only problem I've had so far is finding nuts that are big enough...Of course that is only the first step in the process so i might find myself running into other issues also.
 

Skie_M

Member
Joined
Aug 7, 2015
Messages
2,737
Location
Lawton, Ok
Oh, great ... I just had to look.


Now "Rat Nuts" are on my to-do list too!


Just as a side note, Steve ...


Take a square piece of stock (like for a bottle stopper) ... cut off the corners with a table saw to make an octagon (and true it up nicely) ....

Drill your center hole on the lathe ...

Split it in half with the table saw, and now you have twins!

Then go drill your tap holes.... finished!


Obviously, you would need the appropriate angle guide to make other shapes, but an octagon would certainly get either of us started.
 
Last edited:

jttheclockman

Member
Joined
Feb 22, 2005
Messages
19,132
Location
NJ, USA.
Just as food for thought you can also use square nuts and make a celtic knot in a round blank very easily too. Or multiple celtic knots.
 

Skie_M

Member
Joined
Aug 7, 2015
Messages
2,737
Location
Lawton, Ok
Just as food for thought you can also use square nuts and make a celtic knot in a round blank very easily too. Or multiple celtic knots.

Yeah ... but Octagons work for that too! Just skip to the 90 flats! .... o wait, you could also TWIST the Celtic Knot design as you rotate up the blank!


..... i gnna shutup now...
 

jttheclockman

Member
Joined
Feb 22, 2005
Messages
19,132
Location
NJ, USA.
Just as food for thought you can also use square nuts and make a celtic knot in a round blank very easily too. Or multiple celtic knots.

Yeah ... but Octagons work for that too! Just skip to the 90 flats! .... o wait, you could also TWIST the Celtic Knot design as you rotate up the blank!


..... i gnna shutup now...


You do realize that was a hexagon nut:) My Dad always told me KISS:)
 

Skie_M

Member
Joined
Aug 7, 2015
Messages
2,737
Location
Lawton, Ok
Yeah ... hexagon nut would be nice for spacing the "feathering" effect around a blank ... as would octagon.


I'm pretty sure I can easily make the octagon version using the method I described....


Then again, a nut is a nut, and I'm a nut too, right? =D
 
Top Bottom